Introduction
This user manual provides comprehensive instructions for the safe and effective use of your LIARTY Nose and Eyebrow Hair Removal Waxing Kit. Please read all instructions carefully before first use to ensure optimal results and safety.
The LIARTY waxing kit is designed for quick and efficient removal of unwanted hair from the nostrils and eyebrows, suitable for both men and women. Its unique formulation and applicator design aim to provide a comfortable waxing experience.
Product Components

Image: Overview of the LIARTY Nose and Eyebrow Hair Removal Waxing Kit components, including the wax container, mustache stencils, nose wax sticks, pre-waxing cleaning pads, and after-waxing cleaning pads.
- Nose Wax (150g): Specially formulated hard wax for effective hair removal.
- Applicator Sticks (15 count): Designed for safe and precise application within the nostrils.
- Mustache Stickers (12 count): Protective stickers for use during eyebrow waxing to shield areas not intended for waxing.
- Wax Melting Cup (1 count): A reusable cup for melting the wax.
- Pre-Wax Pads (6 count): For preparing the skin before waxing.
- After-Wax Pads (6 count): For soothing and cleaning the skin after waxing.
- Instruction Manual (1 count): This detailed guide for proper use.
Safety Information
Adhering to safety guidelines is crucial for preventing injury and ensuring effective hair removal. Please read and understand all warnings before proceeding.
- Temperature Check: Always test the wax temperature on a small area of your wrist before applying to the intended area to prevent burns. The wax should be warm, not hot.
- Heating Precautions: Do not heat the wax for more than 2 minutes in the microwave. Overheating can cause the wax to become excessively hot and potentially damage the container or cause burns.
- Skin Sensitivity: If you have sensitive skin, it is recommended to apply an anesthetic cream to the skin before waxing. Perform a patch test on a small, inconspicuous area of skin 24 hours prior to full application to check for any adverse reactions.
- Internal Use: The nose applicator is designed to remove only visible hair at the edge of the nostril. Do not insert the applicator too deeply into the nasal cavity, as this can disturb important nasal hairs that filter air.
- Avoid Irritated Skin: Do not use the wax on irritated, broken, sunburned, or recently shaved skin. Avoid use on areas with moles, warts, or varicose veins.
- Eye Contact: Avoid direct contact with eyes. In case of contact, rinse immediately with plenty of water and seek medical advice if irritation persists.
- Keep Out of Reach of Children: Store the product in a safe place away from children and pets.
- Professional Advice: If you are unsure about using this product due to a medical condition or skin sensitivity, consult a healthcare professional before use.
Setup
Before beginning the waxing process, ensure your workspace is clean and all necessary components are readily available.
- Prepare the Wax: Remove the lid from the wax container. Place the container (without the lid) into a microwave.
- Melt the Wax: Heat the wax in the microwave for approximately 1-2 minutes, or until it reaches a honey-like consistency. Heating times may vary depending on microwave wattage.
- Check Temperature: Carefully remove the container from the microwave using the anti-scald handle. Dip an applicator stick into the melted wax and test a small amount on your wrist to ensure it is warm and not too hot for skin application.
- Prepare Skin: Cleanse the area to be waxed using one of the provided pre-wax pads. Ensure the skin is dry before applying wax.

Image: Illustration showing the wax container being heated in a microwave. A warning indicates not to heat for more than 2 minutes.

Image: A hand holding the wax container by its anti-scald handle, demonstrating ease of handling even after heating.
Operating Instructions
Follow these steps for effective and safe hair removal.
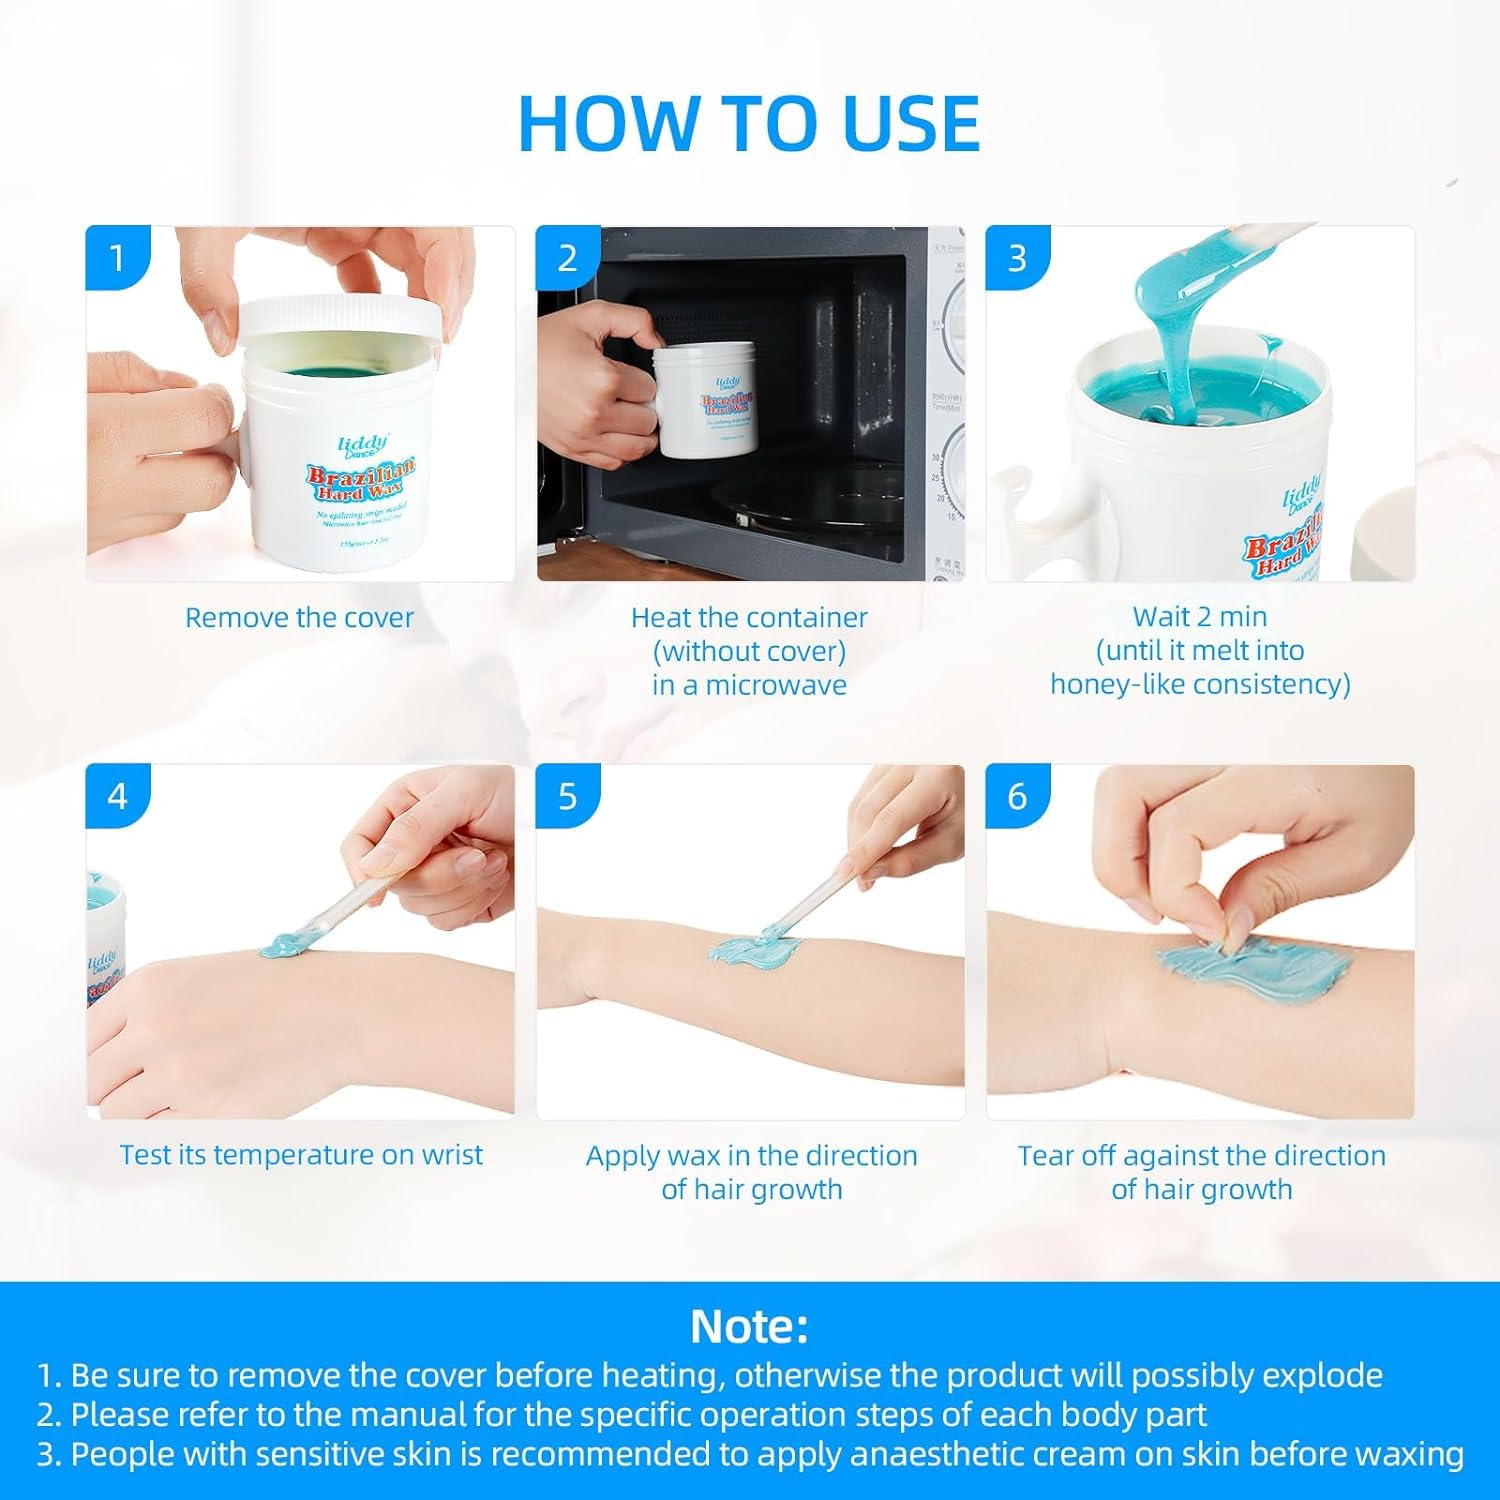
Image: A six-step visual guide demonstrating the waxing process, from removing the cover to tearing off the wax.
For Nose Hair Removal:
- Dip a nose wax applicator stick into the melted wax, ensuring it is coated evenly but not excessively.
- Carefully insert the wax-coated end of the applicator into one nostril, ensuring only the visible hair at the edge is covered. Do not push too deep.
- Allow the wax to cool and harden for approximately 90 seconds to 2 minutes. The wax should feel firm to the touch.
- Once hardened, firmly grasp the applicator stick and pull it out quickly in one swift motion.
- Repeat for the other nostril if desired.
For Eyebrow Hair Removal:
- Apply mustache stickers around the eyebrow area to protect skin not intended for waxing.
- Using a clean applicator stick, apply a thin layer of wax in the direction of hair growth on the desired eyebrow area.
- Allow the wax to cool and harden for approximately 90 seconds to 2 minutes.
- Hold the skin taut with one hand, and with the other, quickly pull the hardened wax strip against the direction of hair growth.
- Remove any residual wax with an after-wax pad.
Note: For best results, ensure the wax is at the correct temperature and the skin is clean and dry. Always pull the wax quickly and parallel to the skin, not upwards.
Maintenance
Proper maintenance ensures the longevity of your waxing kit and hygiene.
- Cleaning the Wax Cup: After use, allow any remaining wax in the cup to cool and harden. Once solid, it can be easily removed. Wipe the cup clean with a dry cloth. Do not wash with water while wax is still liquid or warm, as this can make cleaning difficult.
- Storage: Store the wax container with its lid securely closed in a cool, dry place away from direct sunlight and extreme temperatures.
- Applicator Sticks: Applicator sticks are for single use to maintain hygiene. Dispose of used sticks properly.
Troubleshooting
| Problem | Possible Cause | Solution |
|---|---|---|
| Wax is too sticky or not hardening. | Wax is too hot or not cooled sufficiently. | Allow the wax to cool for a longer period before application. Ensure it reaches a honey-like consistency when melted, and hardens quickly on testing. |
| Wax is too hard or difficult to apply. | Wax is not heated enough. | Reheat the wax in the microwave for short intervals (e.g., 15-30 seconds) until it reaches the desired honey-like consistency. |
| Hair is not being removed effectively. | Wax applied too thinly, not allowed to harden sufficiently, or pulled incorrectly. | Apply a slightly thicker layer of wax. Ensure the wax is fully hardened before pulling. Pull quickly and parallel to the skin, against the direction of hair growth. Ensure skin is clean and dry before application. |
| Skin irritation or redness after waxing. | Sensitive skin, improper technique, or wax too hot. | Ensure wax temperature is appropriate. Apply an after-wax pad to soothe the skin. If irritation persists, discontinue use and consult a dermatologist. Consider applying anesthetic cream before waxing if you have sensitive skin. |
Specifications
- Brand: LIARTY
- Model: Nose and Eyebrow Hair Removal Waxing Kit
- ASIN: B0CQ7PVS7R
- Item Form: Wax
- Recommended Uses: Nose, Eyebrow
- Material Feature: Non Toxic, Fragrance-Free
- Material Type Free: Fragrance Free
- Skin Type: All
- Package Dimensions: 3.82 x 3.5 x 3.11 inches
- Item Weight: 9.91 ounces
Warranty and Support
For any questions, concerns, or support regarding your LIARTY Nose and Eyebrow Hair Removal Waxing Kit, please contact LIARTY customer service through the retailer's platform where the product was purchased. Please retain your proof of purchase for any warranty claims.
LIARTY is committed to providing high-quality products and customer satisfaction. We encourage you to visit the official LIARTY store for more information and product updates.
Official LIARTY Store: LIARTY Store on Amazon


