Introduction
This manual provides essential information for the safe and efficient operation of your morpilot 4-in-1 Electric Milk Frother. Please read it thoroughly before first use and retain it for future reference.
The morpilot Electric Milk Frother is designed to prepare various milk-based beverages, offering options for hot and dense milk foam, hot and airy milk foam, cold milk foam, or simply heated milk. Its quick operation allows for milk frothing or heating in approximately 2 minutes.
Product Components
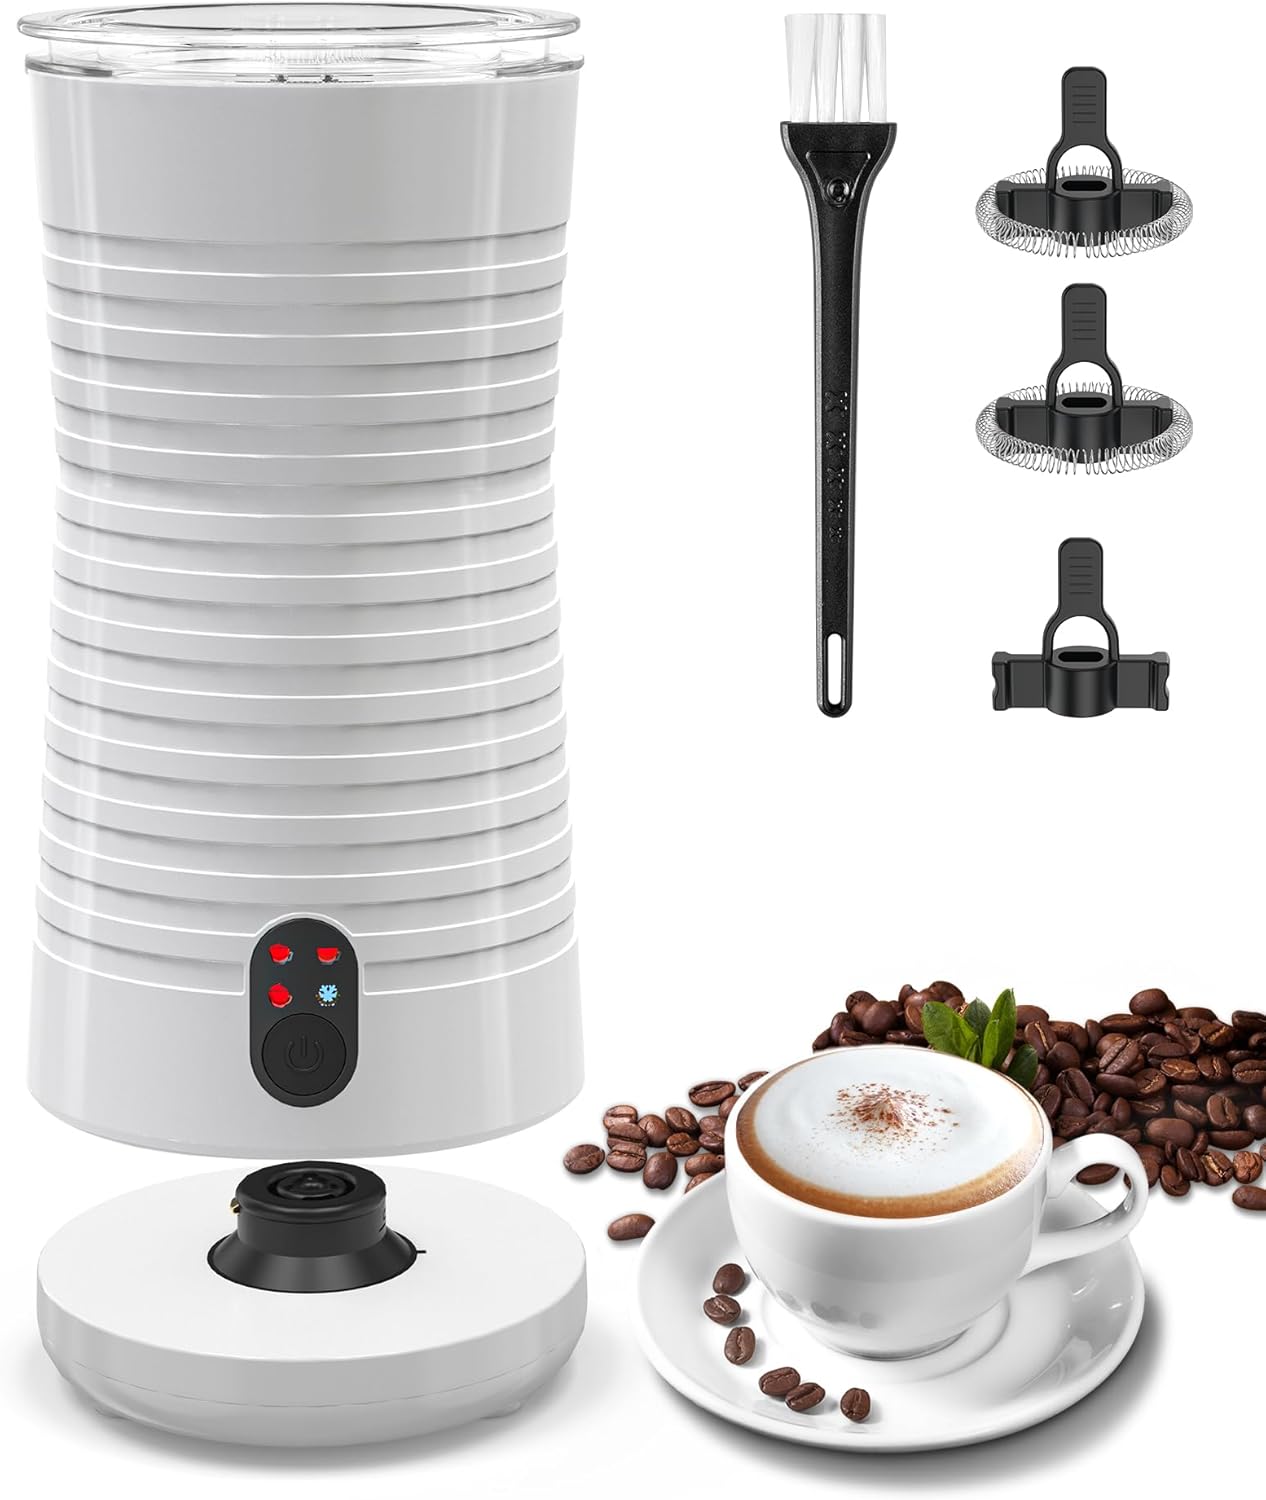
Figure 1: morpilot Electric Milk Frother and included accessories. This image shows the main frother unit, its power base, two whisk attachments (one for frothing, one for heating), and a cleaning brush. A cup of frothed coffee and coffee beans are also depicted.

Figure 2: Exploded view illustrating the internal and external components of the milk frother. Key parts include the scratch-resistant non-stick coating, maximum frothing level, minimum liquid level, insulating plastic body, and the 360° swivel base.
The package includes:
- 1 x Electric Milk Frother Unit
- 1 x Power Base
- 1 x Frothing Whisk (for dense/airy foam)
- 1 x Heating Whisk (for heating milk without frothing)
- 1 x Cleaning Brush
- 1 x User Manual
Setup
- Unpacking: Carefully remove all components from the packaging. Retain packaging for future storage or transport.
- Initial Cleaning: Before first use, clean the frother jug and whisks according to the "Cleaning and Maintenance" section. Wipe the exterior of the power base with a damp cloth.
- Placement: Place the power base on a dry, flat, stable, and heat-resistant surface. Ensure it is away from water sources and out of reach of children.
- Power Connection: Plug the power cord into a suitable electrical outlet.
Operating Instructions
The morpilot milk frother features a simple one-button operation for four different functions.

Figure 3: Close-up of the frother's control panel, highlighting the single power button and four indicator lights representing different milk preparation modes: Warm airy milk foam, Hot milk, Warm dense milk foam, and Cold milk foam.

Figure 4: Visual guide to the four functions: Warm Dense Milk Foam, Warm Airy Milk Foam, Hot Milk, and Cold Milk Foam, showing the required whisk and resulting beverage.
Choosing the Right Whisk:
- Frothing Whisk: Use this whisk for all frothing functions (Warm Dense, Warm Airy, Cold Foam). It has a coil design.
- Heating Whisk: Use this whisk when you only want to heat milk without frothing. It is a flat, non-coiled whisk.
Steps for Operation:
- Select Whisk: Insert the appropriate whisk into the bottom of the frother jug. Ensure it is securely placed.
- Add Milk: Pour cold milk into the frother jug. Observe the internal markings for maximum fill levels:
- For frothing (foam): Do not exceed the lower "MAX FROTH" line (approx. 130ml).
- For heating milk (no foam): Do not exceed the upper "MAX HEAT" line (approx. 240ml).
Note: Using milk directly from the refrigerator (approx. 4-6°C) yields the best frothing results.
- Close Lid: Place the lid securely on the frother jug.
- Place on Base: Position the frother jug onto the power base.
- Select Function: Press the power button once to turn on. The indicator lights will illuminate. Press the button repeatedly to cycle through the four modes until the desired function's light is illuminated. The modes are:
- Warm Dense Milk Foam
- Warm Airy Milk Foam
- Hot Milk
- Cold Milk Foam
- Start Operation: The frother will automatically start once a function is selected. The process typically takes about 2 minutes.
- Automatic Shut-off: The frother will automatically stop when the milk reaches approximately 65 ± 5 ℃ or when the cold foam cycle is complete. The indicator light will turn off.
- Serve: Carefully remove the frother jug from the base. Pour the frothed or heated milk into your cup.

Figure 5: Illustrates the smooth and consistent texture of the dense milk froth as it is poured from the frother into a glass, ready for a beverage.
Cleaning and Maintenance
Regular cleaning ensures optimal performance and extends the lifespan of your frother. The frother features a non-stick coating and a detachable base for easier cleaning.

Figure 6: Demonstrates the ease of cleaning the frother's interior using the provided cleaning brush under running water.
- Unplug: Always unplug the power base from the electrical outlet before cleaning.
- Cool Down: Allow the frother jug to cool down completely after use.
- Remove Whisk: Carefully remove the whisk from the bottom of the jug.
- Wash Jug and Whisk: Wash the interior of the frother jug and the whisk(s) with warm, soapy water using the provided cleaning brush. The non-stick coating makes cleaning easier. Rinse thoroughly.
- Dry: Dry all parts completely before reassembling or storing.
- Exterior Cleaning: Wipe the exterior of the frother jug and the power base with a soft, damp cloth. Do not immerse the power base in water or any other liquid.
- Storage: Store the frother in a clean, dry place when not in use.
Important Cleaning Notes:
- Do not use abrasive cleaners, scouring pads, or harsh chemicals, as these can damage the non-stick coating.
- The frother jug is not dishwasher safe.
Troubleshooting
| Problem | Possible Cause | Solution |
|---|---|---|
| Frother does not turn on. | Not plugged in; power outage; frother not correctly placed on base. | Ensure the power cord is securely plugged into a working outlet. Check the power supply. Ensure the frother jug is properly seated on the power base. |
| Milk is not frothing or foam is poor. | Incorrect whisk used; too much milk; milk type not suitable; milk not cold enough. | Ensure the frothing whisk is used. Do not exceed the "MAX FROTH" line. Use cold, fresh milk (dairy or suitable plant-based milk). Ensure milk is cold (refrigerated). |
| Milk is not hot enough. | Heating whisk not used (if no foam desired); too much milk. | If only heating, ensure the heating whisk is used. Do not exceed the "MAX HEAT" line. The frother heats to approximately 65 ± 5 ℃. |
| Frother stops prematurely. | Overheating protection activated; milk level too low. | Allow the unit to cool down for a few minutes before attempting to use again. Ensure milk is above the minimum liquid level. |
Specifications
| Brand: | morpilot |
| Model: | MMF-809 |
| Color: | White |
| Capacity: | 240 ml (Max Heat), 130 ml (Max Froth) |
| Wattage: | 400 W |
| Material: | Stainless Steel (interior), Insulating Plastic (exterior) |
| Special Features: | Detachable Base, Non-stick Coating, Automatic Shut-off (Strix Temperature Control) |
| Item Weight: | 830 g |
| Dimensions: | 20.1 x 14.1 x 11.2 cm (Package) |
Warranty and Support
For warranty information and customer support, please refer to the contact details provided with your purchase or visit the official morpilot website. Keep your proof of purchase for any warranty claims.
Online Support: Visit the morpilot Store on Amazon


