1. Introduction
This manual provides detailed instructions for the installation, operation, and maintenance of your new WEELMOTO Headlights. These headlights are designed as a direct replacement for the original equipment on 2009-2010 Toyota Corolla models that came with factory halogen headlights. Please read this manual thoroughly before installation and use to ensure proper function and safety.
Compatibility: This product is specifically designed for 2009-2010 Toyota Corolla Sedan models. It is crucial that your vehicle originally came equipped with halogen headlights for proper fitment and function. The set includes both the driver's side (left) and passenger's side (right) headlight assemblies.
OEM Part Numbers: 8115002670, 8111002670, 8115002680, 8111002680.
2. Important Safety Information
- Proposition 65 Warning: This product may contain chemicals known to the State of California to cause cancer and birth defects or other reproductive harm.
- Bulbs Not Included: Headlight bulbs are not included with these assemblies. Please use your vehicle's existing stock bulbs (HB3 & HB4) for installation to ensure proper light output and compatibility.
- Halogen Headlight Compatibility: These headlights are only compatible with Toyota Corolla models that originally came with factory halogen headlights. They are not designed for models with other headlight types (e.g., LED, HID) unless specified.
- Beam Adjustment: The headlights are pre-adjusted from the factory. If manual adjustment is necessary, do not turn the adjustment screws more than three times in either clockwise or counter-clockwise direction to prevent damage.
- LED Bulb Warning:

Safety Reminder: It is strongly advised NOT to directly replace your stock halogen bulbs with aftermarket LED bulbs in these assemblies. These headlights are designed for halogen bulbs, and using LED bulbs may result in improper beam patterns, reduced visibility, and may not comply with road safety regulations.
3. Package Contents
Your WEELMOTO Headlight package includes:
- One (1) Driver's Side Headlight Assembly
- One (1) Passenger's Side Headlight Assembly

Image: The complete set of WEELMOTO replacement headlights, including both driver and passenger side units.
4. Setup (Installation)
These WEELMOTO headlights feature a plug-and-play design for straightforward installation. While professional installation is always recommended, the following steps outline the general process.

Image: A page from the instruction manual detailing installation and adjustment procedures.
4.1. Installation Steps
- Prepare the Vehicle: Ensure the vehicle is turned off and the parking brake is engaged. For safety, disconnect the negative terminal of the car battery.
- Remove Grille and Fasteners: Carefully remove the front grille. Locate and undo any screws, clips, or retainer springs that secure the existing headlight assembly. These fasteners are typically found at the top and bottom of the headlight unit.
- Disconnect Wiring: Disconnect the electrical wiring harness from the back of the stock headlight assembly.
- Remove Old Headlight: Detach and remove the old headlight assembly from the vehicle.
- Install New Headlight: Position the new WEELMOTO headlight assembly into the opening. Ensure it fits securely and aligns correctly with the mounting points.
- Reconnect Wiring: Reconnect the electrical wiring harness to the new headlight assembly. Ensure all connections are secure.
- Secure Headlight: Re-install all screws, clips, or retainer springs to firmly hold the new headlight in place. Ensure all fasteners are properly sealed.
- Re-install Grille: Carefully put the front grille back into its original position and secure it.
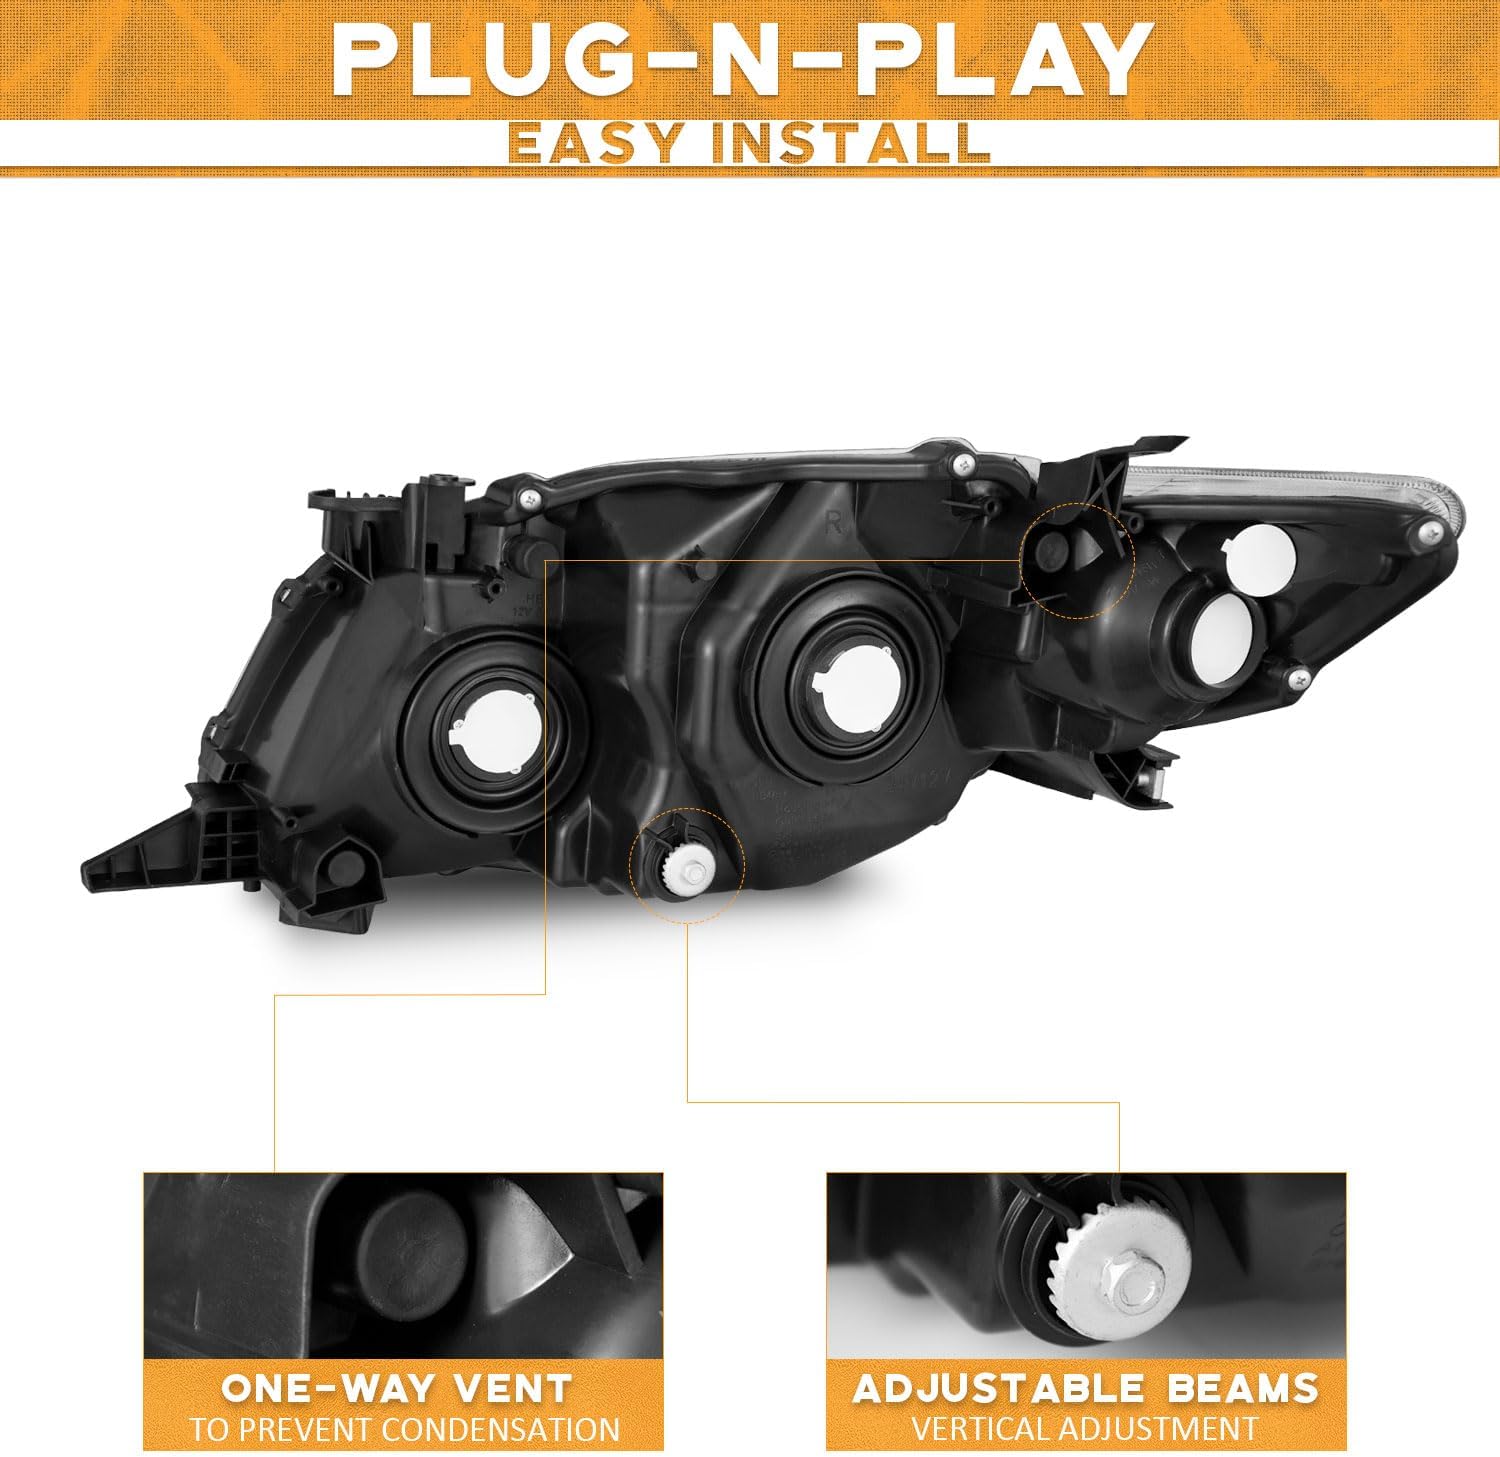
Image: Rear view of the headlight assembly, highlighting the one-way vent for condensation prevention and the vertical beam adjustment mechanism.

Image: A silver 2009-2010 Toyota Corolla with the WEELMOTO headlights perfectly installed, demonstrating the precise fit.
5. Operating Instructions
Your WEELMOTO headlights function identically to your vehicle's original equipment, providing high beam, low beam, and turn signal capabilities. Operate them using your vehicle's standard headlight controls.

Image: A detailed view of the headlight's front, indicating the positions of the high beam, low beam, amber reflector, and turn signal.
5.1. Headlight Beam Adjustment
The headlights are factory-adjusted for optimal beam patterns. Manual adjustment is generally not required. However, if you observe an unsatisfactory light pattern, you can adjust the beam angle using the regulator screws on the headlight housing.
How to Adjust Your Headlights:
- Park your vehicle on a level surface approximately 25 feet (7.6 meters) in front of a flat wall.
- Turn on your low beam headlights.
- Mark the center points of each light's brightest spot on the wall with tape.
- Block one headlight to focus on adjusting the other. The light pattern should be below the horizontal line, and the brightest spot should be centered on your marked 'X'.
- Locate the adjustment screws on top of each bulb housing. Turn these screws as needed to align the beam pattern. Remember not to turn more than three times in any direction.
- Repeat for the other headlight.

Image: A visual comparison demonstrating improved road visibility and light distribution after installing the new WEELMOTO headlights.
6. Maintenance
Proper maintenance ensures the longevity and optimal performance of your WEELMOTO headlights.
6.1. Durability Features
Your headlights are constructed with high-durability materials and feature:
- Anti-Heat Properties: Designed to withstand high temperatures.
- Anti-UV-Aging: Protected against degradation from ultraviolet radiation.
- Anti-Freezing: Engineered to perform in cold conditions.
- UV Coating: An exterior UV coating further protects the lens from environmental damage.

Image: The headlight assembly depicted in both hot and cold environments, illustrating its robust construction for high durability across various temperatures.
6.2. Condensation Management
It is normal for headlight lenses to experience temporary misting or fogging due to differences in temperature, air pressure, and other weather conditions. Your headlights are equipped with a one-way vent to help manage this.

Image: A car equipped with WEELMOTO headlights navigating through heavy rain, emphasizing the IP65 certified waterproof design.
How to Address Temporary Condensation:
- Check Vents: Ensure the one-way vents on the headlight housing are clear and not blocked.
- Activate Lights: Turn on your low beam headlights for approximately 20 minutes. The heat generated by the bulbs can help dissipate the moisture.
- Inspect Bulbs: If condensation persists, carefully remove the bulbs and inspect for any moisture inside the housing. Clear any visible mist.
- Desiccant Use: Placing a silica gel packet inside the headlight housing (if accessible and safe) can help absorb residual moisture.
7. Troubleshooting
This section addresses common issues you might encounter.
7.1. Headlight Fogging/Condensation
As mentioned in the Maintenance section, temporary fogging is normal. Refer to Section 6.2. Condensation Management for steps to resolve this.
7.2. Improper Light Pattern or Dimness
- Bulb Type: Ensure you are using the correct stock halogen bulbs (HB3 & HB4). Using incorrect bulb types, especially aftermarket LED bulbs not designed for these housings, can lead to poor light output and an improper beam pattern. Refer to Section 2. Important Safety Information regarding LED bulbs.
- Beam Adjustment: If the light pattern appears incorrect, follow the steps in Section 5.1. Headlight Beam Adjustment to fine-tune the beam angle.
- Wiring: Check all electrical connections to ensure they are secure and free from corrosion.
8. Specifications
| Brand | WEELMOTO |
| Model | TYCR-09 |
| OEM Part Numbers | 8115002670, 8111002670, 8115002680, 8111002680 |
| Vehicle Service Type | Toyota Corolla Sedan 2009-2010 (ONLY fits model with factory halogen headlights) |
| Color | Clear Lens I Chrome Housing I Amber Reflector |
| Lens Material | Polycarbonate |
| Wattage | 60 watts (based on typical halogen bulb usage) |
| Special Features | High Beam, Low Beam, Pair of headlights (driver and passenger sides), Waterproof, UV Coating |
| Item Weight | 12.23 pounds |
| Package Dimensions | 25 x 15.75 x 11 inches |
9. Warranty and Support
WEELMOTO stands behind the quality of its products.
9.1. Warranty Period
Your WEELMOTO Headlights come with a 3-year assurance period from the date of purchase, covering manufacturing defects and material flaws under normal use.
9.2. Customer Support
For any questions, concerns, or support needs regarding your product, please contact WEELMOTO customer service. We offer dedicated 1-to-1 service to assist you. To initiate a support request, please visit the WEELMOTO store page or the product listing and use the 'Ask a Question' feature.


