
Introduction
This manual provides instructions for the proper assembly, use, and maintenance of your HQRP Glass Jar Set, designed as a replacement for various Oster and Osterizer blender models. Please read these instructions carefully before first use to ensure safe and effective operation.
Compatibility Information
This HQRP Glass Jar Set is designed to fit most Oster and Osterizer blenders, including all Oster Kitchen Center Models. It is compatible with a wide range of model numbers, including but not limited to:
- Oster 004954-011-090, 014709-156-000, 004902-003-NP0, 148381-000-090, 126450-001-090, 015132-020-090, 126450-000-090, 015132-200-090
- Oster 4093-8, 4094, 4096, 4119-022, 4122, 4123, 4125, 4126, 4127, 4128, 4134, 4204, 4242, 4258-022, 4270-015, 6606, 6607, 6628-009, 6628, 6684, 6629, 6648, 6665, 6650, BLSTRM-DZ0-015, 006845-000-NP0, 6642, 6878, 6677, BPST02-B, 6864, BPHT02-B00-026, BRLY07-B, 6837, 6678, 6651, 6656, 6679, 6680, 6681, 6686, 6687, 6688, 6689, 6692, 6696, 6751
- Oster 6752, 6753, 6760, 6763, 6765, 6791-015, 6792-027, 6793-027, 6672, 6673, 6674, 6675, 6676, 6896, BCCG08-C, BLSTDG-B, BRLY07-W, BRLY07-Z, BLSTBH-SR, BLSTMG-W, 6643, BLSTTG-PCP-000, 006878-042, 6843, BLSTSS-PZO, 6803, 006830-000-000, 006694-015-RNP, 6847, 6630, BPCT02, 4096009NP0, BVCB07-L00-126, BVLB07-L, BCBG08-C, BLSTCC-BFP, BRLY07-BF, BLSTBH-SC Blenders
Important Compatibility Note:

Image: A warning graphic indicating that the glass jar set is not compatible with Oster Xpert Series, Pro, Master, or Versa models. A woman is shown making a 'stop' gesture next to the incompatible blender parts.
This glass jar set is NOT COMPATIBLE with Oster Xpert Series, Pro, Master, or Versa models. Please verify your blender model before installation.

Image: A visual guide demonstrating how to measure the opening of your blender's motor base to ensure compatibility with the replacement jar set.
Before purchasing or installing, measure your existing blender base to ensure proper fit. Refer to the Specifications section for detailed dimensions of the replacement parts.
Setup and Installation
Follow these steps to assemble and install the HQRP Glass Jar Set onto your blender base.
- Inspect Components: Ensure all parts are present and undamaged: the glass jar, blade assembly, and base cap.
- Assemble Blade and Base Cap: Place the blade assembly into the opening at the bottom of the glass jar. Secure it by screwing the base cap onto the bottom of the jar until it is hand-tight. Ensure the gasket is properly seated to prevent leaks.
- Attach to Blender Motor Base: Carefully place the assembled glass jar onto your blender's motor base. Ensure it is seated securely and locked into place according to your blender's specific design.

Image: The individual components of the HQRP Glass Jar Set, including the glass pitcher, the stainless steel blade assembly, and the black threaded base cap.

Image: A detailed view of the stainless steel blade assembly and the black plastic base cap, ready for assembly with the glass jar.

Image: A graphic illustrating the simple steps to install the jar set, showing the blade and base cap being attached to the jar, and then the complete jar placed on the blender motor.
Operating Instructions
Once the glass jar set is properly installed, you can use your blender as usual.
- Add Ingredients: Place desired ingredients into the glass jar. Do not overfill; ensure the liquid level is below the maximum fill line if indicated.
- Secure Lid: Place the blender lid firmly onto the glass jar.
- Start Blending: Select the desired speed or function on your blender's motor base. Always ensure the jar is securely seated before starting the blender.
- Monitor Blending: Observe the blending process. If ingredients are not circulating, stop the blender, remove the lid, and use a spatula to push ingredients towards the blades. Never use your hands or utensils while the blender is running.
- Finish Blending: Once blending is complete, turn off the blender and wait for the blades to stop completely before removing the jar.

Image: A person is shown holding the assembled glass jar on a blender base, demonstrating typical usage in a kitchen setting.
Maintenance and Cleaning
Regular cleaning and maintenance will ensure the longevity and hygiene of your HQRP Glass Jar Set.
- Disassembly: After each use, disassemble the jar by unscrewing the base cap and removing the blade assembly.
- Washing: Wash the glass jar, blade assembly, and base cap with warm, soapy water. Use a brush to clean around the blades carefully. The glass jar is typically dishwasher safe, but hand washing is recommended for the blade assembly and base cap to preserve their components.
- Rinsing: Rinse all components thoroughly to remove soap residue.
- Drying: Allow all parts to air dry completely before reassembling or storing to prevent odor and bacterial growth.
- Storage: Store the clean, dry components in a safe place.
Troubleshooting
If you encounter issues with your HQRP Glass Jar Set, refer to the following common solutions:
- Leaking from Base: Ensure the base cap is screwed on tightly and the gasket (seal) is correctly positioned and not damaged. A damaged gasket may need replacement.
- Jar Not Seating Properly: Verify that the jar's bottom is clean and free of debris. Ensure the blender motor base is also clean. Confirm that the jar is compatible with your specific blender model (refer to the Compatibility section).
- Blades Not Spinning: Check if the blade assembly is correctly installed and the base cap is tight. Ensure the blender motor base is functioning correctly. Do not overload the jar with ingredients.
Specifications
| Component | Detail |
|---|---|
| Capacity | 1.25 Liters (approximately 0.33 Gallons) |
| Material | Glass Jar, Stainless Steel Blades, Plastic Base Cap |
| Jar Dimensions (Approx.) | 8 inches (Height), 5.5 inches (Top Diameter) |
| Base Cap Dimensions (Approx.) | 2.6 inches (Height), 3 inches (Diameter) |
| Item Weight | 3.52 pounds |
| Model Number | 887774412132332 |
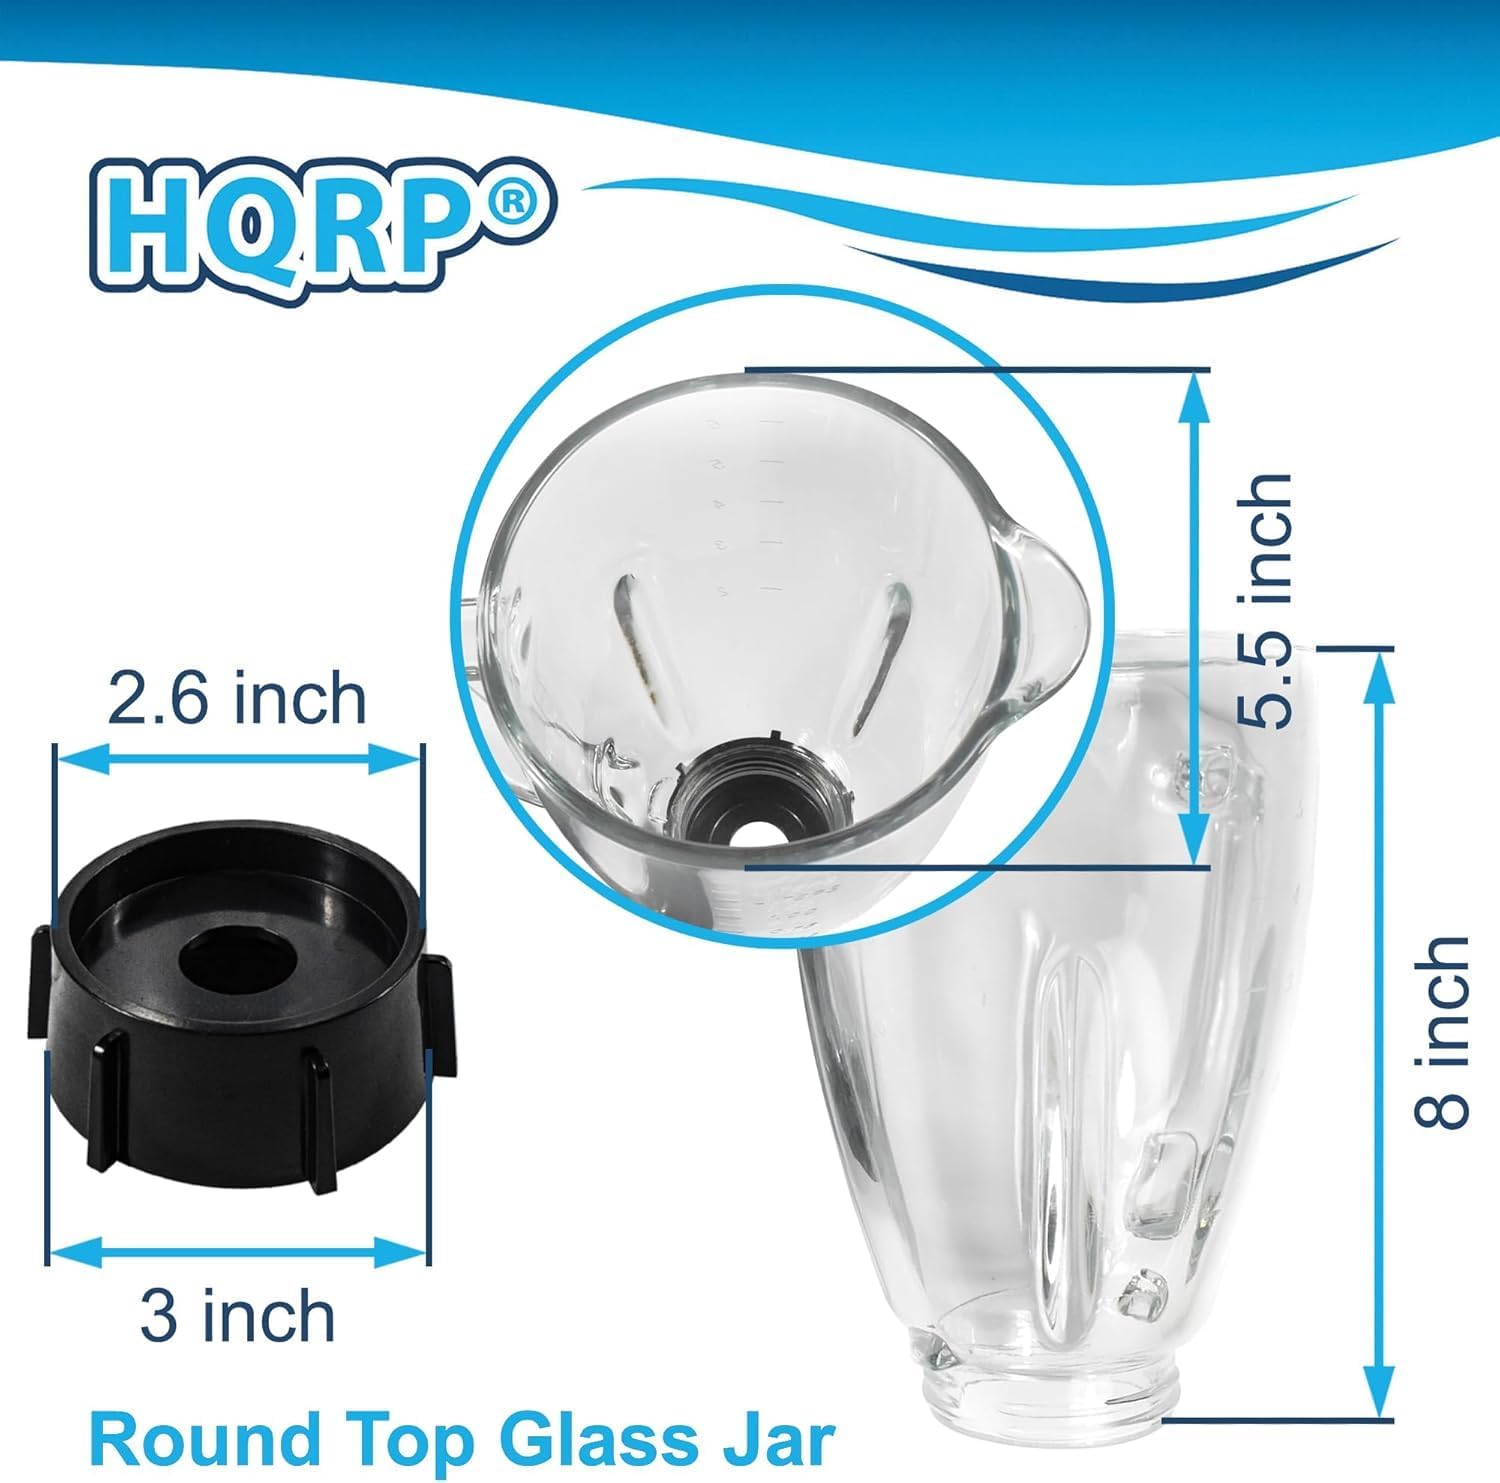
Image: A diagram illustrating the approximate dimensions of the glass jar and base cap, showing height and diameter measurements for both components.
Legal Disclaimer
This is not an Original Equipment Manufacturer (OEM) product; HQRP branded product is a replacement. All brand names and logos are registered trademarks of their respective owners. Any use of the brand names or model designations for this product are made solely for purposes of demonstrating compatibility.