
HUANANZHI LGA2011-X79
HUANANZHI X79M PRO Motherboard User Manual
Model: LGA2011-X79
1. Product Overview
The HUANANZHI X79M PRO Motherboard is designed to provide robust performance for Intel LGA2011 platform processors. Featuring an Intel B75 chipset, it supports up to 128GB of dual-channel DDR3 memory, making it suitable for demanding computing tasks. This motherboard offers extensive connectivity and expansion options, including multiple SATA ports, PCI Express slots, and an M.2 NVMe slot for high-speed storage.

Figure 1.1: The HUANANZHI X79M PRO Motherboard alongside its product packaging.
2. Technical Specifications
Below are the detailed technical specifications for the HUANANZHI X79M PRO Motherboard:
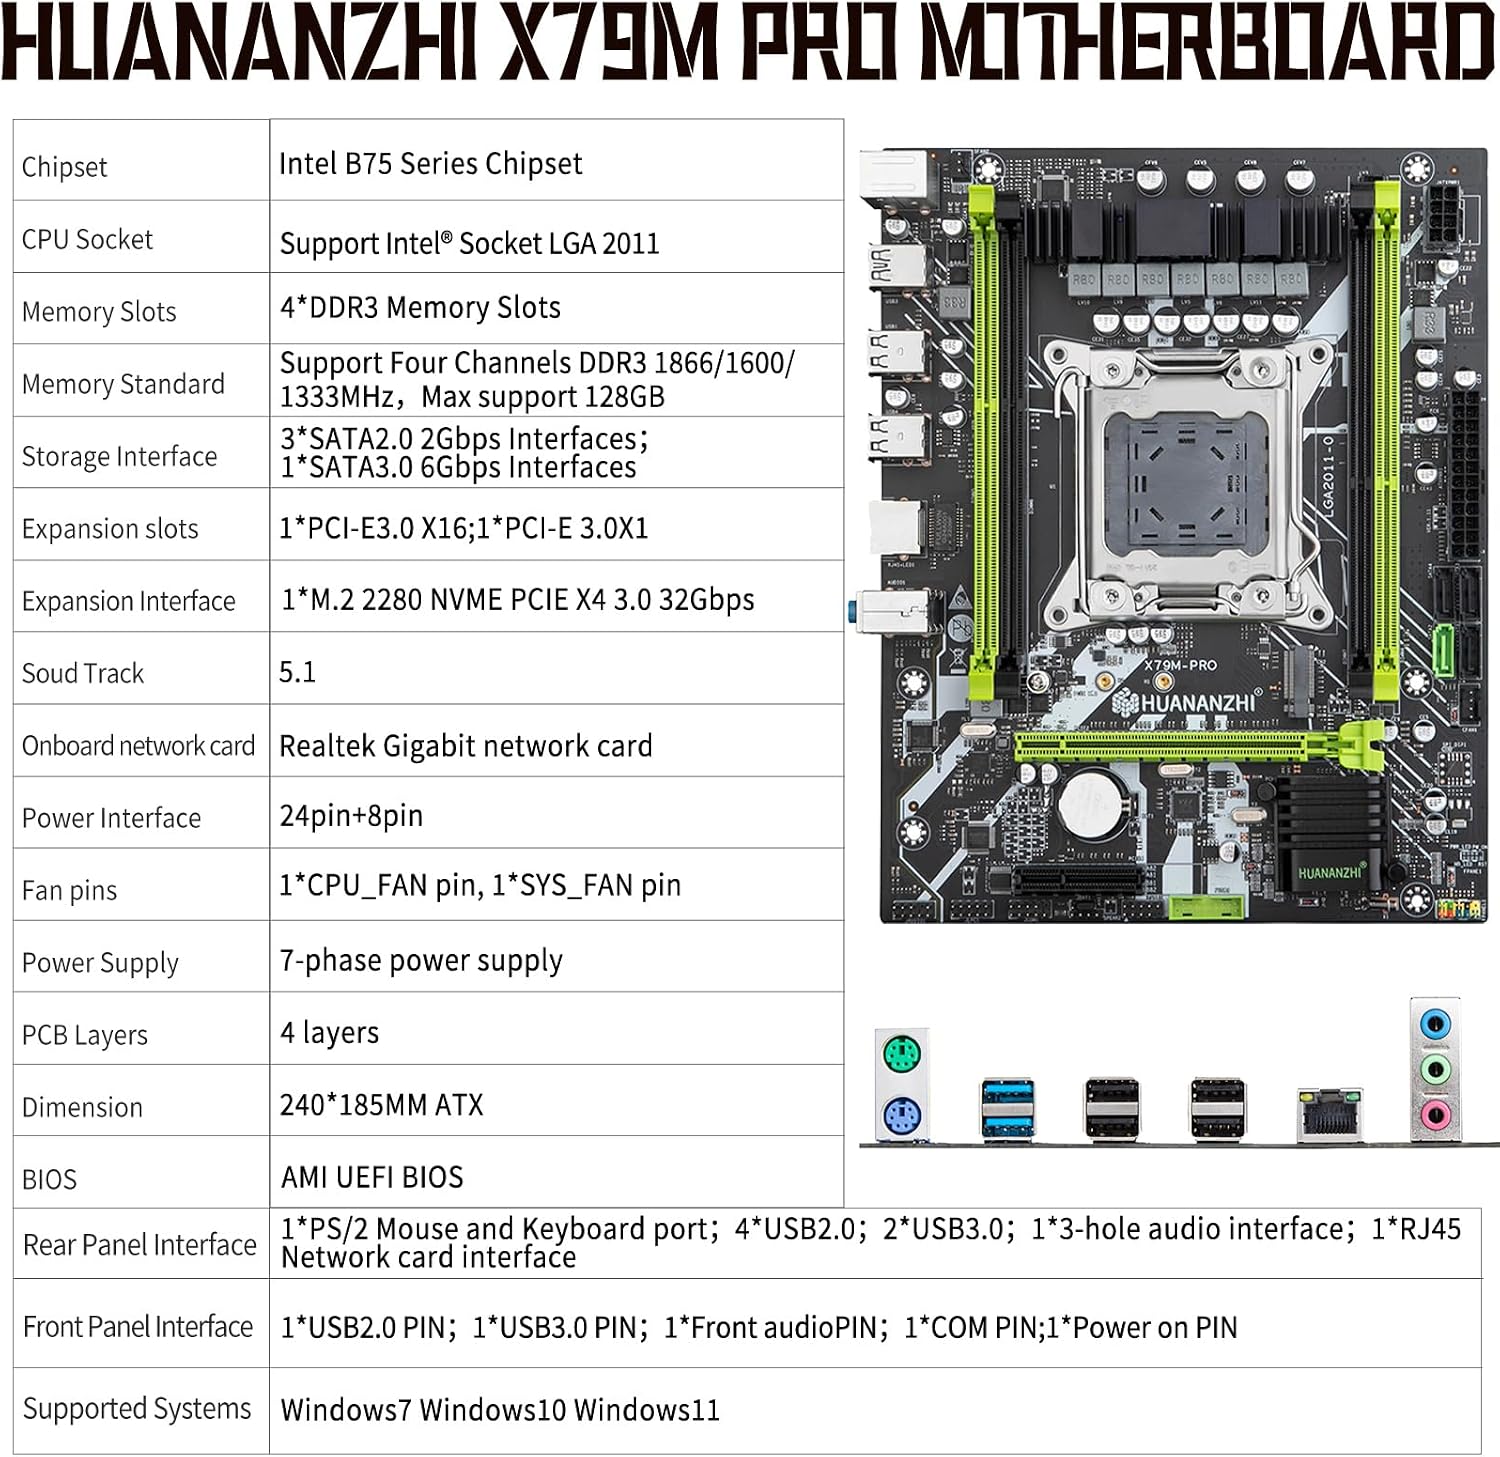
Figure 2.1: Visual representation of the motherboard with key specifications highlighted.
| Feature | Specification |
|---|---|
| Model | HUANANZHI X79M PRO Motherboard |
| Main Chipset | Intel B75 |
| CPU Socket | Intel LGA2011 platform processor support |
| Memory Slots | 4 x DDR3 memory slots |
| Memory Standard | Dual channel DDR3 1866/1600/1333MHz (Max 128GB) |
| Storage Interface | 3x SATA 2.0 (3Gbps), 1x SATA 3.0 (6Gbps) |
| Expansion Slots | 1x PCI Express 3.0 x16, 1x PCI Express 3.0 x4 |
| Expansion Interface | 1x M.2 2280 NVME PCIE X4 3.0 (32Gbps) |
| Audio | 5.1 sound card |
| Network Card | Gigabit Ethernet |
| Power Interface | 24PIN + 8PIN |
| FAN PINs | 1x CPU_FAN PIN, 1x SYS_FAN PIN |
| Power Supply | 7-phase power supply |
| PCB Layers | 4-layer PCB |
| Dimension | 240 x 185mm (M-ATX) |
| Rear Panel Interface | 1x PS/2 Mouse and Keyboard port, 4x USB 2.0, 2x USB 3.0, 1x RJ45 Network card interface, 1x 3-hole audio interface |
| Front Panel Interface | 1x USB 2.0 PIN, 1x USB 3.0 PIN, 1x Front audio PIN, 1x Power on PIN, 1x COM PIN |
| Supported Systems | Windows 7, Windows 10, Windows 11 |
| BIOS | AMI UEFI BIOS |

Figure 2.2: Close-up view of the Intel LGA 2011 CPU socket, compatible with various Intel Xeon processors.
3. Setup and Installation
Proper installation is crucial for the stable operation of your motherboard. Always ensure your system is powered off and unplugged before handling internal components. It is recommended to wear an anti-static wrist strap.
3.1. Preparing the Chassis
Ensure your computer case is compatible with M-ATX motherboards. Install the necessary standoffs in the chassis according to the motherboard's mounting holes.
3.2. Installing the CPU
- Gently lift the CPU socket retention lever.
- Align the triangular mark on the CPU with the corresponding mark on the socket. Carefully place the CPU into the LGA2011 socket without forcing it.
- Lower the retention lever to secure the CPU in place.
- Apply a thin, even layer of thermal paste to the top of the CPU.
- Install the CPU cooler according to its manufacturer's instructions, ensuring proper contact and secure mounting.
3.3. Installing Memory Modules
The motherboard features four DDR3 memory slots. For optimal performance, install memory modules in pairs for dual-channel operation.
- Open the clips at both ends of the memory slot.
- Align the notch on the memory module with the key in the memory slot.
- Press down firmly on both ends of the memory module until the clips snap into place.
3.4. Installing Storage Devices
Connect your SATA storage devices (HDDs/SSDs) to the SATA 2.0 or SATA 3.0 ports using SATA data cables. For M.2 NVMe SSDs:

Figure 3.1: Close-up view of the M.2 NVMe slot and PCI Express slots, indicating expansion capabilities.
- Locate the M.2 2280 NVME PCIE X4 3.0 slot.
- Insert the M.2 SSD into the slot at an angle.
- Gently push down the SSD and secure it with the provided screw.
3.5. Connecting Power Supplies
Connect the 24-pin ATX power connector and the 8-pin CPU power connector from your power supply unit (PSU) to the corresponding ports on the motherboard.
3.6. Connecting Peripherals and Front Panel
Connect your case's front panel connectors (power button, reset button, USB ports, audio jacks) to the appropriate headers on the motherboard as indicated in the motherboard's silkscreen labels.

Figure 3.2: Detailed view of the rear panel I/O ports, including PS/2, USB, LAN, and audio interfaces.
- Rear Panel: PS/2 Mouse and Keyboard, USB 2.0, USB 3.0, RJ45 Network, 3-hole Audio.
- Front Panel Headers: USB 2.0 PIN, USB 3.0 PIN, Front Audio PIN, Power On PIN, COM PIN.
4. Operating System Support and BIOS
The HUANANZHI X79M PRO Motherboard supports a range of Microsoft Windows operating systems, including Windows 7, Windows 10, and Windows 11. It features an AMI UEFI BIOS for system configuration and management.
4.1. BIOS Configuration
To enter the BIOS setup utility, press the DEL key (or F2, depending on system configuration) during the Power-On Self-Test (POST) sequence. The BIOS allows you to configure various system settings, including boot order, CPU settings, memory timings, and peripheral options.
4.2. Driver Installation
After installing your operating system, install the necessary drivers for the chipset, audio, network, and other integrated components. These drivers are typically provided on a support CD or can be downloaded from the manufacturer's website.
5. Maintenance and Care
To ensure the longevity and optimal performance of your motherboard, follow these maintenance guidelines:
- Dust Removal: Regularly clean dust from inside your computer case using compressed air. Dust accumulation can lead to overheating and component failure.
- Cable Management: Ensure cables are neatly routed to improve airflow and prevent obstruction of cooling fans.
- Environmental Conditions: Operate the computer in a cool, dry, and well-ventilated environment. Avoid extreme temperatures and humidity.
- BIOS Updates: Periodically check the manufacturer's website for BIOS updates. Updates can improve stability, compatibility, and performance. Exercise caution when updating BIOS.
6. Troubleshooting
This section provides solutions to common issues you might encounter.
6.1. No Power / System Not Booting
- Check Power Connections: Ensure the 24-pin ATX and 8-pin CPU power connectors are securely seated on the motherboard.
- PSU Check: Verify that the power supply unit (PSU) is functioning correctly and its power switch is in the ON position.
- Front Panel Connections: Double-check the power button connection to the motherboard's front panel header.
- Component Seating: Reseat the CPU, memory modules, and any expansion cards (e.g., graphics card) to ensure they are properly installed.
6.2. No Display Output
- Monitor Connection: Ensure the monitor is properly connected to the graphics card (or integrated graphics, if applicable) and is powered on.
- Graphics Card: If using a dedicated graphics card, ensure it is correctly seated in its PCIe slot and has adequate power connected.
- Memory Issues: Incorrectly seated or faulty RAM can prevent display output. Try booting with one memory stick at a time.
6.3. System Instability / Crashes
- Overheating: Check CPU and case fan operation. Ensure proper airflow within the case. Monitor temperatures using system monitoring software.
- Memory Test: Run a memory diagnostic tool (e.g., MemTest86) to check for RAM errors.
- Driver Issues: Ensure all drivers are up-to-date and correctly installed. Corrupt or outdated drivers can cause instability.
- BIOS Settings: Reset BIOS settings to default to rule out incorrect configurations.
7. Warranty and Support
The HUANANZHI X79M PRO Motherboard comes with a warranty card included in the packing list. Please refer to the warranty card for specific terms and conditions regarding warranty coverage and duration.
For technical support, driver downloads, and BIOS updates, please visit the official HUANANZHI website or contact their customer service. Keep your purchase receipt and product serial number handy when seeking support.
Manufacturer: HUANANZHI
Website: Visit the HUANANZHI Store on Amazon (for general brand information)
Related documentsLGA2011-X79


Ask a question about this manual
Ask about setup, troubleshooting, compatibility, parts, safety, or missing instructions. Manuals+ will review the question and use this page’s manual context to help answer it.