
1. Introduction
Thank you for choosing the OOWOKS Remote Control. This manual provides essential information for the safe and efficient operation of your remote control, designed to manage compatible OOWOKS wall and ceiling lamps. Please read this manual thoroughly before use and retain it for future reference.
2. Safety Information
- Keep the remote control away from water and high humidity.
- Avoid dropping or subjecting the remote to strong impacts.
- Do not attempt to disassemble or repair the remote control yourself. Contact qualified personnel for service.
- Dispose of used batteries responsibly according to local regulations.
- Ensure correct battery polarity when inserting new batteries.
3. Product Overview
The OOWOKS Remote Control (Model 65680371) is an infrared device designed for convenient control of your OOWOKS lighting fixtures. It features dedicated buttons for power, brightness, color temperature, and various lighting modes.

Figure 1: Front view of the OOWOKS Remote Control. This image displays the white remote control with various buttons for light adjustment and power.
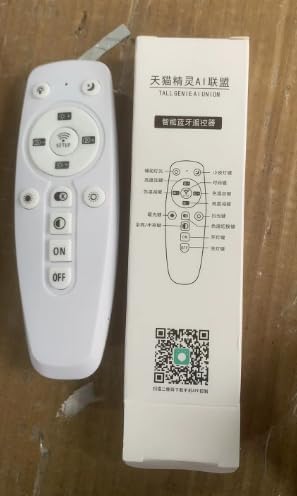
Figure 2: OOWOKS Remote Control alongside its retail packaging. The packaging shows a diagram of the remote and some text in Chinese.
4. Setup
4.1. Battery Installation
- Locate the battery compartment cover on the back of the remote control.
- Slide the cover open in the direction indicated by the arrow.
- Insert two AAA batteries (not included), ensuring the correct polarity (+ and -) as marked inside the compartment.
- Close the battery compartment cover until it clicks securely into place.
4.2. Pairing with Your Lamp
To ensure proper functionality, the remote control must be paired with your OOWOKS wall or ceiling lamp.
- Ensure your lamp is powered off at the main switch.
- Turn on the lamp at the main switch.
- Within 5 seconds of turning on the lamp, press and hold the SETUP button on the remote control.
- Hold the button until the lamp flashes, indicating successful pairing.
- If pairing fails, repeat the steps. Ensure the remote is pointed directly at the lamp during the pairing process.
5. Operating Instructions
Familiarize yourself with the buttons on your remote control:
| Button Icon/Label | Function | Description |
|---|---|---|
| ON | Power On | Turns the connected lamp ON. |
| OFF | Power Off | Turns the connected lamp OFF. |
| 💡 (Light Bulb) | Full Brightness / Day Mode | Activates maximum brightness, typically with a neutral or cool white light. |
| 🌙 (Moon) | Night Mode | Activates a low-brightness, warm light setting suitable for nighttime. |
| - (Left D-pad) | Decrease Brightness | Decreases the light intensity incrementally. |
| + (Right D-pad) | Increase Brightness | Increases the light intensity incrementally. |
| ↑ (Up D-pad) | Scene/Mode Up | Cycles through available lighting scenes or modes in an upward direction. |
| ↓ (Down D-pad) | Scene/Mode Down | Cycles through available lighting scenes or modes in a downward direction. |
| ☀ (Sun, bottom left) | Warmer Color Temperature | Adjusts the light to a warmer (more yellowish) white. |
| K (middle button) | Color Temperature Cycle | Cycles through preset color temperature options (e.g., warm white, neutral white, cool white). |
| ☀ (Sun, bottom right) | Cooler Color Temperature | Adjusts the light to a cooler (more blueish) white. |
| ◑ (Half-filled Circle) | Dynamic Mode Toggle | Switches between dynamic lighting effects or special modes. |
| SETUP (center button) | Pairing Function | Used to pair the remote control with a compatible OOWOKS lamp (see Section 4.2). |
6. Maintenance
6.1. Cleaning
To clean the remote control, gently wipe it with a soft, dry cloth. Do not use abrasive cleaners, solvents, or wet cloths, as these can damage the surface or internal components.
6.2. Battery Replacement
If the remote control's range decreases or it becomes unresponsive, the batteries may need replacement. Follow the battery installation steps in Section 4.1. Always replace both batteries at the same time with new ones of the same type.
6.3. Storage
When not in use for extended periods, store the remote control in a cool, dry place. If storing for several months, it is advisable to remove the batteries to prevent leakage.
7. Troubleshooting
| Problem | Possible Cause | Solution |
|---|---|---|
| Remote not responding. | Dead or incorrectly inserted batteries. | Replace batteries, ensuring correct polarity. |
| Remote not controlling the lamp. | Remote is not paired with the lamp. | Perform the pairing procedure as described in Section 4.2. |
| Reduced operating range. | Low battery power. Obstruction between remote and lamp. | Replace batteries. Ensure a clear line of sight to the lamp's receiver. |
| Lamp flashes unexpectedly during pairing. | Interference or incorrect timing. | Ensure no other infrared devices are in use. Repeat pairing, paying close attention to the 5-second window after powering on the lamp. |
8. Specifications
- Brand: OOWOKS
- Model: 65680371
- Maximum Operating Range: 10.0 meters
- Connector Type: Infrared
- Power Source: 2 x AAA Batteries (not included)
9. Warranty and Support
OOWOKS products are manufactured to high-quality standards. For warranty information, technical support, or any questions regarding your remote control, please refer to the warranty card included with your product or visit the official OOWOKS website.
You can also contact OOWOKS customer service through the retailer where the product was purchased.