1. Introduction
This manual provides detailed instructions for the installation, operation, and maintenance of your DIAGKING MINI VCI J2534 TIS OBD2 Diagnostic Cable. This device is designed to interface with Toyota and Lexus vehicles for diagnostic purposes using the Techstream software.

Image 1.1: The DIAGKING MINI VCI J2534 TIS OBD2 Diagnostic Cable.
2. Product Overview
2.1 Key Features
- Supports Windows 7, 8, 10, and 11 (32-bit & 64-bit operating systems).
- Compatible with Toyota and Lexus models.
- Enables diagnostic functions and data viewing.
- Provides access to Techstream V18 software (download link available upon request).
- Offers technical support for installation and software functionality.
2.2 What's Included
- 1 x DIAGKING MINI VCI Diagnostic Cable

Image 2.1: The MINI VCI cable and accompanying software CD.
3. Setup and Installation
3.1 System Requirements
Ensure your computer meets the following specifications for optimal performance:
- Operating System: Windows 7, Windows 8, Windows 10, or Windows 11 (32-bit or 64-bit versions).
- USB Port: Available USB port for connecting the MINI VCI cable.
- Software: Techstream V18.00.008 or later.
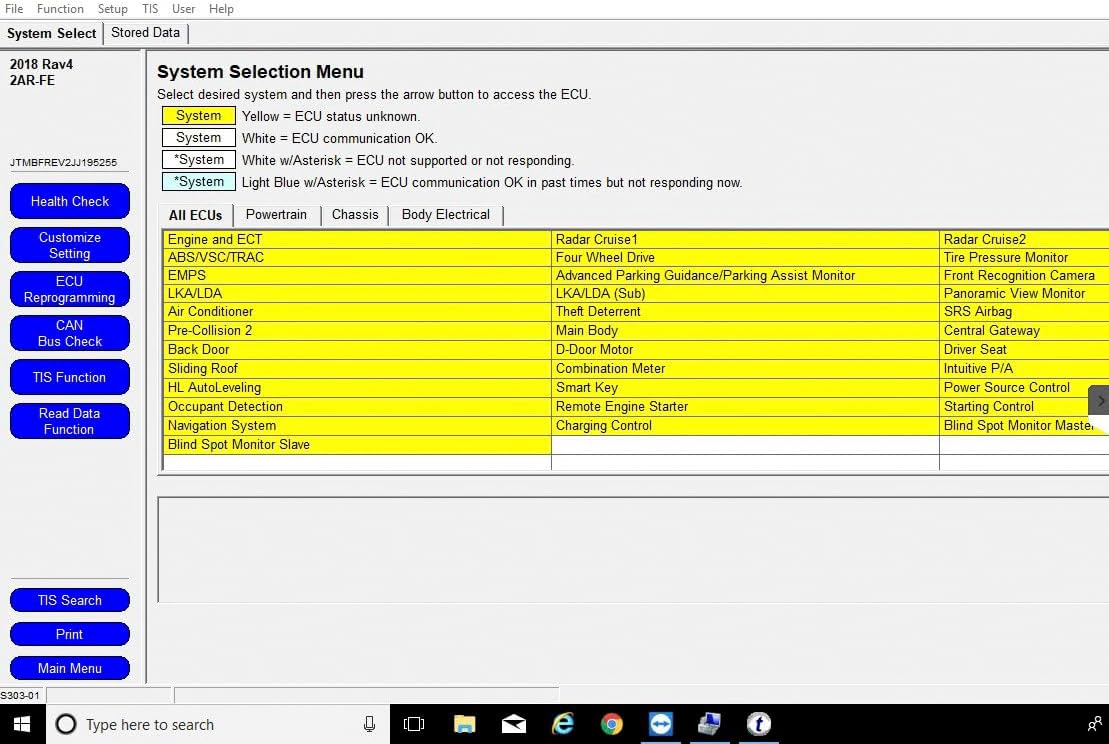
Image 3.1: The diagnostic cable supports various Windows operating systems.
3.2 Software Installation (Techstream)
- Disable Antivirus and Firewall: Before installation, temporarily disable your computer's antivirus software and firewall to prevent interference with the installation process.
- Obtain Software: If you do not have the Techstream V18.00.008 software, please contact technical support for a download link.
- Run Setup: Locate and run the Techstream setup file. Follow the on-screen prompts.
- Select Language: Choose your preferred language for the software.
- Accept License Agreement: Read and accept the license terms to proceed.
- Enter User Information: Provide the required user and company name.
- Complete Installation: Click 'Install' and wait for the installation to complete. Click 'Finish' when prompted.
3.3 Driver Installation
- Connect Device: Insert the MINI VCI cable into an available USB port on your computer.
- Install Drivers: The system may automatically attempt to install drivers. If not, navigate to the driver folder provided with the software (often on the included CD or in the downloaded package).
- Manual Driver Update (if needed): If the driver installation fails or the device is not recognized, open Device Manager, locate the unrecognized device (often under 'Other devices' or 'Ports (COM & LPT)'), right-click, and select 'Update driver'. Browse to the driver folder and install manually.
- Verify COM Port: In Device Manager, check the 'Ports (COM & LPT)' section to identify the COM port assigned to the 'USB Serial Port' or 'MVCI' device. Note this COM port number.
3.4 Software Registration
After installation, you may need to register the Techstream software. If prompted for a key, refer to the provided documentation or contact technical support for assistance.
Video 3.1: Detailed guide on how to install the MINI VCI Techstream software.
Video 3.2: Installation process for the Mini Vci J2534 Cable for Toyota.
4. Operating Instructions
4.1 Connecting to the Vehicle
- Locate OBD2 Port: Identify the OBD2 diagnostic port in your Toyota or Lexus vehicle. This is typically located under the dashboard on the driver's side.
- Connect Cable: Plug the 16-pin end of the MINI VCI cable into the vehicle's OBD2 port.
- Connect to Computer: Ensure the USB end of the cable is securely connected to your computer.
- Ignition ON: Turn the vehicle's ignition to the 'ON' position (do not start the engine unless instructed by a specific diagnostic procedure).

Image 4.1: Close-up of the OBD2 connector.
4.2 Launching Techstream Software
- Open Techstream: Launch the Techstream software from your desktop or Start Menu.
- Connect to Vehicle: Within the Techstream application, select the 'Connect to Vehicle' option. The software will attempt to establish communication with your vehicle.
- Vehicle Information: Once connected, the software will prompt you to confirm vehicle details such as Model Code, Vehicle Spec, and VIN. Select the appropriate options.
4.3 Performing Diagnostics
After successful connection, you can access various diagnostic functions:
- System Selection: The 'System Selection Menu' allows you to choose specific ECUs (Electronic Control Units) for diagnosis, such as Engine and ECT, ABS/VSC/TRC, SRS Airbag, etc.
- Health Check: Perform a comprehensive health check to scan all accessible systems for diagnostic trouble codes (DTCs).
- Trouble Codes: View, read, and clear DTCs. Each code will have a description to help identify the issue.
- Data List: Access real-time sensor data and parameters from various ECUs. This can include engine speed, vehicle speed, battery voltage, throttle position, and more.
- Active Test: Perform active tests to control specific components or systems for diagnostic purposes.
- Customize Setting: Modify certain vehicle settings (availability depends on vehicle model and ECU capabilities).
- ECU Reprogramming: (Advanced users only) Reprogram ECUs. Exercise extreme caution when using this function.

Image 4.2: The Techstream software's System Selection Menu, showing various ECUs.

Image 4.3: Techstream interface showing a list of accessible ECUs for Toyota and Lexus vehicles.
5. Maintenance
To ensure the longevity and proper functioning of your DIAGKING MINI VCI cable:
- Store the cable in a clean, dry environment away from extreme temperatures.
- Avoid bending or kinking the cable excessively.
- Clean the connectors periodically with a dry, lint-free cloth.
- Do not attempt to disassemble the device.
6. Troubleshooting
6.1 Common Issues and Solutions
- Software Installation Failure: Ensure your antivirus and firewall are temporarily disabled during installation. These security measures can sometimes block necessary files.
- Device Not Recognized: Verify that the drivers are correctly installed. Check Device Manager for any unrecognized USB devices or COM port issues. Reinstall drivers if necessary.
- Lost Communication with Vehicle: Ensure the vehicle's ignition is in the 'ON' position. Check all cable connections (OBD2 port and USB). Verify the correct COM port is selected in the Techstream configuration.
- Software Update Issues: Do not update the software directly through the application without consulting technical support. Unauthorized updates may cause functionality issues.

Image 6.1: Temporarily disable antivirus and firewall during software installation.
7. Technical Specifications
| Specification | Detail |
|---|---|
| Brand | DIAGKING |
| Model | MINI VCI 2 |
| Item Weight | 5.1 ounces |
| Package Dimensions | 7.83 x 5.59 x 1.46 inches |
| Operating System Support | WIN7, WIN8, WIN10, WIN11 (32-bit & 64-bit) |
| Manufacturer Part Number | 0010 |
| Supported Protocols | K-Line ISO 9141, KWP 2000 ISO 14230, SAE J1850 PWM, SAE J1850 VPW, CAN 2.0B ISO 11898, CAN ISO 15765-4 |
8. Warranty and Technical Support
DIAGKING is committed to providing reliable products and support. For any technical assistance, software installation help, or troubleshooting, please contact our support team.
- Technical Support: We offer professional technical support to assist with software installation and operational queries.
- Software Updates: For software updates, please contact us directly to receive the correct updated software. Do not attempt to update independently.

Image 8.1: Our dedicated technical support team is available to assist you.

Image 8.2: Professional technical support is available to help with software installation via remote assistance.


