
1. Introduction
Thank you for choosing the Morphy Richards Aero Pro 500W Mixer Grinder. This appliance is designed for efficient grinding, blending, and mixing of various food ingredients. To ensure safe and optimal performance, please read this instruction manual carefully before using the appliance and keep it for future reference.

Image 1.1: The Morphy Richards Aero Pro 500W Mixer Grinder with its three accompanying jars.
2. Included Components
Your Morphy Richards Aero Pro 500W Mixer Grinder package includes the following items:
- 1 x Mixer Grinder Main Unit (500W)
- 3 x Stainless Steel Jars with Lids and Blades:
- 1 x 0.4 Litre Chutney Jar
- 1 x 1 Litre Dry/Wet Grinding Jar
- 1 x 1.2 Litre Liquidizing Jar
- 1 x User Manual
- 1 x Warranty Card

Image 2.1: The three stainless steel jars included with the mixer grinder, showing their respective capacities and typical uses.
3. Safety Instructions
Please observe the following safety precautions to prevent injury or damage to the appliance:
- Always ensure the appliance is unplugged before assembly, disassembly, or cleaning.
- Do not immerse the motor unit in water or any other liquid. Clean with a damp cloth only.
- Keep hands and utensils away from moving blades during operation to prevent injury.
- Ensure the jar lid is securely locked in place before operating the mixer grinder.
- Do not operate the appliance if the cord or plug is damaged, or if the appliance malfunctions or is dropped. Contact authorized service personnel.
- This appliance is for household use only. Do not use outdoors or for commercial purposes.
- Do not overload the mixer grinder. Refer to the maximum capacity markings on the jars.
- Allow the motor to cool down between consecutive operations, especially after heavy loads, to prevent overheating. The appliance features overload protection for motor safety.
- Keep out of reach of children.
4. Setup
- Unpacking: Carefully remove all components from the packaging. Retain the packaging for future storage or transport.
- Initial Cleaning: Before first use, wash the jars, lids, and blades thoroughly with warm soapy water. Rinse and dry completely. Wipe the main motor unit with a damp cloth.
- Placement: Place the mixer grinder on a stable, flat, and dry surface, away from heat sources and direct sunlight. Ensure there is adequate ventilation around the unit.
- Power Connection: Ensure your power supply matches the voltage requirements of the appliance (220 V | 50 Hz). Plug the power cord into a suitable electrical outlet.
5. Operating Instructions
Follow these steps for safe and effective operation:
- Prepare Ingredients: Cut ingredients into small pieces suitable for grinding. Do not overfill the jar beyond its maximum capacity.
- Attach Jar: Place the desired jar onto the main unit and twist it clockwise until it locks securely into position. Ensure the jar is firmly seated.
- Secure Lid: Place the lid firmly on the jar and ensure it is properly closed. For liquidizing, ensure the lid is tightly sealed to prevent spills.
- Select Speed: Turn the speed control knob (device interface) to the desired speed setting (1, 2, or 3).
- Speed 1: For light grinding and blending.
- Speed 2: For medium grinding and mixing.
- Speed 3: For heavy-duty grinding and liquidizing.
- Incher Facility: The incher facility allows for momentary operation at maximum speed, useful for quick bursts or for dislodging ingredients. Turn the knob to the "Pulse" or "Incher" position and release.
- Monitor Operation: Do not operate continuously for long periods. Allow short breaks to prevent motor overheating. If the motor stops due to overload, switch off the appliance, unplug it, and allow it to cool down for a few minutes before restarting.
- Switch Off: Once grinding is complete, turn the speed control knob to the "OFF" position and unplug the appliance from the power outlet.
- Remove Jar: Twist the jar counter-clockwise to unlock and lift it from the main unit. Carefully remove the lid and empty the contents.
Recommended Uses: This mixer grinder is suitable for grinding grains, spices, and other food items for various culinary purposes, including making chutneys, purees, and batters.
6. Maintenance and Cleaning
Regular cleaning and maintenance will prolong the life of your appliance:
- Unplug First: Always ensure the mixer grinder is unplugged from the power supply before cleaning.
- Cleaning Jars and Lids:
- Wash the stainless steel jars, lids, and blades immediately after use to prevent food residue from drying.
- Use warm soapy water and a soft brush or sponge. Be careful when handling blades as they are sharp.
- Rinse thoroughly under running water and dry completely before storing.
- Cleaning Main Unit:
- Wipe the exterior of the motor unit with a soft, damp cloth.
- Do not use abrasive cleaners, scouring pads, or harsh chemicals.
- Never immerse the motor unit in water.
- Storage: Store the mixer grinder and its accessories in a clean, dry place when not in use.
7. Troubleshooting
If you encounter any issues, refer to the following troubleshooting guide:
| Problem | Possible Cause | Solution |
|---|---|---|
| Appliance does not start. |
|
|
| Motor runs, but blades do not rotate. |
|
|
| Burning smell during operation. |
|
|
| Leakage from jar. |
|
|
8. Specifications
Key technical specifications for the Morphy Richards Aero Pro 500W Mixer Grinder:
- Model Number: AERO PRO 500W
- Wattage: 500 Watts
- Voltage: 220 V | 50 Hz
- Number of Jars: 3 (0.4L, 1L, 1.2L)
- Jar Material: Stainless Steel
- Blade Material: Stainless Steel
- Body Material: Plastic (Shock-proof insulated body)
- Speed Control: 3-speed function with Incher facility
- Safety Features: Overload Protection for motor, Anti-Bacterial & Anti-Viral Coating
- Color: Purple
- Country of Origin: India
- Dimensions (Approx.): 17.20 cm (W) x 34.20 cm (D) x 35.00 cm (H)
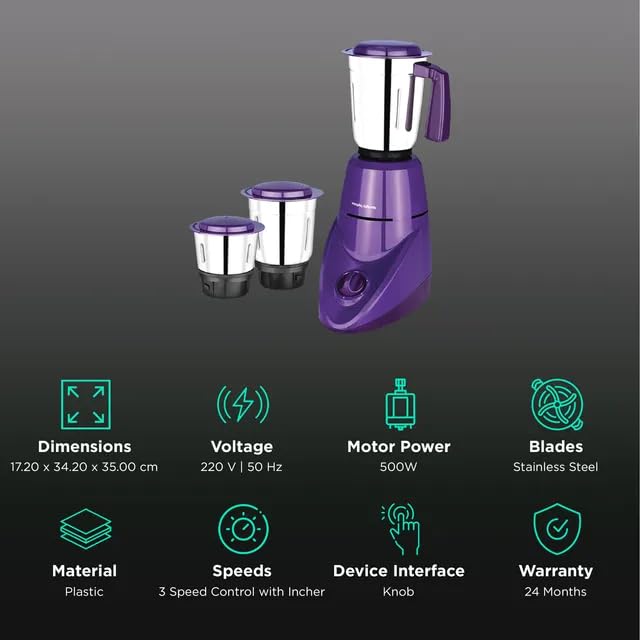
Image 8.1: Key specifications and features of the Morphy Richards Aero Pro 500W Mixer Grinder.
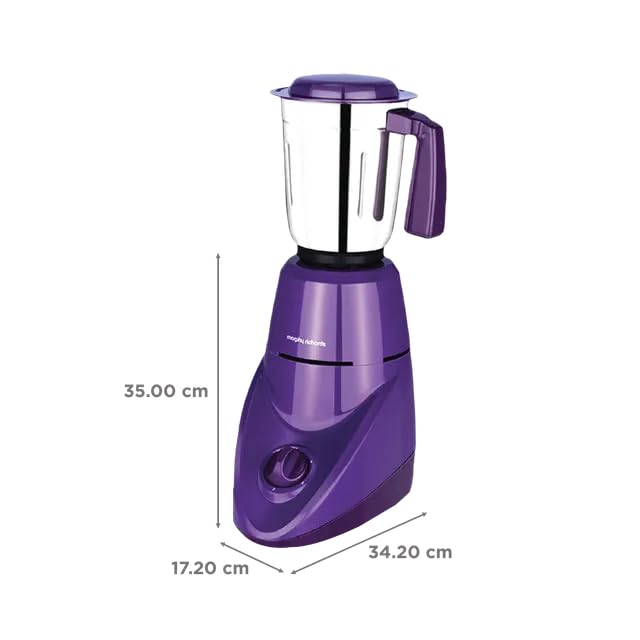
Image 8.2: Detailed dimensions of the mixer grinder unit.
9. Warranty and Support
Your Morphy Richards Aero Pro 500W Mixer Grinder comes with a comprehensive warranty:
- Product Warranty: 2 Years
- Motor Warranty: 2 Years
The warranty covers manufacturing defects from the date of purchase. Please retain your purchase receipt and warranty card for any warranty claims.
For service, support, or spare parts, please contact Morphy Richards customer care. Refer to the warranty card or the official Morphy Richards website for contact details.
Manufacturer: BAJAJ ELECTRICAL