1. Introduction
The GIGABYTE TRX50 AERO D is an E-ATX motherboard designed for high-performance computing, supporting AMD Ryzen Threadripper PRO 7000 Series Processors. This motherboard integrates advanced features such as DDR5 memory support, PCIe 5.0 for both expansion slots and M.2 storage, dual USB4 Type-C ports, Wi-Fi 7, and Marvell 10GbE networking. It is engineered for content creators, enthusiasts, and AI professionals requiring robust stability and performance under demanding workloads.

Figure 1: GIGABYTE TRX50 AERO D Motherboard and retail packaging.
2. Key Features
- AMD sTR5 Socket: Supports AMD Ryzen Threadripper PRO 7000 Series Processors.
- Power Design: 16+8+4 Phases Digital VRM Solution for stable power delivery.
- DDR5 Compatible: Four SMD R-DIMM slots with AMD EXPO & Intel XMP Support.
- Advanced Thermal Design: Features VRM Thermal Armor and M.2 Thermal Guard for efficient heat dissipation.
- Next-Gen Connectivity: Includes dual USB4 Type-C ports and PCIe 5.0 support.
- EZ-Latch: PCIe 5.0 & M.2 Connectors with a quick release and screwless design for easy installation.
- Fast Networking: Equipped with 10GbE + 2.5GbE Dual LAN and Wi-Fi 7 for high-speed network access.
3. Setup and Installation
This section provides general guidelines for installing the GIGABYTE TRX50 AERO D motherboard and its components. Always refer to the detailed instructions in your CPU, RAM, and other component manuals for specific installation steps.
3.1 Motherboard Layout
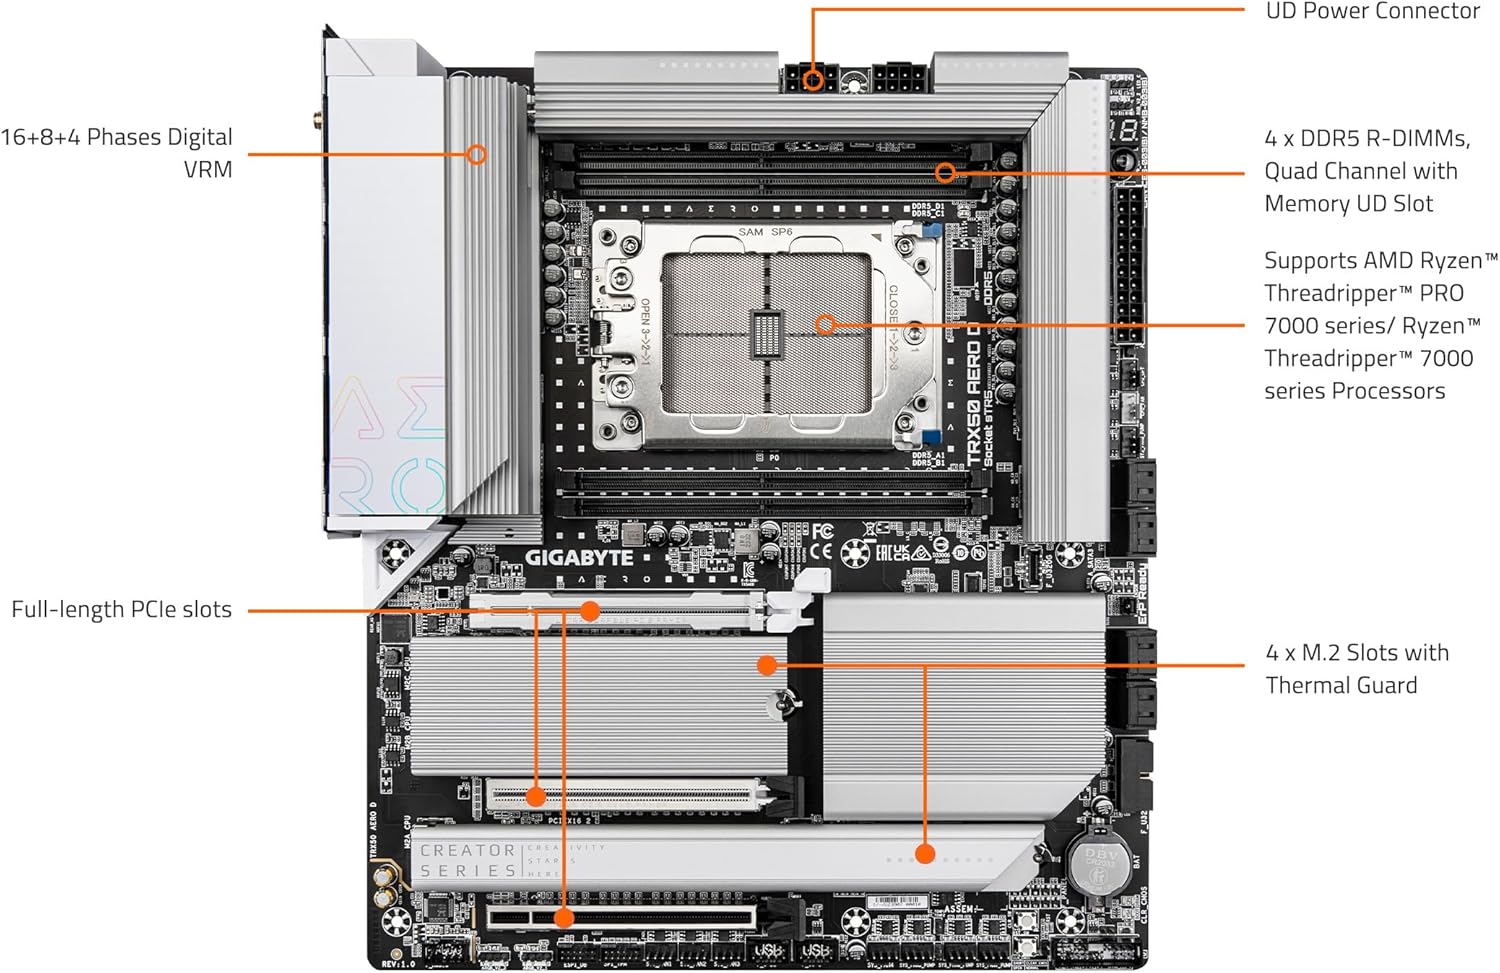
Figure 2: Labeled diagram of the GIGABYTE TRX50 AERO D Motherboard components.
3.2 CPU Installation (sTR5 Socket)
Carefully align your AMD Ryzen Threadripper PRO 7000 Series Processor with the sTR5 socket. Ensure the CPU is correctly oriented before gently lowering it into place. Follow the cooler manufacturer's instructions for installing the CPU cooler.
3.3 Memory (DDR5 R-DIMM) Installation
The motherboard supports four DDR5 R-DIMM modules. Insert the memory modules into the designated slots, ensuring they are fully seated until the clips on both ends lock into place. Refer to the motherboard manual for recommended memory configurations.
3.4 Storage (M.2 and SATA) Installation
The TRX50 AERO D features multiple M.2 slots with Thermal Guards. To install an M.2 SSD, remove the thermal guard, insert the SSD into the slot, and secure it using the EZ-Latch mechanism. Reattach the thermal guard. For SATA drives, connect the data and power cables to the appropriate ports.
3.5 Expansion Card (PCIe 5.0) Installation
Install PCIe expansion cards (e.g., graphics cards) into the available PCIe 5.0 slots. Ensure the card is firmly seated and secured with the case's retention mechanism. The EZ-Latch feature simplifies removal.
3.6 Power Connections
Connect the 24-pin ATX main power connector and the necessary CPU power connectors (e.g., 8-pin + 8-pin or 8-pin + 4-pin) from your power supply to the motherboard. Ensure all power connections are secure.
3.7 Rear I/O Panel Connections
Connect your peripherals to the rear I/O panel. This includes USB devices, Ethernet cables for 10GbE and 2.5GbE LAN, Wi-Fi antennas, and audio devices.
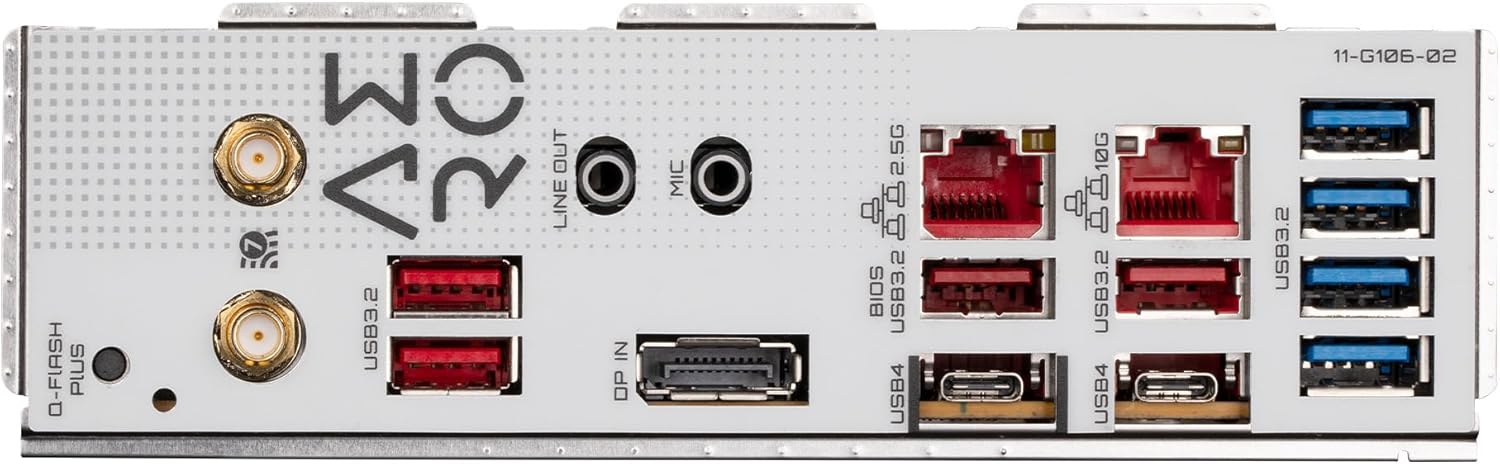
Figure 3: Rear I/O Panel of the GIGABYTE TRX50 AERO D Motherboard.
4. Operating Instructions
4.1 Initial Boot and BIOS Access
After assembling your system, power it on. During the boot process, press the designated key (usually DEL or F2) to enter the BIOS/UEFI setup. Here you can configure system settings, boot order, and monitor hardware status. It is recommended to load optimized defaults after a BIOS update or initial setup.
4.2 Driver Installation
After installing your operating system, install the necessary drivers for the motherboard components. It is recommended to download the latest chipset drivers directly from the AMD website and other specific drivers (e.g., LAN, Wi-Fi, Audio) from the official GIGABYTE support page for your motherboard model to ensure optimal performance and compatibility.
5. Maintenance
5.1 BIOS Updates
GIGABYTE periodically releases BIOS updates to improve system stability, compatibility, and performance. Use the Q-Flash utility (accessible via BIOS) or GIGABYTE's dedicated software to update the BIOS. Always follow the instructions provided by GIGABYTE carefully during the update process.
5.2 System Cleaning
Regularly clean your computer system to prevent dust buildup, which can affect cooling efficiency. Use compressed air to clear dust from heatsinks, fans, and other components. Ensure the system is powered off and unplugged before cleaning.
6. Troubleshooting
This section addresses common issues you might encounter with the GIGABYTE TRX50 AERO D motherboard.
- Long Boot Times / Inconsistent POST: Some users have reported extended boot times or inconsistent Power-On Self-Test (POST) behavior. Ensure your BIOS is updated to the latest version. Clearing CMOS (Complementary Metal-Oxide-Semiconductor) and loading optimized defaults in BIOS can sometimes resolve these issues. Verify all components are correctly seated.
- Memory Incompatibility: If the system fails to boot or recognize DDR5 modules, update the BIOS using Q-Flash. Ensure memory modules are compatible with the motherboard and installed in the correct slots as per the manual.
- Driver and Chipset Issues: If devices are not recognized or function incorrectly, ensure you have installed the latest chipset drivers from the AMD website and other necessary drivers from the GIGABYTE support page.
- Fan Speed Issues: If fan speeds are erratic or excessively loud, check BIOS settings for fan curves and control modes. Ensure all fan headers are correctly connected. A BIOS update may also address fan control anomalies.
- Hardware Malfunctions (e.g., R-DIMM slot, USB port): In rare cases, individual components like R-DIMM slots or USB ports may be defective. If you suspect a hardware defect after thorough troubleshooting, contact GIGABYTE customer support for assistance or warranty service.
7. Specifications
| Feature | Specification |
|---|---|
| Brand | GIGABYTE |
| Series | TRX50 AERO D |
| Model Name | TRX50 AERO D |
| CPU Socket | sTR5 |
| Compatible Processors | AMD Ryzen Threadripper PRO 7000 Series |
| Chipset Type | AMD TRX50 |
| RAM Memory Technology | DDR5 |
| RAM Memory Maximum Size | 1000 GB |
| Number of USB 2.0 Ports | 2 (internal headers) |
| Product Dimensions (LxWxH) | 3.1 x 13.6 x 11.6 inches |
| Item Weight | 4 pounds |
| Platform | Windows |
8. Warranty and Support
For warranty information, please refer to the documentation included with your product or visit the official GIGABYTE website. If you encounter issues that cannot be resolved using the troubleshooting steps provided, please contact GIGABYTE customer support for further assistance. You can find contact details on the GIGABYTE support portal.