1. Introduction
This manual provides detailed instructions for the assembly, operation, and maintenance of your ROKR 3D Wooden Puzzle Mechanical Music Box Cello (Model AMK63) and Vintage Pendulum Clock (Model LC701). These kits offer an engaging building experience, culminating in functional and decorative mechanical models. Please read all instructions carefully before beginning assembly.
2. Safety Information
- Small Parts Warning: This kit contains small parts and is not suitable for children under 3 years due to choking hazards.
- Sharp Edges: Some wooden pieces may have sharp edges. Handle with care during removal and assembly.
- Adult Supervision: Adult supervision is recommended, especially for younger builders.
- Keep Dry: Store and assemble the model in a dry environment to prevent damage to the wooden components.
3. Package Contents
Your ROKR 3D Puzzle kit includes the following components:
- Pre-cut wooden sheets (various designs for Cello and Clock)
- Mechanical music box module (for Cello)
- Clock mechanism (for Clock)
- Assorted small parts (pins, shafts, springs, etc.)
- Assembly tools (small wooden tool, screwdriver, wax)
- Detailed instruction manual with diagrams

Figure 1: Overview of the ROKR 3D Cello Music Box and Vintage Pendulum Clock models.
4. General Assembly Guidelines
Successful assembly requires patience and attention to detail. Follow these general tips:
- Read Instructions: Review all instructions and diagrams thoroughly before starting each step.
- Organize Parts: Carefully remove pieces from the wooden sheets. It is helpful to organize them by part number.
- Use Tools: Utilize the provided wooden tool and screwdriver to gently push pieces into place. Avoid using excessive force, which can cause breakage.
- Apply Wax: Use the provided wax on gear teeth and moving parts to ensure smooth operation.
- Test Mechanisms: Periodically test moving parts and gears during assembly to ensure they turn freely and without obstruction.
- Work with a Partner: Some steps may benefit from an extra pair of hands, especially for holding pieces in alignment.
- Magnification: For very small details or print, a magnifying glass may be helpful.
5. Assembly Instructions - Cello Music Box (AMK63)
Follow the numbered steps in your included manual. The Cello Music Box features intricate gears and a self-drawing bow mechanism.
- Begin by assembling the base and the book-shaped pedestal.
- Carefully construct the main body of the cello, integrating the internal gears as shown in the diagrams.
- Assemble the neck and headstock of the cello, attaching the tuning pegs.
- Install the self-drawing bow mechanism, ensuring all gears are aligned and move smoothly. Apply wax to the gears.
- Integrate the mechanical music box module into the base.
- Attach the decorative elements, such as the carved flowers and leaves.

Figure 2: The ROKR Cello Music Box with its self-drawing bow mechanism.

Figure 3: Detailed view of the gear transmission within the ROKR Cello Music Box.
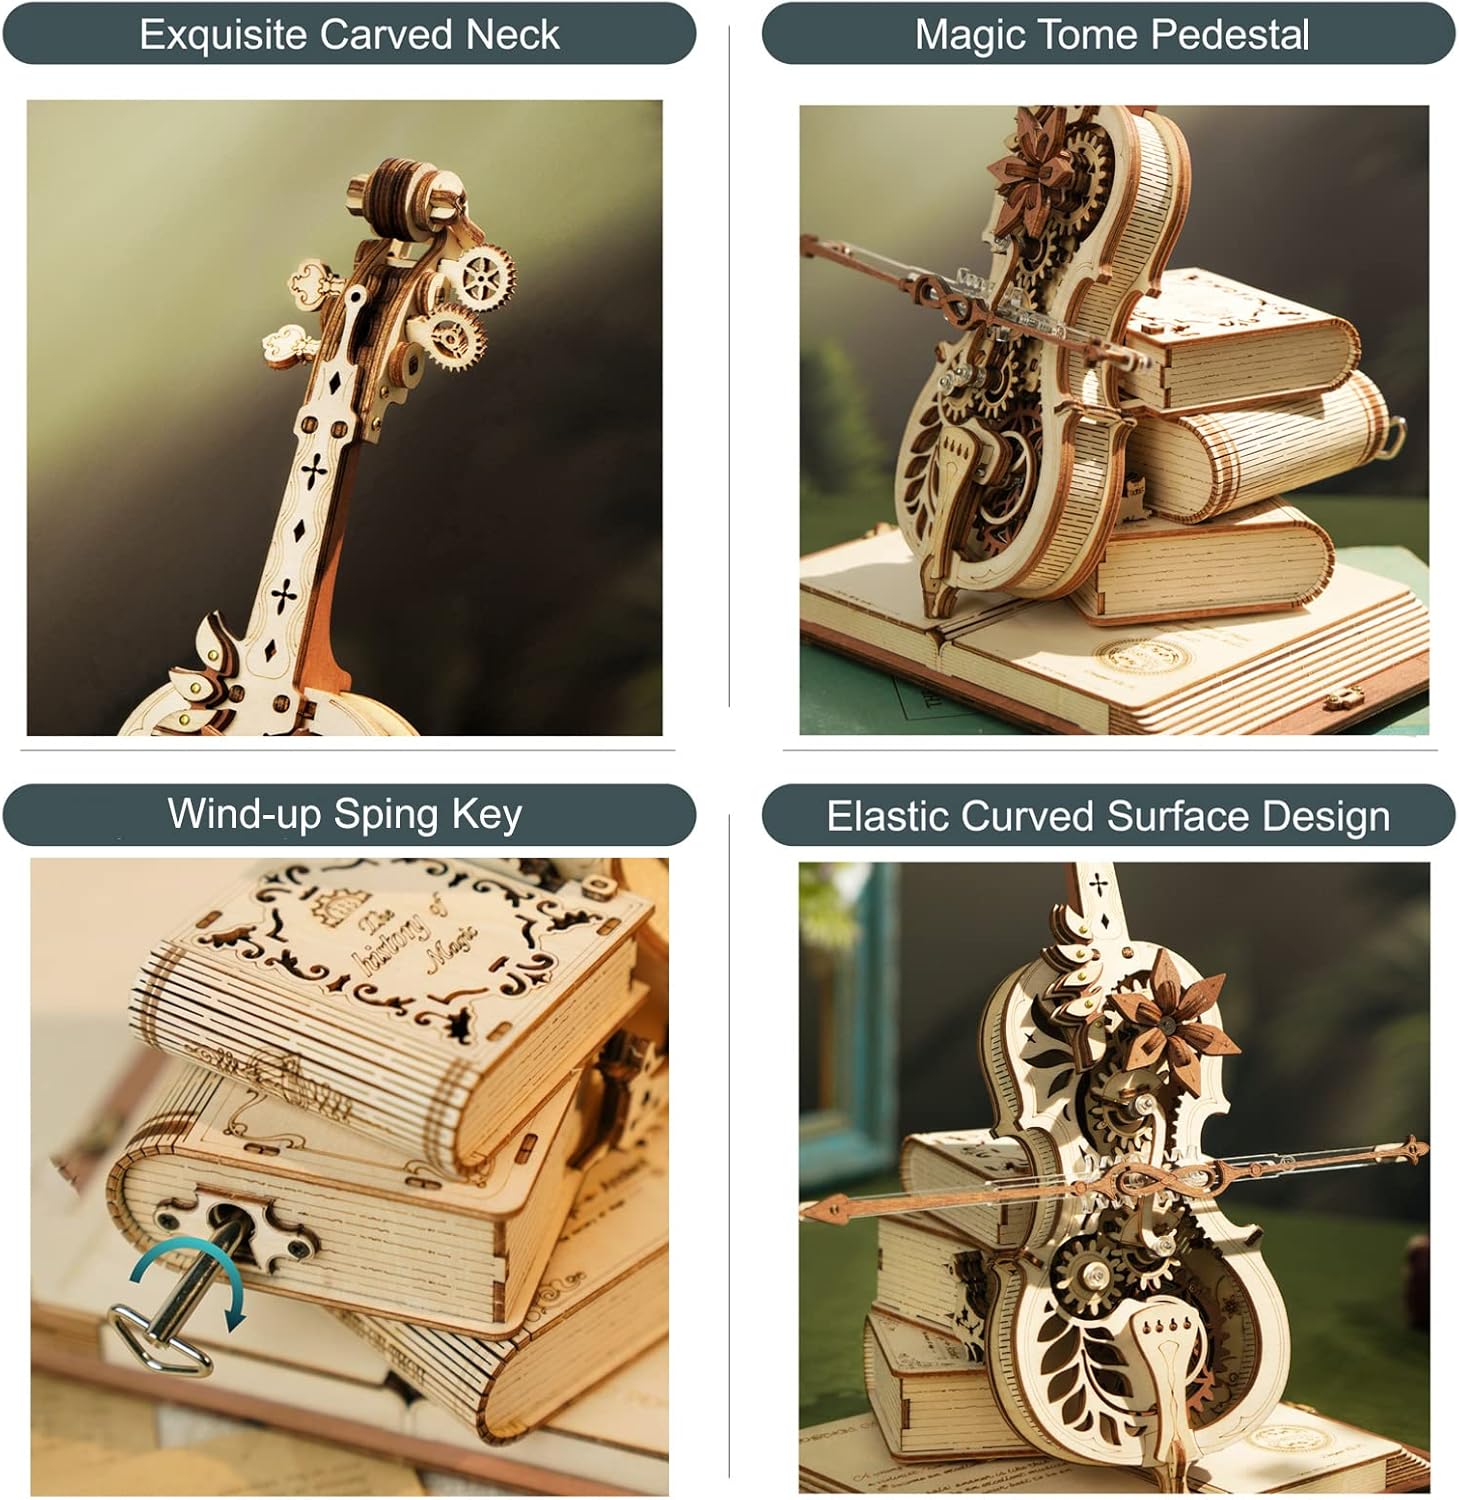
Figure 4: Close-up of various Cello Music Box components including the carved neck, magic tome pedestal, wind-up spring key, and elastic curved surface design.
Video 1: A brief demonstration of the ROKR 3D Cello Music Box in operation, showcasing its mechanical movement and musical output.
6. Assembly Instructions - Vintage Pendulum Clock (LC701)
Refer to the specific instructions for the Vintage Pendulum Clock in your manual. This model features a functional clock mechanism and a pendulum.
- Assemble the main frame and decorative outer casing of the clock.
- Install the internal clock gears and mechanism, ensuring precise alignment for proper function.
- Construct and attach the pendulum and its heavy hammer.
- Mount the clock face and hands.
- Attach the flexible hook combinations for wall mounting.

Figure 5: The ROKR Vintage Pendulum Clock displayed on a wall.
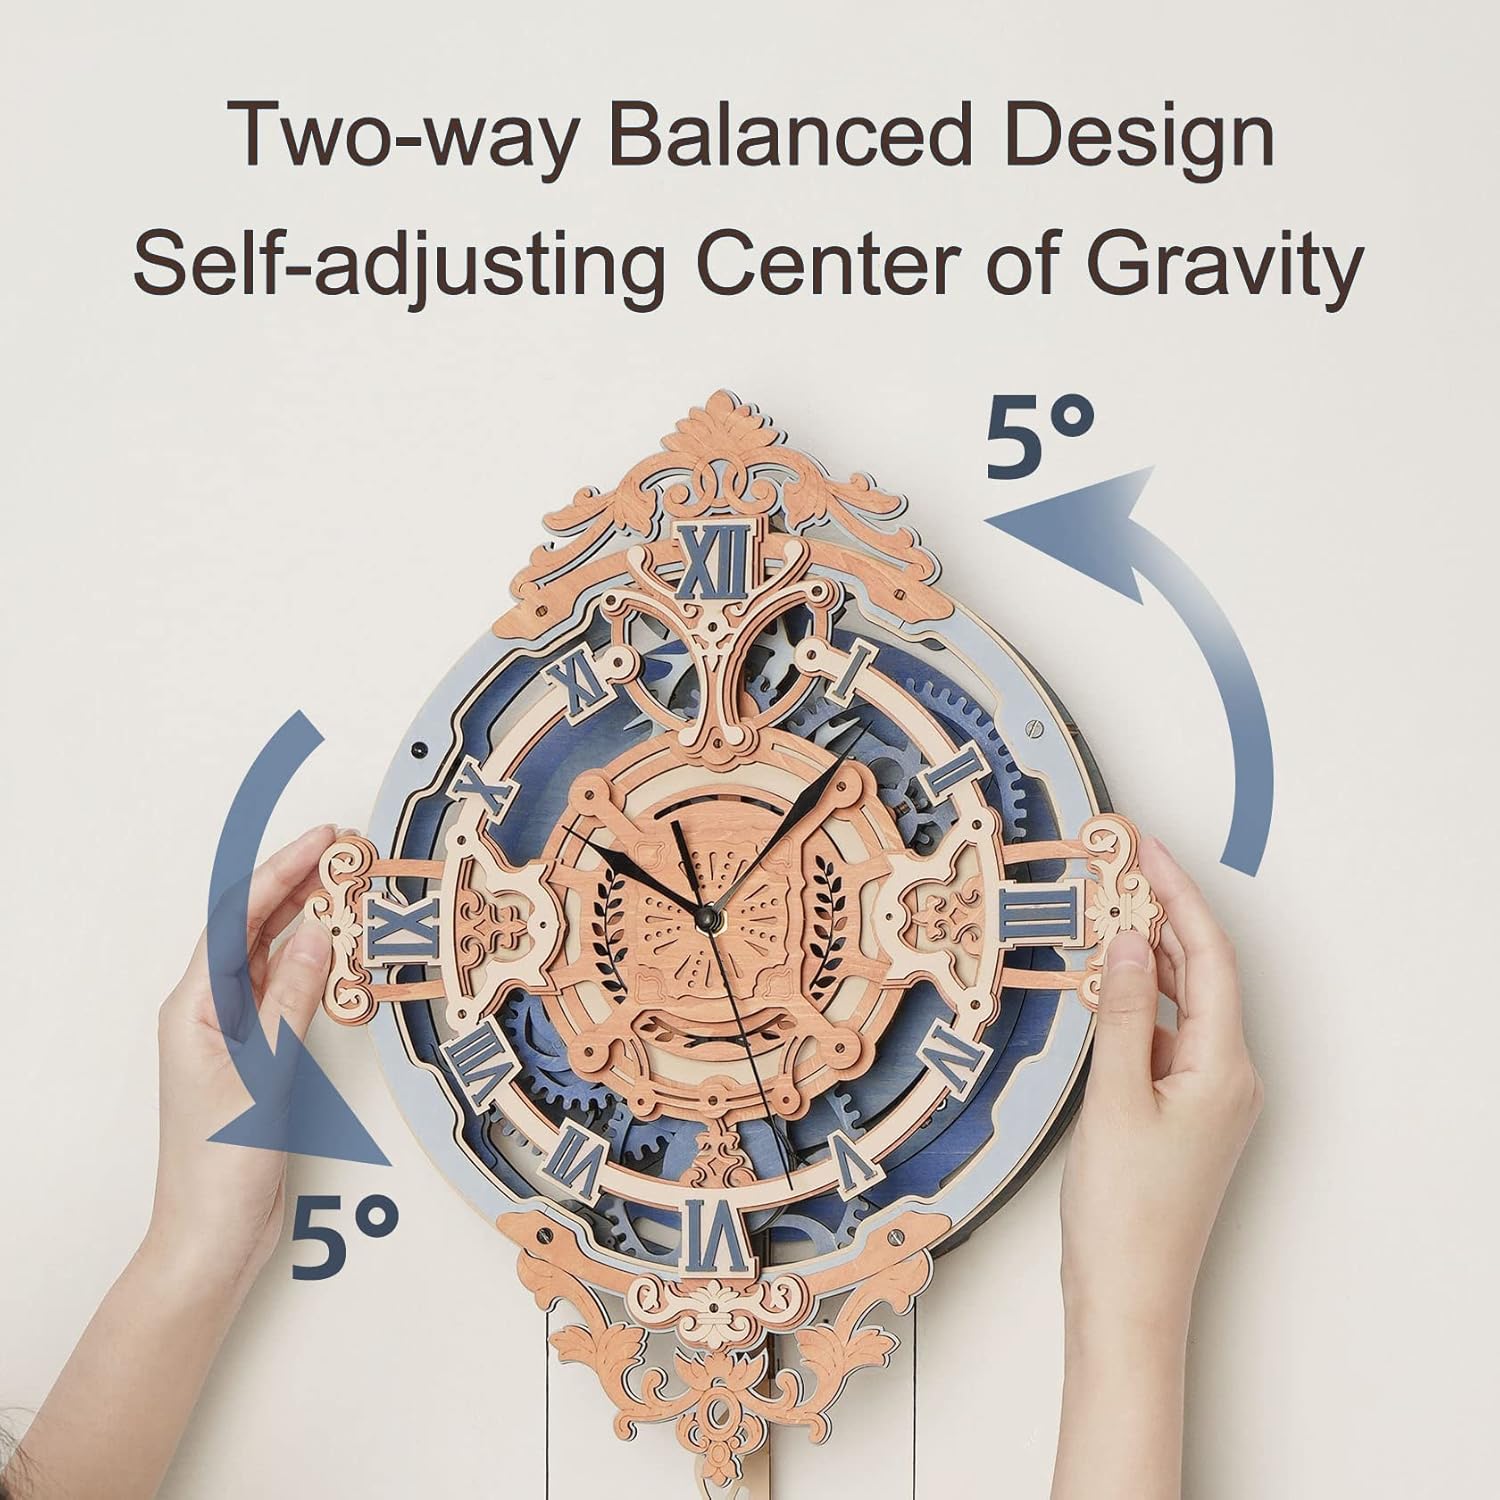
Figure 6: Illustration of the two-way balanced design and self-adjusting center of gravity for the ROKR Vintage Pendulum Clock.

Figure 7: Close-up of various Clock components including dip-dyed wood grain craftsmanship, Roman pattern heavy hammer, laurel branch decoration, and flexible hook combinations.
7. Operating Instructions
7.1. Cello Music Box (AMK63)
- Winding: Locate the winding key on the side of the base. Turn the key clockwise until you feel slight resistance. Do not overwind.
- Playing Music: Once wound, the music box will play the melody "Nocturne in E-flat, Op.9 No.2" while the self-drawing bow moves across the cello.
7.2. Vintage Pendulum Clock (LC701)
- Setting Time: Gently turn the minute hand clockwise to set the correct time.
- Starting Pendulum: Once assembled and mounted, gently push the pendulum to start its swing. Ensure it swings freely without touching the sides.
- Winding: The clock is a mechanical model. Follow the specific winding instructions in your manual to keep it running.
8. Maintenance
- Cleaning: Use a soft, dry cloth to gently wipe dust from the model. Avoid using liquids or abrasive cleaners.
- Lubrication: Reapply wax to gears and moving parts periodically if you notice increased friction or noise.
- Storage: Store the model in a stable, dry place away from direct sunlight or extreme temperature changes.
9. Troubleshooting
9.1. Cello Music Box
- Music box not playing or gears not moving:
- Ensure the music box is fully wound (do not overwind).
- Check for any obstructions in the gear mechanism.
- Verify that all gears are properly aligned and seated. Reapply wax if necessary.
- Ensure the cello body is not pressing too heavily on the music box mechanism, causing excessive friction.
9.2. Vintage Pendulum Clock
- Pendulum not swinging or clock not keeping time:
- Check for any obstructions preventing the pendulum from swinging freely.
- Ensure the clock mechanism is correctly assembled and all gears are properly engaged.
- Verify the clock is wound according to the instructions.
- Ensure the clock is mounted on a stable, level surface.
9.3. General Issues
- Broken or missing pieces: If you encounter a broken or missing piece, please contact ROKR customer support for assistance.
10. Specifications
- Brand: ROKR
- Model: AMK63 (Cello Music Box) + LC701 (Vintage Pendulum Clock)
- Material: Wood
- Cello Pieces: 199 pieces
- Clock Pieces: (Information not provided in source, refer to product packaging)
- Cello Music: Nocturne in E-flat, Op.9 No.2
- Assembly Time: Varies by individual, typically 3-5 hours per model.
11. Warranty and Support
ROKR products are designed for quality and enjoyment. For any questions, concerns, or to request replacement parts, please contact ROKR customer support through their official website or the retailer where you purchased the product. Keep your purchase receipt as proof of purchase.


