1. Introduction
The LIORQUE 3-in-1 Electrostimulator is a versatile device designed for muscle pain relief, muscle spasm relaxation, and muscle strengthening. It combines TENS (Transcutaneous Electrical Nerve Stimulation), EMS (Electrical Muscle Stimulation), and FITNESS modes to provide a comprehensive solution for various body needs. This manual provides detailed instructions for safe and effective use of your device.

Image 1.1: LIORQUE Muscle Electrostimulator with included electrode pads.
2. Important Safety Information
Please read all instructions and warnings before using this device. Failure to do so may result in injury or device damage.
- Do not use if you have a pacemaker, implanted defibrillator, or other implanted metallic or electronic device.
- Consult your physician before use if you have any medical conditions, including but not limited to epilepsy, heart disease, or recent surgery.
- Do not use on broken skin, open wounds, or areas with swelling, redness, or inflammation.
- Do not use while driving or operating heavy machinery.
- Keep out of reach of children.
- Do not immerse the device in water or other liquids.
- Only use the electrode pads and cables provided or approved by the manufacturer.
- Discontinue use immediately if you experience any discomfort, pain, or adverse reactions.
3. Package Contents
Verify that all items are present in the package:

Image 3.1: Contents of the LIORQUE Electrostimulator package.
- 1 x LIORQUE TENS Massage Device
- 10 x Electrode Pads (50x50mm)
- 2 x Connection Cables
- 1 x USB-C Charging Cable
- 1 x Storage Box
- 1 x User Manual
4. Product Overview
4.1 Device Features

Image 4.1: Key features of the LIORQUE Electrostimulator.
- 3-in-1 Functionality: TENS, EMS, and FITNESS modes.
- Independent Dual Channels: Allows different modes and intensities for two separate areas or two users.
- 50 Massage Modes: A wide variety of preset programs.
- 16 Intensity Levels: Customizable intensity for personalized comfort.
- Ultra-long Battery Life: Extended usage time on a single charge.
- Timer Function: Set treatment duration.
4.2 Controls and Display
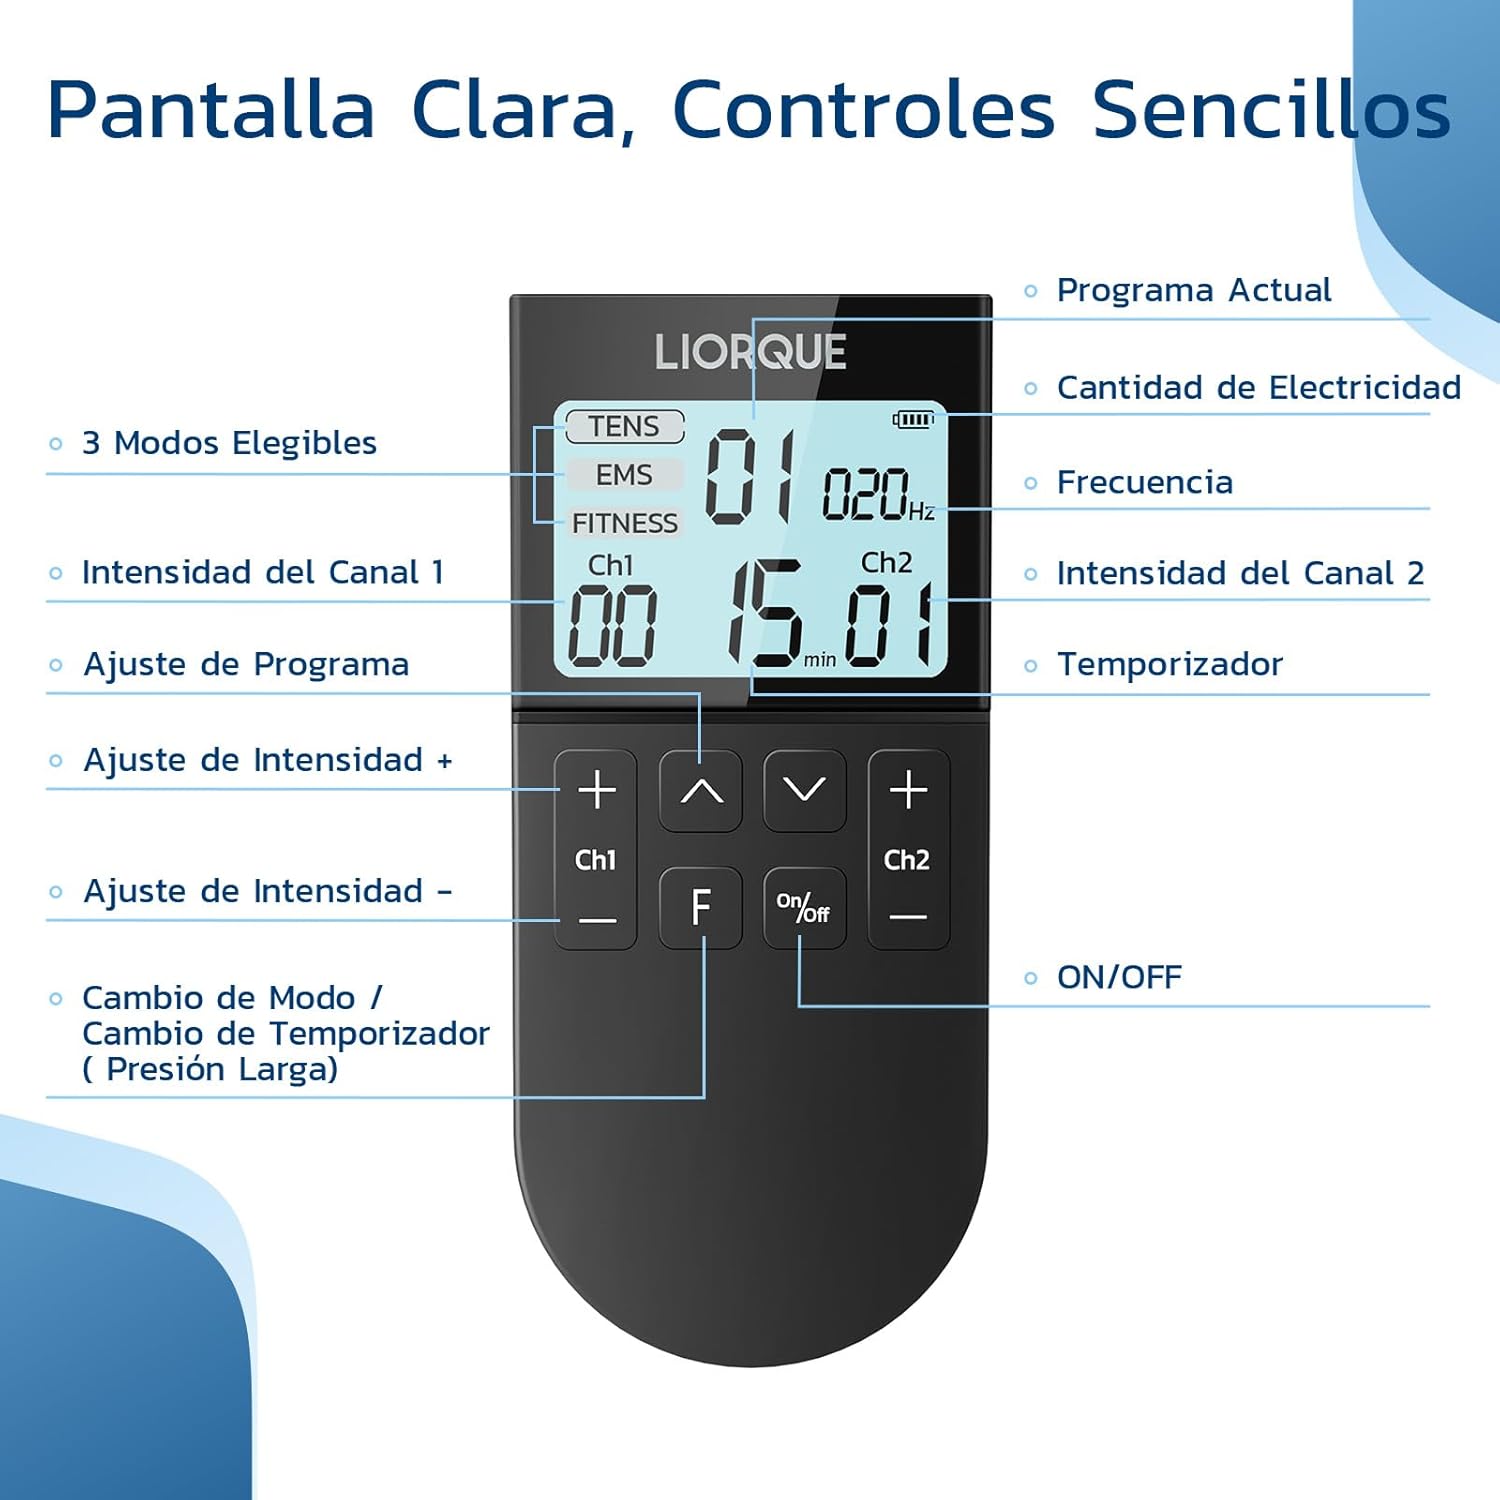
Image 4.2: Clear display and simple controls of the device.
- Display: Shows current program, battery level, frequency, channel intensities, and timer.
- Ch1 +/- Buttons: Adjust intensity for Channel 1.
- Ch2 +/- Buttons: Adjust intensity for Channel 2.
- Up/Down Arrows: Adjust program.
- 'F' Button: Mode Change / Timer Change (Long Press).
- On/Off Button: Power on/off the device.
5. Setup
5.1 Charging the Device

Image 5.1: Battery specifications and charging information.
- Connect the provided USB-C cable to the charging port on the device.
- Plug the other end of the USB-C cable into a compatible USB power adapter (not included) or a computer USB port.
- The battery indicator on the display will show charging status. A full charge typically takes about 2 hours.
- Once fully charged, the device can be used for approximately 12 days (based on 30 minutes of use per day).
5.2 Attaching Electrode Pads
- Ensure the device is turned off before connecting pads.
- Connect the pin connectors of the electrode cables to the electrode pads.
- Plug the other end of the electrode cables into the channel ports (Ch1 or Ch2) on the top of the device.
- Peel the protective film from the electrode pads.
- Apply the sticky side of the pads firmly to clean, dry skin in the desired treatment area. Ensure good contact for effective stimulation.
6. Operating Instructions
6.1 Basic Operation
- Power On: Press the 'On/Off' button to turn on the device.
- Select Mode: The device starts in TENS mode by default. Press the 'F' button briefly to cycle through TENS, EMS, and FITNESS modes.
- Select Program: Use the Up/Down arrow buttons to choose from the 50 available programs within the selected mode.
- Adjust Intensity: Once pads are applied to the skin, use the 'Ch1 +/-' and 'Ch2 +/-' buttons to increase or decrease the intensity for each channel independently. Start with the lowest intensity and gradually increase until you feel a comfortable, gentle sensation.
- Set Timer: Long press the 'F' button to adjust the treatment timer.
- Power Off: Press and hold the 'On/Off' button to turn off the device after use.
6.2 Application Areas

Image 6.1: Suitable body areas for applying electrode pads.
The LIORQUE Electrostimulator can be applied to various body parts for targeted relief and muscle stimulation, including:
- Shoulders
- Back
- Waist
- Abdomen
- Legs
- Arms
Ensure pads are placed on muscle groups and avoid bony areas, joints, or sensitive regions like the face or neck.

Image 6.2: Example of device usage on leg and arm.
7. Modes Description
The device offers three distinct modes, each with specific benefits:
- TENS (Transcutaneous Electrical Nerve Stimulation) - Modes 1-20: Primarily used for pain relief. TENS works by sending gentle electrical impulses through the skin to block pain signals from reaching the brain and stimulating the body's natural pain-relieving endorphins.
- EMS (Electrical Muscle Stimulation) - Modes 21-40: Designed to relax muscle spasms and improve muscle performance. EMS causes muscles to contract and relax, which can help with muscle recovery, reduce soreness, and improve circulation.
- FITNESS - Modes 41-50: Specialized for muscle toning and strengthening, particularly abdominal muscles. This mode helps to improve muscle development and create a firmer appearance.
8. Electrode Pads
The LIORQUE Electrostimulator comes with high-quality electrode pads designed for durability and effective conductivity.

Image 8.1: Construction of the reusable electrode pads.
- Material: Made of high-quality PU for better adhesion.
- Reusability: Each pad can be reused up to 100+ times with proper care.
- Compatibility: The electrode pads feature a universal design, making them compatible with most replacement parts available on the market.
8.1 Pad Care and Storage
- After each use, place the protective film back onto the sticky side of the pads.
- Store the pads in the provided storage box in a cool, dry place.
- If the pads lose their stickiness, gently wipe the adhesive surface with a damp cloth (water only) and let them air dry. Do not use soap or harsh chemicals.
9. Maintenance
- Cleaning the Device: Wipe the device surface with a soft, dry cloth. Do not use abrasive cleaners or immerse the device in water.
- Storage: Store the device and accessories in the provided storage box in a cool, dry place, away from direct sunlight and extreme temperatures.
- Battery: To prolong battery life, charge the device regularly, even if not in frequent use. Avoid completely draining the battery before recharging.
10. Troubleshooting
If you encounter issues with your LIORQUE Electrostimulator, refer to the table below for common problems and solutions.
| Problem | Possible Cause | Solution |
|---|---|---|
| Device does not turn on. | Low battery; Device not charged. | Charge the device fully. |
| No sensation or weak sensation. | Pads not properly applied; Intensity too low; Pads worn out; Cable disconnected. | Ensure pads are firmly on clean, dry skin. Increase intensity gradually. Replace old pads. Check cable connections. |
| Sensation is uncomfortable or stinging. | Intensity too high; Pads not making full contact; Skin not clean. | Decrease intensity. Reapply pads ensuring full contact. Clean skin thoroughly before application. |
| Pads losing stickiness. | Pads are dirty or old. | Gently wipe adhesive surface with a damp cloth and air dry. If still not sticky, replace pads. |
11. Specifications
| Feature | Detail |
|---|---|
| Model Number | KTR-2610 |
| Manufacturer | LIORQUE |
| Dimensions | 16.5 x 8.5 x 5.4 cm |
| Item Weight | 280 g |
| Battery Type | 1 Lithium Ion battery (included) |
| Number of Modes | 50 (TENS, EMS, FITNESS) |
| Intensity Levels | 16 |
| Channels | Independent Dual Channels |
12. Warranty and Support
For warranty information and customer support, please refer to the documentation provided with your purchase or contact LIORQUE customer service through their official website or the retailer where the product was purchased.


