Introduction
This manual provides comprehensive instructions for the installation, operation, maintenance, and troubleshooting of your Moen KTN Spring NORI Chrome Faucet, model 87897. Please read this manual thoroughly before installation and use to ensure proper function and longevity of your product.
Product Overview
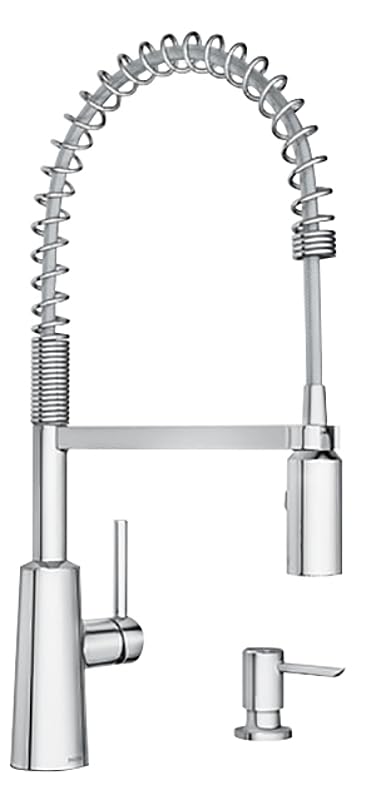
Figure 1: Moen KTN Spring NORI Chrome Faucet (Model 87897)
This image displays the complete Moen KTN Spring NORI Chrome Faucet system. It features a tall, arching neck with a visible spring coil, indicating a pull-down sprayer functionality. The main faucet body is on the left, with a single lever handle for water control. To the right, a separate, smaller soap dispenser is visible. Both components are finished in polished chrome, reflecting light and indicating a sleek, modern design. The overall appearance suggests a robust and functional kitchen or utility faucet.
The Moen KTN Spring NORI Chrome Faucet (Model 87897) is a deck-mount, single-hole installation faucet designed for modern kitchens. It features a polished chrome finish, a durable stainless steel construction, and a convenient pull-down sprayer for enhanced functionality. The single lever handle provides precise control over water temperature and flow.
Setup and Installation
1. Before You Begin
- Ensure you have all necessary tools: adjustable wrench, Phillips screwdriver, plumber's putty or silicone sealant, safety glasses, and a bucket.
- Turn off the main water supply to your home or the specific hot and cold water lines leading to the installation area.
- Clear the area under the sink for easy access.
2. Removing Your Old Faucet (If Applicable)
- Disconnect the hot and cold water supply lines from the old faucet.
- Unscrew the mounting nuts securing the old faucet to the sink or countertop.
- Lift the old faucet assembly from the sink. Clean the mounting surface thoroughly.
3. Installing the New Faucet
- Place the gasket or O-ring (if provided) on the base of the new faucet.
- Insert the faucet body into the single hole on your sink or countertop.
- From underneath the sink, secure the faucet using the mounting washer and nut. Hand-tighten first, then use a wrench to snug it up, ensuring the faucet is straight.
- Connect the hot and cold water supply lines from the faucet to your home's water supply. Use thread sealant tape on the threads for a watertight seal.
- Attach the pull-down sprayer hose to the quick-connect fitting under the faucet. Ensure it clicks securely into place.
- Install the weight onto the pull-down hose at the marked location (usually 6-8 inches from the end of the hose) to ensure proper retraction.
- If included, install the soap dispenser into its designated hole and secure it from underneath.
4. Final Steps
- Slowly turn on the main water supply.
- Check for any leaks at all connections. Tighten if necessary.
- Run both hot and cold water through the faucet for several minutes to flush out any debris from the lines.
Operating Instructions
Water Flow and Temperature Control
- The single lever handle controls both water flow and temperature.
- To turn on the water, lift the handle upwards. The further you lift, the greater the water flow.
- To adjust temperature, move the handle left for hot water and right for cold water.
- To turn off the water, push the handle downwards.
Using the Pull-Down Sprayer
- To use the sprayer, simply pull the spray head down from the spout. The flexible hose allows for extended reach.
- The spray head typically has buttons or a toggle to switch between stream and spray functions. Press the desired button to change the water pattern.
- When finished, guide the spray head back into the spout. The weight on the hose will assist in its retraction.
Maintenance and Care
Cleaning the Faucet
- Clean the faucet regularly with a soft cloth and mild soap.
- Avoid abrasive cleaners, harsh chemicals, or scouring pads, as these can damage the polished chrome finish.
- Rinse thoroughly with clean water after cleaning and dry with a soft cloth to prevent water spots.
Aerator Maintenance
- If water flow decreases or becomes erratic, the aerator may be clogged.
- Unscrew the aerator from the tip of the spout (you may need an aerator key or pliers with a cloth to protect the finish).
- Rinse out any debris or mineral deposits. For stubborn deposits, soak the aerator in a 50/50 solution of white vinegar and water.
- Reassemble the aerator and screw it back onto the spout.
Troubleshooting
| Problem | Possible Cause | Solution |
|---|---|---|
| Low Water Flow | Clogged aerator; partially closed shut-off valves; kinked supply line. | Clean aerator (see Maintenance); fully open shut-off valves; check supply lines for kinks. |
| Leaks at Connections | Loose connections; worn washers/O-rings. | Tighten connections; replace washers/O-rings if damaged. |
| Faucet Drips | Worn cartridge. | Contact Moen customer support for a replacement cartridge. |
| Sprayer Does Not Retract Fully | Improperly positioned hose weight; obstruction under sink. | Adjust hose weight position; clear any obstructions. |
Specifications
- Brand: Moen
- Model Name: FAUCET KTN SPRING NORI CHROME
- Model Number: 87897
- Mounting Type: Deck Mount
- Installation Type: Single Hole
- Finish Type: Polished
- Material: Stainless Steel
- Color: Chrome
- Number of Handles: 1
- Handle Type: Lever
- Handle Location: Right
- Special Feature: Pull Down Sprayer, Easy to Install
- Spout Design: Pulldown
- Spout Reach: 10 Inches
- Item Weight: 5 pounds
- Product Dimensions: 10 x 10 x 10 inches
- UPC: 026508324349
- Included Components: Moen FAUCET KTN SPRING NORI CHROME 87897 (Faucet Assembly, Soap Dispenser)
Warranty and Support
Moen products are manufactured under the highest standards of quality and workmanship. For warranty information, product registration, or technical assistance, please visit the official Moen website or contact their customer service directly.
Moen Official Website: www.moen.com
Please have your model number (87897) and date of purchase available when contacting support.


