
1. Product Overview
This manual provides instructions for the installation and use of the SCREENARAMA LCD LED screen replacement for HP 14-DQ0054DX and 14-DQ0055DX laptop models. This screen features a matte finish, HD 1366x768 resolution, and a 30-pin connector. It is designed for non-touch laptops.

Image 1: SCREENARAMA 14.0 inch HD 30-pin Matte LCD LED Replacement Screen. This image shows the front view of the replacement screen.
2. Product Features
- Resolution: 1366x768 HD, suitable for non-touch laptops.
- Connector Type: 30-pin connector.
- Surface Finish: Matte finish to reduce glare.
- Compatibility: Specifically designed for HP 14-DQ0054DX and 14-DQ0055DX models.
- Included Accessories: Comes with necessary tools and adhesive tape for DIY installation.
- Warranty: Includes a 2-year warranty.
3. What's Included
Your SCREENARAMA screen replacement package includes the following items:
- 1x SCREENARAMA 14.0" HD 30-pin Matte LCD LED Display
- 1x Set of Installation Tools
- 1x Adhesive Tape

Image 2: Included installation tools. This image displays the various tools provided for screen replacement, including screwdrivers, prying tools, and tweezers.
4. Compatibility and Correct Screen Selection
Before installation, it is crucial to verify that this replacement screen is compatible with your laptop. Incorrect screen selection can lead to damage or malfunction. Please ensure your original screen matches the following specifications:
- Video Connector: Must be 30-pin. This screen is not compatible with 40-pin connectors.
- Resolution: Must be 1366x768 HD. Not compatible with higher resolutions like 1600x900, 1920x1080, or 3840x2160.
- Touchscreen Functionality: This is a non-touch screen. It is not compatible with touchscreen laptops.
- Refresh Rate: Ensure your original screen's refresh rate is compatible (e.g., 60Hz).
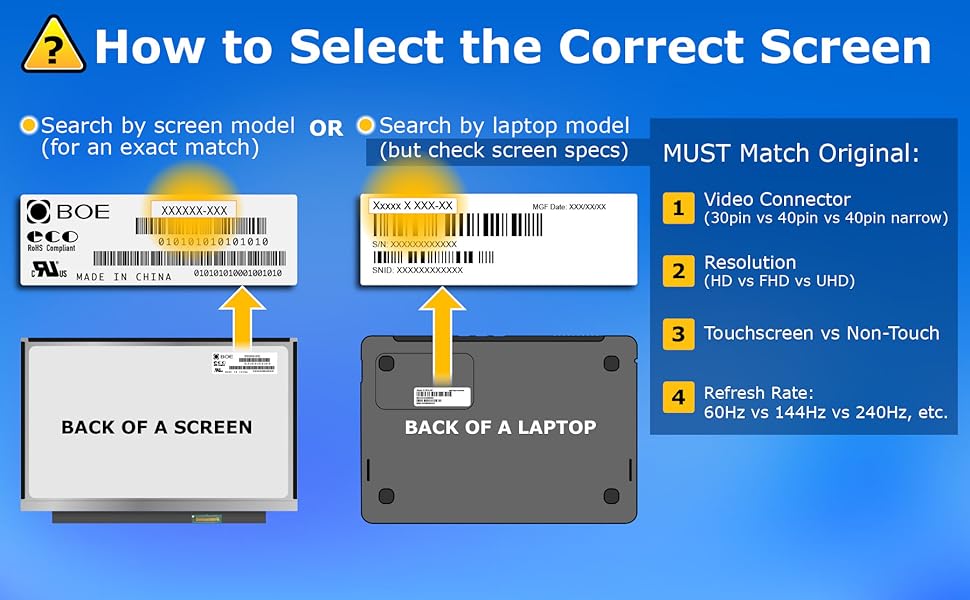
Image 3: Guide on how to select the correct screen. This image illustrates how to find screen model numbers on the back of a screen or laptop and highlights key specifications to match: video connector, resolution, touchscreen vs. non-touch, and refresh rate.

Image 4: Back of a 14.0 inch HD screen, highlighting the 30-pin video connector. This image shows the ribbon cable connector at the bottom of the screen.

Image 5: Visual comparison between a 30-pin video connector (correct) and a 40-pin video connector (incorrect, marked with an 'X'). This helps identify the correct connector type.

Image 6: Resolution compatibility guide. This image shows that the screen works only for 1366x768 resolution and is not compatible with 1600x900, 1920x1080, or 3840x2160 resolutions.

Image 7: Illustration indicating "LCD Screen Only. No Touchscreen." The top image shows a standard LCD, while the bottom image, crossed out, represents a touchscreen.
Video: Screen Specifications Overview
Video 1: This video provides a visual overview of the screen's specifications, including its 14.0-inch size, HD 1366x768 resolution, 30-pin connector, matte finish, and non-touch functionality.
5. Installation Guide (General Steps)
This section provides general steps for replacing a laptop screen. Specific steps may vary depending on your laptop model. Always refer to your laptop's service manual for detailed instructions if available. It is recommended to watch a relevant video tutorial for your specific laptop model before proceeding.
- Power Off and Disconnect: Completely shut down your laptop and disconnect it from the power adapter. Remove the battery if it is external.
- Discharge Static Electricity: Touch a grounded metal object to discharge any static electricity from your body.
- Remove Bezel: Carefully pry off the plastic bezel surrounding the screen. Use the included prying tools to avoid damage.
- Unscrew Old Screen: Locate and remove the screws holding the old screen in place. These are often found on the sides of the screen assembly.
- Disconnect Video Cable: Gently lay the old screen face down on the keyboard. Carefully peel back the tape securing the video cable connector and disconnect the 30-pin cable from the old screen.
- Install New Screen: Connect the 30-pin video cable to the new SCREENARAMA replacement screen. Secure it with the provided adhesive tape.
- Mount New Screen: Position the new screen in the laptop lid and secure it with the screws previously removed.
- Test Screen: Before reattaching the bezel, temporarily connect the battery and power adapter to test the new screen. Power on the laptop to ensure the display functions correctly.
- Reattach Bezel: If the screen functions correctly, power off the laptop, disconnect power, and carefully snap the bezel back into place.
- Final Assembly: Reinstall the battery (if removed) and close the laptop.
Caution: Handle the screen and internal components with care. Avoid touching the screen surface directly. If you are unsure about any step, seek professional assistance.
6. Specifications
| Feature | Specification |
|---|---|
| Screen Size | 14.0 inches |
| Resolution | HD 1366x768 |
| Connector Type | 30-pin |
| Surface Type | Matte |
| Touchscreen | No |
| Backlight Type | LCD LED |
| Package Dimensions | 17 x 11 x 1 inches |
| Item Weight | 1 pound |
| Manufacturer | SCREENARAMA |
7. Troubleshooting
If you encounter issues after installing the new screen, follow these troubleshooting steps:
- No Display / Blank Screen:
- Connect an external monitor to your laptop to confirm the laptop itself is still operational.
- Ensure the video cable is securely connected to both the new screen and the laptop's motherboard. Reconnect it if necessary and secure with tape.
- Verify that the video cable connector is not damaged.
- Confirm the number of pins on the original LCD and the new one are identical (30-pin).
- Dim Image:
- Try connecting the old LCD screen (if it still displays an image, even if broken). If both LCDs do not light up, check the backlight fuse, which is usually located near the video connector on the motherboard.
- Issue Persists: If the problem is the same with both the old and new LCDs, the issue is likely with another component of the laptop (e.g., motherboard, video card).

Image 8: Troubleshooting steps guide. This image outlines common troubleshooting procedures for screen replacement issues, including checking external monitors, cable connections, and backlight fuses.
8. Warranty and Support
This SCREENARAMA replacement screen comes with a 2-year warranty. For warranty claims, technical support, or any questions regarding installation or product functionality, please contact SCREENARAMA customer service through the retailer's platform or visit the official SCREENARAMA website for support options.
Please have your product model number (HP 14-DQ0054DX or 14-DQ0055DX) and purchase details ready when contacting support.
9. Important Safety Information
- Always disconnect power and remove the battery before performing any internal repairs on your laptop.
- Discharge static electricity from your body before handling electronic components.
- Use appropriate tools and follow proper procedures to avoid damaging your laptop or the new screen.
- Keep small parts and tools away from children.
- If you are not comfortable performing the installation yourself, seek professional repair services.