1. Introduction
This manual provides detailed instructions for the installation, operation, and maintenance of the Makerbase MKS Robin Nano V3.1 3D Printer Control Board. The MKS Robin Nano V3.1 is an advanced 32-bit control board designed for 3D printers, offering enhanced processing capabilities and improved anti-interference performance. It supports various firmware options, including Marlin 2.X and Klipper, and is compatible with a range of displays such as the TS35 touch screen, MKS H43, and MINI12864 LCDs.
2. Product Overview
2.1 Key Features
- Enhanced Processing: Features an upgraded STM32F407VET6 MCU for more powerful processing compared to previous versions.
- Improved Stability: Incorporates Schottky diodes in temperature measurement and MOS circuits, and TVS protection for power input to enhance anti-interference performance.
- Wide Compatibility: Designed for use with various 3D printers, including Ender-3, Ender-3 V2, and Ender-3 Pro.
- Display Versatility: Compatible with MKS TS35 touch screen, MKS H43, and MINI12864 LCD displays.
- Firmware Support: Based on Marlin 2.X firmware, allowing for direct use of existing repositories with minor modifications for motherboard type. Klipper firmware is also supported.
- Integrated Components: Includes support for TMC2209 stepper motor drivers and optional WiFi module.
- Printing Options: Supports USB disk printing and TF card printing.
2.2 Package Contents
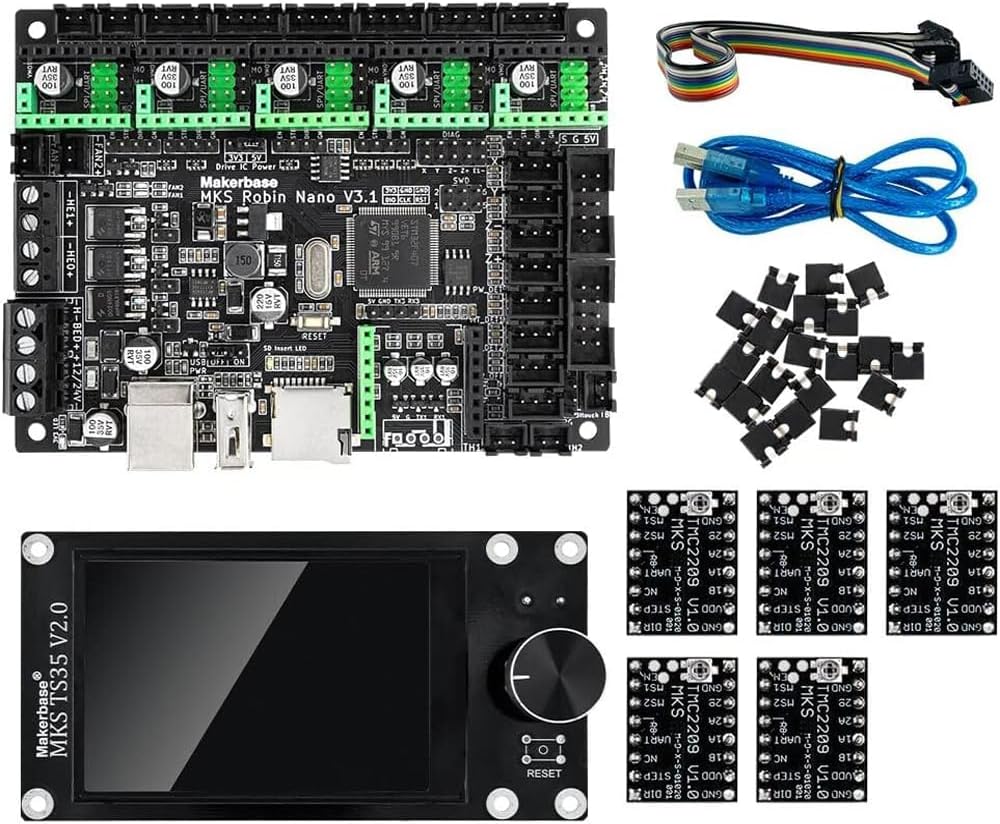
Figure 1: The complete package includes the MKS Robin Nano V3.1 control board, a TS35 touch screen, five TMC2209 stepper motor drivers, and various connection cables (USB, ribbon cable, jumper wires).
2.3 Board Dimensions
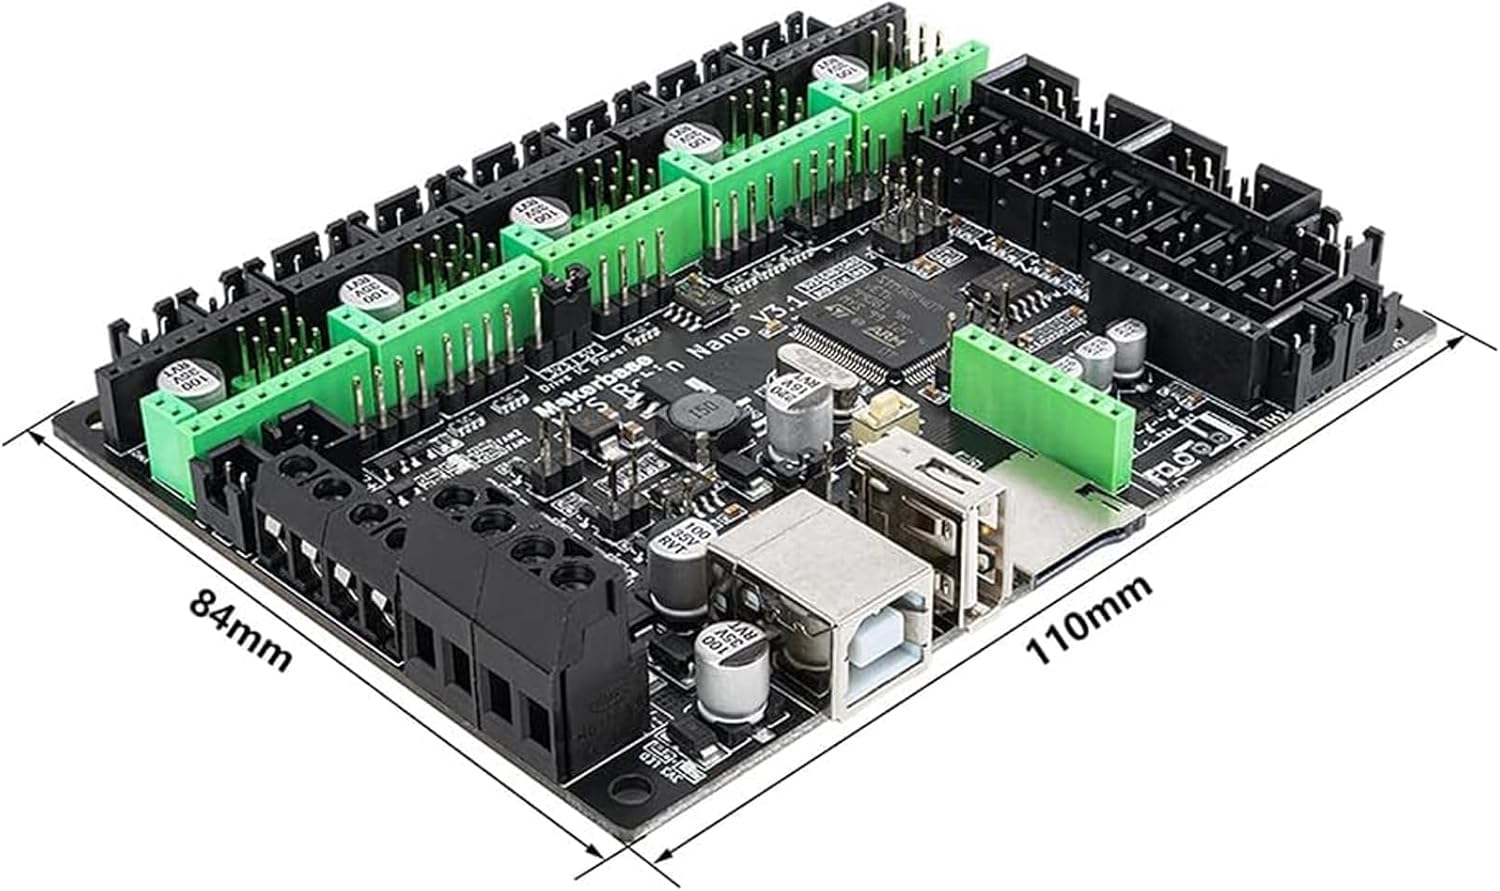
Figure 2: The MKS Robin Nano V3.1 control board measures approximately 110mm in length and 84mm in width.
2.4 TS35 Touch Screen

Figure 3: The MKS TS35 V2.0 touch screen features a color display and a rotary encoder for intuitive control and navigation.
3. Specifications
| Feature | Detail |
|---|---|
| Model | MKS Robin Nano V3.1 |
| Microcontroller (MCU) | STM32F407VET6 |
| Architecture | 32-bit |
| Clock Speed | 168 MHz |
| Flash Memory | 8M (for TS35 module) |
| Input Voltage | 12V-24V DC |
| Logic Voltage | 5 Volts |
| Stepper Driver Support | TMC2209 (UART mode supported) |
| Display Compatibility | MKS TS35, MKS H43, MINI12864, LCD2004 |
| Printing Interface | USB Disk, TF Card |
| Firmware Support | Marlin 2.X, Klipper |
| Connectivity | USB, UART, SPI, I2C, WiFi (optional module) |
| Color | Black |
4. Setup and Installation
Proper installation of the MKS Robin Nano V3.1 board is crucial for safe and reliable operation. Always ensure the power supply is disconnected before performing any installation steps.
4.1 Physical Installation
- Mounting: Secure the MKS Robin Nano V3.1 board within your 3D printer's control box using appropriate standoffs and screws. Ensure it is mounted securely to prevent vibrations.
- Power Connection: Connect the 12V-24V DC power supply to the designated power input terminals on the board. Observe correct polarity.
- Motor Connections: Connect your stepper motors (X, Y, Z, E0, E1) to the corresponding motor driver sockets. Ensure the TMC2209 drivers are correctly inserted into their sockets, paying attention to orientation.
- Heater and Thermistor Connections: Connect the hotend heater (HE0), heated bed (H-BED), and thermistors (TH0, TH1, TH2) to their respective terminals. Double-check connections to prevent damage.
- Endstop Connections: Connect X, Y, Z axis endstops to the appropriate endstop pins.
- Fan Connections: Connect cooling fans (FAN0, FAN1, FAN2) to the designated fan headers.
- Display Connection: Connect the TS35 touch screen or other compatible display using the provided ribbon cable to the EXP1/EXP2 or TFT ports as required.
- Optional Modules: If using a WiFi module or other accessories, connect them to their respective ports (e.g., WiFi module to the dedicated WiFi header).

Figure 4: Pinout diagram illustrating the various connection points on the MKS Robin Nano V3.1 board, including power, motors, heaters, thermistors, and communication ports.

Figure 5: A clear view of the MKS Robin Nano V3.1 board's component layout, highlighting the MCU, stepper driver sockets, and various connectors.
4.2 Firmware Installation
The MKS Robin Nano V3.1 supports Marlin 2.X and Klipper firmware. Refer to the official Makerbase documentation or the respective firmware project's documentation for detailed compilation and flashing instructions.
- Marlin Firmware:
- Download the latest Marlin 2.X source code.
- Configure
Configuration.handConfiguration_adv.hfor your specific printer model and MKS Robin Nano V3.1 board type. Ensure#define MOTHERBOARD BOARD_MKS_ROBIN_NANO_V3_1(or similar, check Makerbase documentation) is correctly set. - Compile the firmware using PlatformIO in VS Code.
- Copy the compiled
firmware.binfile to the root directory of a TF card. - Insert the TF card into the board's slot and power on the printer. The board will automatically flash the new firmware.
- Klipper Firmware:
- Follow the Klipper installation guide for your host device (e.g., Raspberry Pi).
- Compile Klipper firmware for the STM32F407 microcontroller.
- Flash the Klipper firmware to the MKS Robin Nano V3.1 board via USB or TF card, as per Klipper documentation.
- Configure your
printer.cfgfile to match your printer's hardware and the MKS Robin Nano V3.1 board.
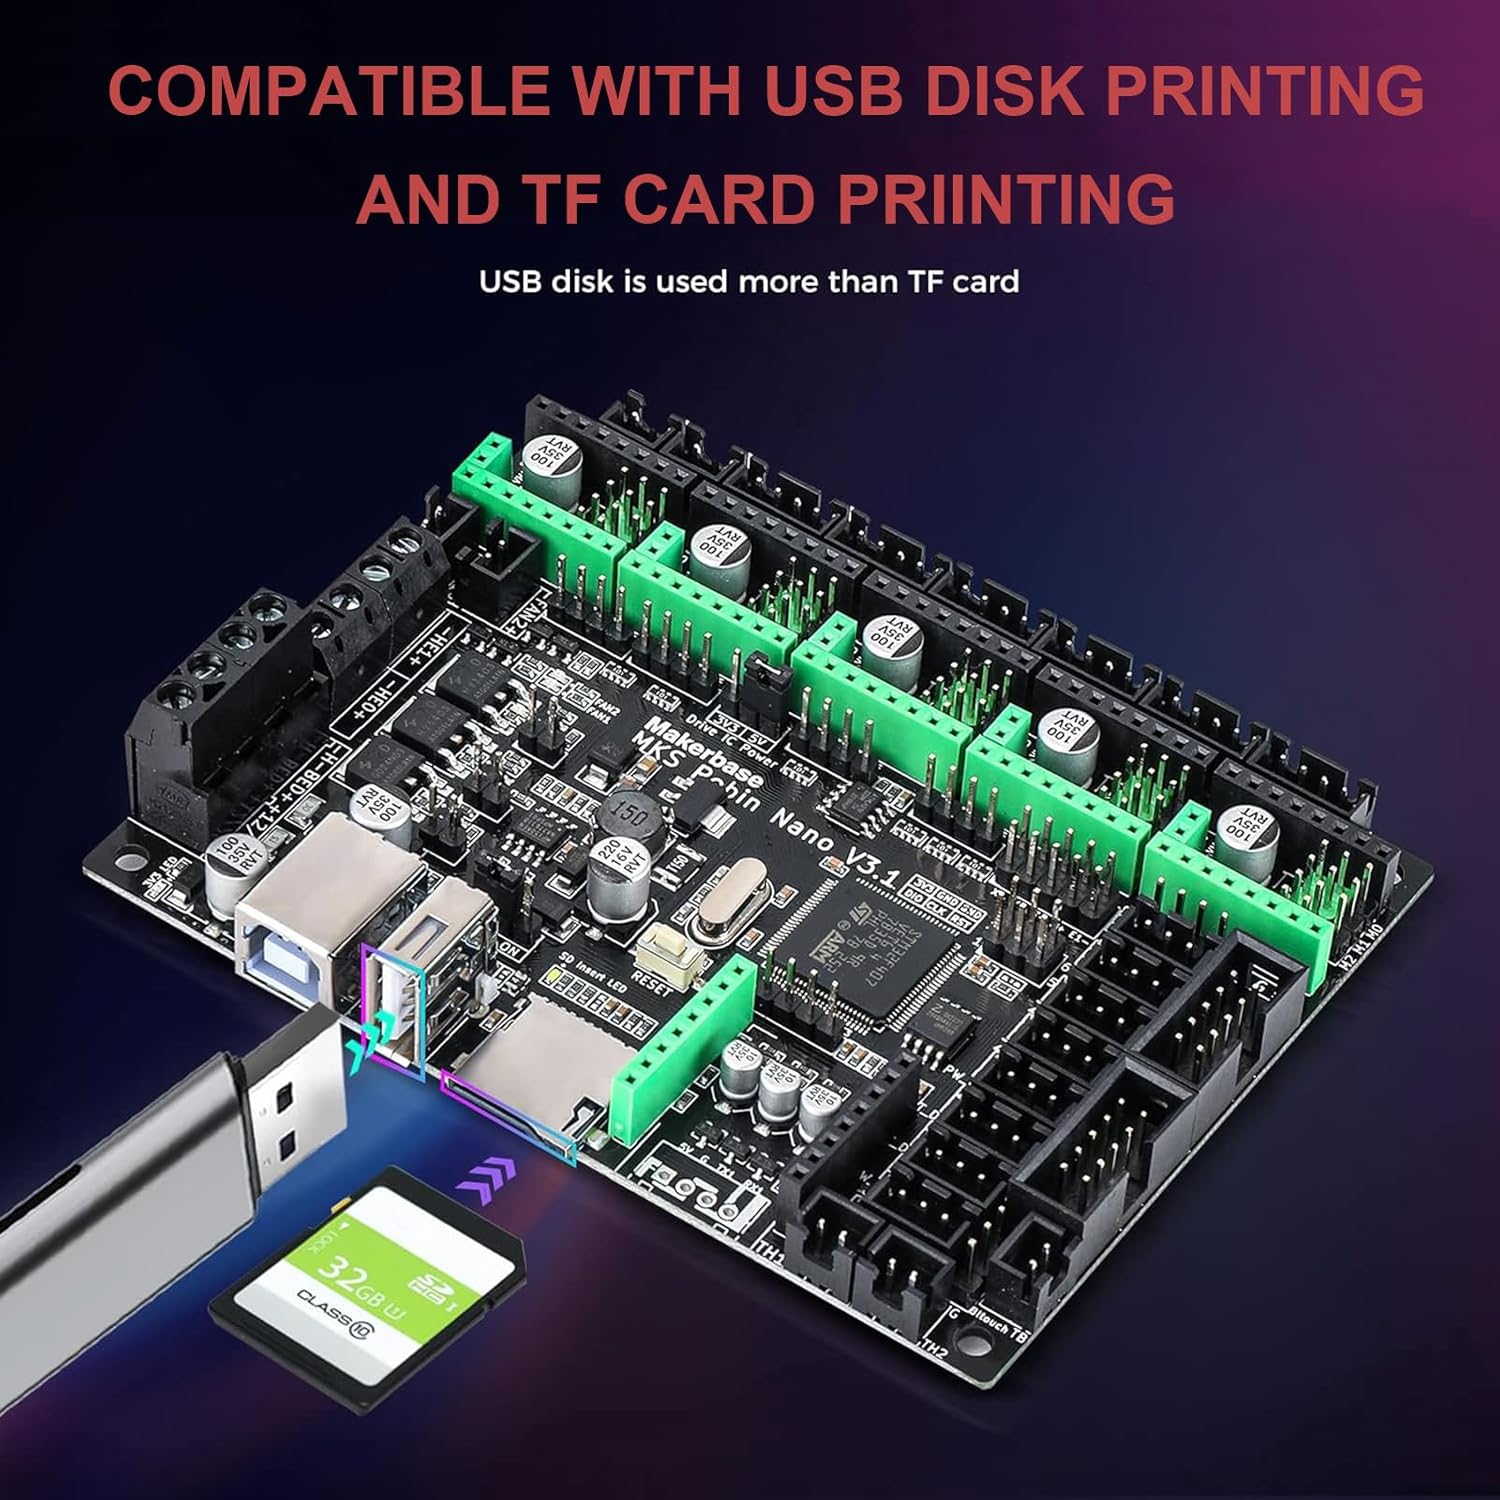
Figure 6: The MKS Robin Nano V3.1 board supports firmware updates and printing directly from a USB disk or TF card.

Figure 7: The MKS Robin Nano V3.1 board offers wide adaptability with different display types, including MKS H43, LCD MINI12864, and the TS35 touch screen.
5. Operating Instructions
Once the MKS Robin Nano V3.1 board is installed and firmware is flashed, you can begin operating your 3D printer.
5.1 Initial Power-Up and Testing
- Power On: Connect the power supply and turn on your 3D printer. The display should light up and show the firmware interface.
- Motor Test: From the display or host software, manually move each axis (X, Y, Z, E) to verify motor functionality and direction. Adjust motor direction in firmware if necessary.
- Heater Test: Briefly preheat the hotend and heated bed to ensure they heat up correctly and thermistors report accurate temperatures. Monitor temperatures closely.
- Endstop Test: Manually trigger each endstop while moving the corresponding axis. The display or host software should indicate when an endstop is triggered.
5.2 Printing from USB/TF Card
- Prepare your G-code file using a slicer software.
- Save the G-code file to a USB disk or TF card.
- Insert the USB disk or TF card into the corresponding slot on the MKS Robin Nano V3.1 board.
- Navigate through the display menu to select the G-code file and start printing.
5.3 Remote Control (with WiFi Module)
If an optional WiFi module is installed and configured, you can control and monitor your printer remotely via a web interface or dedicated application. Refer to the WiFi module's specific instructions for setup and usage.
6. Maintenance
Regular maintenance helps ensure the longevity and optimal performance of your MKS Robin Nano V3.1 control board.
- Dust Removal: Periodically clean the board and surrounding area to prevent dust accumulation, which can lead to overheating or short circuits. Use compressed air or a soft brush.
- Connection Check: Ensure all wire connections are secure and free from corrosion. Loose connections can cause intermittent issues or damage.
- Firmware Updates: Keep your firmware updated to benefit from bug fixes, performance improvements, and new features. Always back up your configuration before updating.
- Environmental Conditions: Operate the board within recommended temperature and humidity ranges. Avoid exposing it to excessive heat, moisture, or static electricity.
7. Troubleshooting
This section addresses common issues you might encounter with the MKS Robin Nano V3.1 board.
- Board Not Powering On:
- Check power supply connections and ensure correct voltage (12V-24V).
- Verify power supply functionality.
- Inspect for any visible damage or short circuits on the board.
- Display Not Working:
- Ensure the ribbon cable is correctly connected to both the board and the display.
- Verify that the firmware is configured for the specific display type you are using.
- Check for any bent pins on the display connectors.
- Motors Not Moving or Moving Incorrectly:
- Confirm stepper motor drivers (TMC2209) are correctly inserted and configured in firmware (e.g., UART mode).
- Check motor wiring for correct pinout and secure connections.
- Verify motor current settings in firmware.
- Heaters Not Heating or Incorrect Temperature Readings:
- Check heater and thermistor wiring for secure connections and correct polarity.
- Ensure thermistor type is correctly configured in firmware.
- Inspect heaters and thermistors for physical damage.
- Firmware Flashing Issues:
- Ensure the
firmware.binfile is in the root directory of a FAT32 formatted TF card. - Verify the TF card is properly inserted.
- Check that the firmware is compiled for the correct board type (MKS Robin Nano V3.1).
- Ensure the
8. Warranty and Support
For warranty information and technical support, please contact the seller or the manufacturer, Makerbase, directly. Keep your proof of purchase for warranty claims.
Additional resources and community support for Makerbase products and 3D printer firmware (Marlin, Klipper) can often be found on online forums and official documentation websites.