Introduction
This manual provides comprehensive instructions for the safe and efficient operation, installation, and maintenance of your COWSAR Commercial Cube Ice Maker, Model Z4790. Please read this manual thoroughly before using the appliance and retain it for future reference.

Figure 1: Front view of the COWSAR Commercial Cube Ice Maker, Model Z4790, showcasing its stainless steel finish and the transparent lid of the ice storage compartment.
Safety Instructions
- Ensure the appliance is placed on a stable, level surface.
- Do not block ventilation openings.
- Connect to a grounded power outlet only.
- Keep the appliance upright for at least 24 hours before initial use.
- Do not use mechanical devices or other means to accelerate the defrosting process, other than those recommended by the manufacturer.
- This appliance is not intended for use by persons (including children) with reduced physical, sensory or mental capabilities, or lack of experience and knowledge, unless they have been given supervision or instruction concerning use of the appliance by a person responsible for their safety.
Setup and Installation
Proper setup is crucial for optimal performance and longevity of your ice maker.
Unpacking
- Carefully remove all packaging materials.
- Inspect the ice maker for any shipping damage. Report any damage to your supplier immediately.
- Ensure all accessories are present: ice scoop, water hose, drain hose.
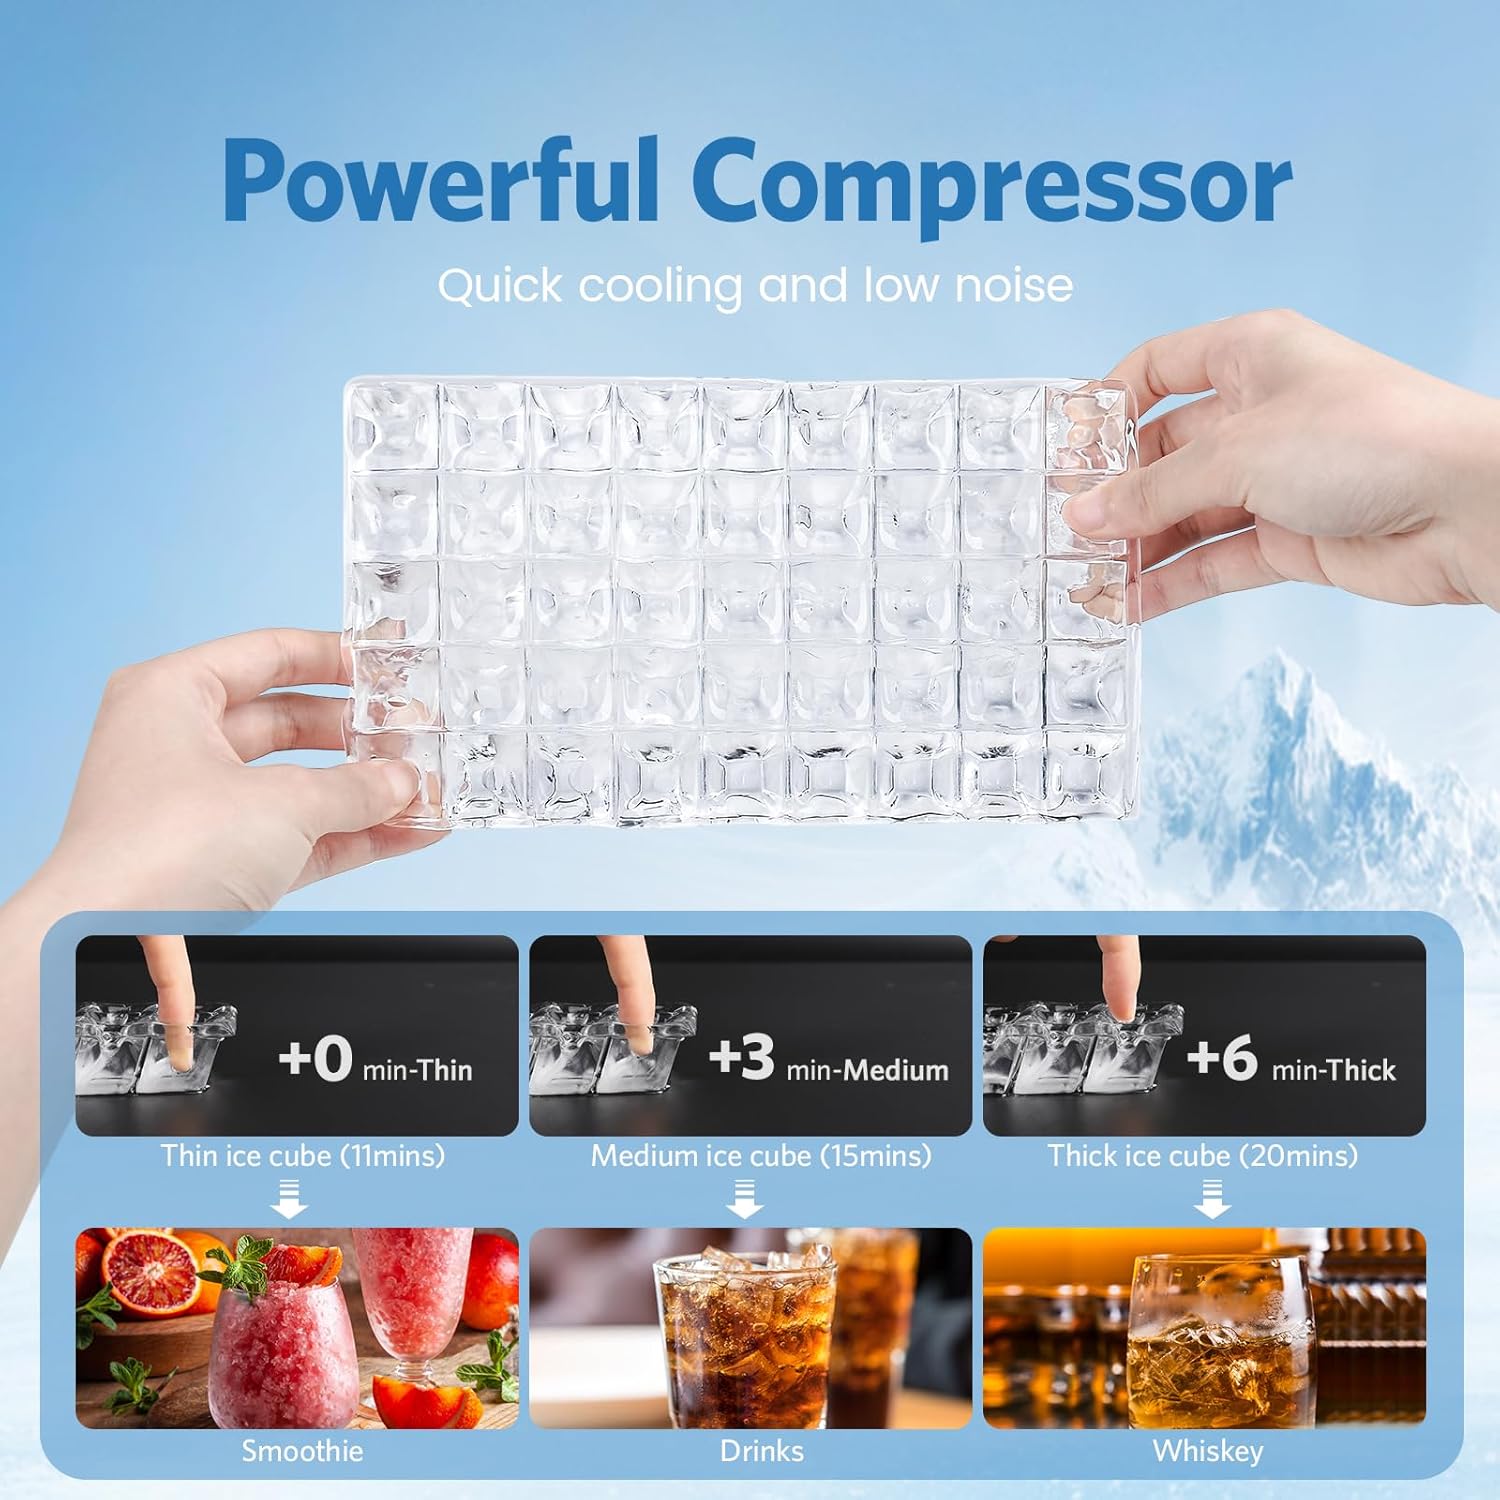
Figure 2: Diagram illustrating the dimensions of the ice maker (15.87"D x 17.52"W x 31.3"H) and showing the included water hose, drain hose, and plastic ice scoop.
Placement
- Place the ice maker on a firm, level surface capable of supporting its weight when full of ice and water.
- Allow adequate clearance around the unit for proper ventilation (at least 5 inches from walls).
- Avoid direct sunlight or heat sources.
- Ensure the ambient temperature is within the recommended operating range (typically 50°F to 90°F / 10°C to 32°C).
Water and Drainage Connection
The ice maker requires a continuous water supply and a gravity drainage system.
- Connect the provided water hose to the water inlet on the back of the machine and to a potable water supply. Ensure connections are secure to prevent leaks.
- Connect the drain hose to the drain outlet on the back of the machine and route it to a floor drain or suitable drainage point. Ensure the drain hose has a continuous downward slope for gravity drainage.

Figure 3: Close-up view of the rear of the ice maker, highlighting the water inlet and drain inlet connections for proper plumbing setup.
Initial Preparation
- After placement and connection, allow the unit to stand upright for at least 24 hours before plugging it in. This allows the refrigerant to settle.
- Before making the first batch of ice, perform a cleaning cycle as described in the "Maintenance" section.
Operating Instructions
The COWSAR ice maker features an intuitive LCD control panel for easy operation.

Figure 4: Detailed view of the LCD control panel, showing indicators for ice thickness, timer, cleaning, ice making status, and full ice alert, along with Power, Mode, Time (+), and Size (-) buttons.
Control Panel Functions
- LCD Display: Shows ambient temperature, current status, and timer settings.
- POWER Button: Turns the unit on or off.
- MODE Button: Used to select different modes, including initiating the cleaning program.
- + / - Buttons (Time/Size Control): Adjusts ice making duration to modify ice cube thickness and sets timer.
- Indicators: Icons for Ice Making, Cleaning, Full Ice Alert, and Timer.
Ice Making Process
- Ensure the unit is properly connected to water and power.
- Press the POWER button to turn on the ice maker.
- The machine will automatically begin the ice making cycle. The display will show the current ambient temperature.
- Adjusting Ice Cube Thickness: Use the + or - buttons to adjust the ice making duration.
- Adding time increases ice thickness (e.g., for whiskey).
- Reducing time decreases ice thickness (e.g., for smoothies).
- The ice maker produces approximately 45 ice cubes per cycle, with a total capacity of 100 lbs per 24 hours.

Figure 5: Illustration demonstrating how to adjust ice cube thickness by modifying the ice-making duration, showing examples for thin (11 mins), medium (15 mins), and thick (20 mins) ice cubes suitable for various beverages.
Ice Full Reminder
When the ice storage bin reaches its maximum capacity (approximately 29 lbs), the "Ice Full" indicator on the control panel will illuminate, and the machine will pause ice production. Empty the ice bin promptly to resume operation and prevent overflow.
Timer Function
The 24-hour timer allows you to schedule ice production. Use the + or - buttons to set the desired delay for the machine to start or stop.

Figure 6: Visual representation of the 24-hour timer function, illustrating its utility for scheduling ice production during off-peak hours (Night Mode) or ensuring ice is ready for business operations (Day Mode).
Maintenance
Regular cleaning and maintenance ensure the longevity and hygienic operation of your ice maker.
Self-Cleaning Feature
The ice maker is equipped with a self-cleaning function. It is recommended to perform this cycle regularly based on usage frequency.
- Ensure the unit is connected to both water supply and drainage.
- Press and hold the MODE button for more than 5 seconds to enter the "Cleaning Program".
- The machine will perform two cleaning cycles, typically lasting 30 minutes.
- After the cleaning program completes, the unit will return to standby mode.

Figure 7: Diagram showing the control panel and the process to activate the self-cleaning function by pressing and holding the "Mode" button for 3 seconds, initiating a 30-minute cleaning cycle.
Manual Cleaning
- Exterior: Wipe the exterior with a soft cloth and mild detergent. Do not use abrasive cleaners.
- Interior: For thorough cleaning, unplug the unit, drain any remaining water, and wipe down the ice storage bin and ice-making components with a solution of water and white vinegar or a food-grade sanitizer. Rinse thoroughly with clean water.
- Condenser: Periodically clean the condenser coils (located at the back or bottom) with a brush or vacuum cleaner to ensure efficient operation.
Troubleshooting
Refer to the table below for common issues and their solutions.
| Problem | Possible Cause | Solution |
|---|---|---|
| Ice maker not producing ice. | No water supply; clogged water filter; ambient temperature too high; unit not plugged in. | Check water connection and supply; clean or replace water filter; ensure proper ventilation and lower room temperature; verify power connection. |
| Ice cubes are too thin or too thick. | Ice making duration setting is incorrect. | Adjust ice making duration using the + or - buttons on the control panel. |
| "Ice Full" indicator is on, but bin is not full. | Ice sensor is obstructed or dirty. | Clean the ice sensor located inside the ice bin. |
| Water leakage. | Loose water or drain hose connections; clogged drain. | Tighten all hose connections; clear any obstructions in the drain hose. |
| Unusual noise during operation. | Unit not level; fan obstruction; compressor issue. | Ensure unit is level; check for obstructions around fan; if noise persists, contact customer support. |
Specifications
| Feature | Detail |
|---|---|
| Brand | COWSAR |
| Model Name | Z4790 |
| Product Dimensions (D x W x H) | 15.87" x 17.52" x 31.3" |
| Ice Production Capacity | 100 lbs / 24 hours |
| Ice Storage Capacity | 29 lbs |
| Ice Cubes per Cycle | 45 cubes / 14 minutes |
| Wattage | 250 watts |
| Voltage | 110 Volts |
| Refrigerant | R290a |
| Material | Stainless Steel |
| Item Weight | 71.3 pounds |
| Installation Type | Undercounter |
| Included Components | Plastic ice scoop, water hose, drain hose |
Warranty and Support
For warranty information, technical support, or service inquiries, please contact COWSAR customer support. Details can typically be found on the product packaging or the official COWSAR website.
When contacting support, please have your model number (Z4790) and purchase date available.
You can visit the COWSAR Store for more information: COWSAR Official Store