1. Introduction
This manual provides essential information for the installation, operation, and maintenance of your Qolsys IQ Panel 4. The IQ Panel 4 is an all-in-one touchscreen security and smart home control panel designed for comprehensive connectivity and reliability.
It features a 7-inch HD touchscreen, an 8-megapixel panel camera with Flex-Tilt, and a QuadSound speaker system. The panel supports various wireless technologies including LTE, Wi-Fi, Z-Wave, Bluetooth, PowerG, and legacy security wireless protocols.
2. Safety Information
- Power Source: Only use the specified power adapter provided with the device. Using an incorrect power source may damage the unit and void the warranty.
- Placement: Install the panel in a dry, indoor location away from direct sunlight, extreme temperatures, and high humidity. Ensure proper ventilation around the device.
- Cleaning: Disconnect power before cleaning. Use a soft, dry cloth. Do not use liquid cleaners or aerosol sprays.
- Servicing: Do not attempt to service this product yourself. Refer all servicing to qualified service personnel.
- Camera: The integrated camera is for security and monitoring purposes. Ensure privacy settings are configured according to your preferences.
3. Package Contents
Verify that all items are present in the package:
- Qolsys IQ Panel 4 (IQP4004)
- Power Supply
- Mounting Hardware (screws, anchors)
- Quick Guide (if applicable)
4. Setup
4.1 Mounting the Panel
The IQ Panel 4 can be wall-mounted or placed on a table using the SmartMount installation system. For wall mounting, ensure the chosen location is central and within Wi-Fi range.
- Identify a suitable location for the panel.
- Use the mounting bracket (if included) as a template to mark drill holes.
- Drill pilot holes and insert wall anchors if necessary.
- Secure the mounting bracket to the wall using the provided screws.
- Carefully attach the IQ Panel 4 to the mounting bracket.
4.2 Powering On
Connect the power supply to the panel's power input port and then plug it into a standard electrical outlet. The panel will automatically power on and begin its boot sequence.
4.3 Initial Configuration
Follow the on-screen prompts to complete the initial setup, which typically includes:
- Selecting your language.
- Connecting to a Wi-Fi network.
- Setting the date and time.
- Creating a master user code.
5. Operating the IQ Panel 4
The 7-inch touchscreen provides intuitive control over your security system and smart home devices.
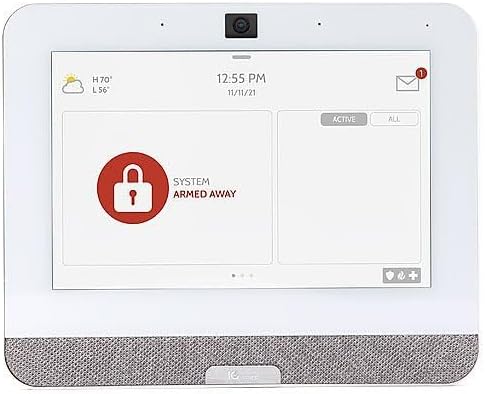
Figure 5.1: The IQ Panel 4 display when the system is armed in 'Away' mode, indicated by a red padlock icon and corresponding text.
5.1 Arming and Disarming
- Arm Stay: Arms the perimeter sensors while allowing movement inside. Tap the "Arm Stay" icon and enter your code.
- Arm Away: Arms all sensors, including interior motion detectors. Tap the "Arm Away" icon and enter your code.
- Disarm: To disarm the system, tap the "Disarm" icon and enter your master code.
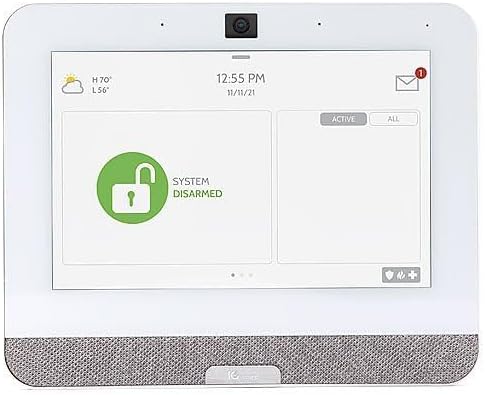
Figure 5.2: The IQ Panel 4 display when the system is disarmed, indicated by a green unlocked padlock icon and corresponding text.
5.2 Camera Features
The 8-megapixel panel camera supports various functions:
- Disarm Photos: The camera can capture an image when the system is disarmed.
- Peek-in: Allows remote viewing of the panel's camera feed.
- Alarm Videos: Records video clips during alarm events.
- Flex-Tilt: Adjust the camera angle for optimal viewing.
5.3 Smart Home Control
The IQ Panel 4 integrates with Z-Wave devices, allowing control of lights, locks, thermostats, and more directly from the panel or a connected smartphone app.
5.4 Bluetooth Touchless Disarming
Enable Bluetooth Touchless Disarming in settings to automatically disarm your system when your paired smartphone is detected within range.
6. Maintenance
- Screen Cleaning: Use a soft, lint-free cloth to clean the touchscreen. For stubborn smudges, slightly dampen the cloth with water. Do not spray cleaners directly onto the screen.
- Software Updates: The IQ Panel 4 receives over-the-air (OTA) software updates. Ensure your panel is connected to Wi-Fi to receive these updates, which provide new features and security enhancements.
- Battery Backup: The panel includes a backup battery. Periodically check the battery status in the system settings. If the battery needs replacement, contact qualified service personnel.
7. Troubleshooting
| Problem | Possible Cause | Solution |
|---|---|---|
| Panel not powering on | No power from outlet; power supply disconnected or faulty. | Check power outlet; ensure power supply is securely connected to panel and outlet. |
| Cannot connect to Wi-Fi | Incorrect Wi-Fi password; out of range; router issue. | Verify password; move panel closer to router; restart router. |
| System not arming | Open sensor (door/window); system error. | Check all sensors are closed; review system messages for errors. |
| Touchscreen unresponsive | Temporary software glitch. | Perform a soft reboot (refer to system settings for option) or power cycle the device. |
8. Specifications
- Model: IQP4004
- Screen Size: 7 Inches (HD, Capacitive glass multi-touch)
- Camera: 8 Megapixel Panel Camera with Flex-Tilt
- Storage: 16GB NAND Flash
- Audio: QuadSound 4x front-facing 4W speakers, 85-decibel siren
- Wireless Connectivity: LTE, Wi-Fi, Z-Wave, Bluetooth, PowerG, 319.5MHz
- Dimensions (Package): 12.32 x 7.24 x 2.13 inches
- Weight (Item): 1.72 pounds
- Color: White
- Compatible Devices: Smartphone (for app control)
9. Warranty and Support
Qolsys products are covered by a limited warranty. For specific warranty terms and conditions, please refer to the warranty card included with your product or visit the official Qolsys website.
For technical support, troubleshooting assistance, or service inquiries, please contact your authorized Qolsys dealer or installer. You may also find additional resources, FAQs, and support documentation on the Qolsys official website.
Note: Unauthorized modifications or repairs to the device will void the warranty.


