1. Introduction
Welcome to the Retrotech R36S Handheld Video Game Console user manual. This guide provides essential information for setting up, operating, maintaining, and troubleshooting your device. Please read this manual thoroughly to ensure optimal performance and longevity of your console.
The Retrotech R36S is a portable gaming device designed to deliver a classic gaming experience with modern convenience. It features a 3.5-inch IPS screen, a vast library of built-in games, and a compact design for gaming on the go.
2. Package Contents
Before you begin, please verify that all items are present in your package:
- Retrotech R36S Handheld Video Game Console
- 64GB TF Cards (2X)
- USB-C Charge Cable
- Screen Protector
- Instruction Manual (this document)
3. Product Overview
Familiarize yourself with the physical components of your Retrotech R36S console.

Figure 3.1: Front view of the Retrotech R36S Handheld Console, showing the screen, D-pad, action buttons (X, Y, A, B), start, select, FN buttons, and dual analog sticks.

Figure 3.2: Retrotech R36S console displaying key features such as HD display, 15,000+ games, open source, save & load functionality, 21 emulators, and included 64GB TF cards and USB-C charge cable.

Figure 3.3: Side view of the Retrotech R36S Handheld Console, highlighting the power button, volume buttons, and the TF2-GAME card slot.
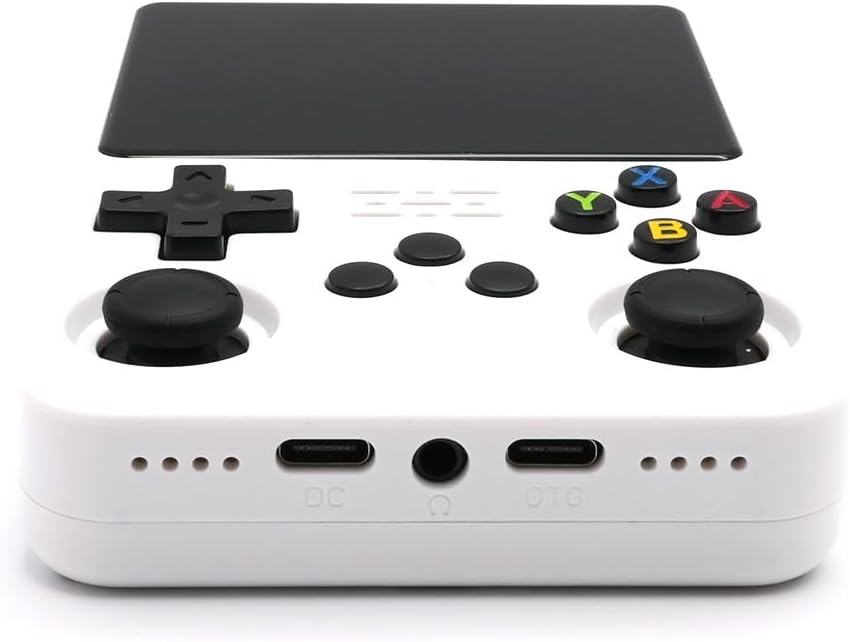
Figure 3.4: Bottom view of the Retrotech R36S Handheld Console, showing the DC (charging) USB-C port, 3.5mm headphone jack, and OTG (On-The-Go) USB-C port.
4. Setup Instructions
4.1. Initial Charging
Before first use, fully charge the console. Connect the included USB-C charge cable to the DC port on the bottom of the console and plug the other end into a compatible USB power adapter (not included) or a computer USB port. The charging indicator light will illuminate and turn off once fully charged.
4.2. Inserting TF Cards
The Retrotech R36S uses two TF (microSD) cards: one for the operating system and one for games. Ensure both cards are properly inserted into their respective slots. The TF1 slot is typically for the system, and the TF2-GAME slot is for game storage. Gently push the cards until they click into place.
4.3. Powering On/Off
- To Power On: Press and hold the Power button (located on the top left side) for a few seconds until the screen illuminates.
- To Power Off: Press and hold the Power button until a power-off menu appears on the screen. Select 'Shutdown' or 'Power Off' to safely turn off the device. A quick press of the power button will put the device into sleep mode.
5. Operating Instructions
5.1. Navigation
Use the D-pad or the left analog stick to navigate through the console's menu interface. The 'A' button typically confirms selections, and the 'B' button usually acts as a back or cancel function.
5.2. Playing Games
- From the main menu, navigate to the desired emulator or game library.
- Select a game from the list using the D-pad or analog stick and press 'A' to launch it.
- Follow any on-screen prompts to start playing.
5.3. Saving Game Progress
The R36S console supports in-game saving and often features system-level save states. Refer to the specific emulator or game instructions for saving progress. Typically, pressing the 'FN' button combined with another button (e.g., 'FN' + 'R1') can access quick save/load menus.
5.4. Volume Control
Adjust the game volume using the dedicated volume buttons located on the top right side of the console.
5.5. Connecting to a TV/Monitor
The console can be connected to a TV or monitor for a larger screen experience. This typically requires a USB-C to AV or HDMI adapter (not included) connected to the OTG USB-C port. Ensure your TV/monitor is set to the correct input source.
6. Maintenance
6.1. Cleaning
Use a soft, dry, lint-free cloth to clean the console's screen and body. For stubborn smudges, slightly dampen the cloth with water. Avoid using harsh chemicals, abrasive cleaners, or solvents, as these can damage the device.
6.2. Storage
When not in use, store the console in a cool, dry place away from direct sunlight, extreme temperatures, and high humidity. Keep it protected from dust and physical impact.
6.3. Battery Care
To prolong battery life, avoid fully discharging the battery frequently. If storing the console for an extended period, charge it to approximately 50% before storage and recharge it every few months to prevent deep discharge.
7. Troubleshooting
If you encounter issues with your Retrotech R36S, please refer to the following common problems and solutions:
| Problem | Possible Solution |
|---|---|
| Console does not power on. | Ensure the battery is charged. Connect the console to a power source and try again. Check if the TF cards are properly inserted. |
| Games are not loading or appear corrupted. | Verify that the game TF card (TF2-GAME) is correctly inserted. Ensure game files are not corrupted. Try restarting the console. |
| Screen is unresponsive or frozen. | Perform a soft reset by holding the Power button for an extended period (e.g., 10-15 seconds) until the device powers off, then restart. |
| No sound or low volume. | Check the volume buttons on the console. Ensure headphones are not connected if you expect sound from the speakers. |
| Console does not charge. | Verify the USB-C cable is securely connected to the DC port and the power source. Try a different USB-C cable or power adapter. |
If the problem persists after attempting these solutions, please contact Retrotech customer support for further assistance.
8. Specifications
Key technical specifications for the Retrotech R36S Handheld Video Game Console:
- Screen Size: 3.5 Inches
- Display Type: IPS
- Controller Type: Button Control
- Power Source: Battery Powered
- Battery Description: Lithium-Ion
- Hardware Interface: USB (USB-C)
- Memory Storage Capacity: 64 GB (via TF cards)
- Material: Plastic
- Product Dimensions: 7 x 5 x 2 inches
- Item Weight: 10.6 ounces (0.3 Kilograms)
- Recommended Age: 8 years and up
9. Warranty Information
Retrotech products are manufactured to high-quality standards. For specific warranty terms and conditions, please refer to the documentation included with your purchase or visit the official Retrotech brand store. Keep your proof of purchase for any warranty claims.
10. Customer Support
For technical assistance, troubleshooting not covered in this manual, or warranty inquiries, please contact Retrotech customer support through the official channels. You can find more information and contact details by visiting the Retrotech Store on Amazon.