1. Introduction
Thank you for choosing the Clarion MCD360V Electronic Crossover. This versatile 3-Way Electronic Crossover is designed to enhance your car audio system by providing precise control over audio frequencies, allowing for optimal sound staging and clarity. It supports two- or three-way system setups with rear fader control and includes a wired remote subwoofer level control for convenient bass adjustment.
This manual provides detailed instructions for the proper installation, operation, and maintenance of your MCD360V unit. Please read this manual thoroughly before using the product to ensure correct usage and to prevent damage.
2. Safety Information
To ensure safe operation and prevent damage to the unit or your vehicle, please observe the following precautions:
- Professional Installation Recommended: Installation of this product requires technical expertise. It is highly recommended to have the unit installed by a qualified professional.
- Power Supply: Connect the unit only to a 12V DC negative ground power supply.
- Wiring: Ensure all wiring is securely connected and properly insulated to prevent short circuits. Use appropriate gauge wires for power and ground connections.
- Mounting: Mount the unit securely in a location that does not obstruct driving, interfere with vehicle safety systems, or expose it to excessive heat, moisture, or vibration.
- Volume Levels: Avoid operating your audio system at excessively high volume levels for prolonged periods, as this can cause hearing damage.
- Ground Loop Isolation: The unit features a ground loop isolation circuit to minimize noise, but proper grounding is still crucial.
3. Product Overview
The Clarion MCD360V is a full-featured three-way electronic crossover designed for precise audio control. It allows you to select from a wide range of crossover points for front, rear, and subwoofer outputs.
Key Features:
- 6/4/2 Channel RCA Inputs
- 6 Channel /5 Volt RCA Outputs
- Adjustable Level Output for Front, Rear, & Subwoofer
- Adjustable High & Low Pass Crossover w/Frequency Multiplier
- Non Fade Low Pass Output
- Subwoofer Equalizer Bass Boost Control
- Remote Subwoofer Level Control
- Ground Loop Isolation Circuit
- Gold Plated RCA & Power Connections
Component Identification:
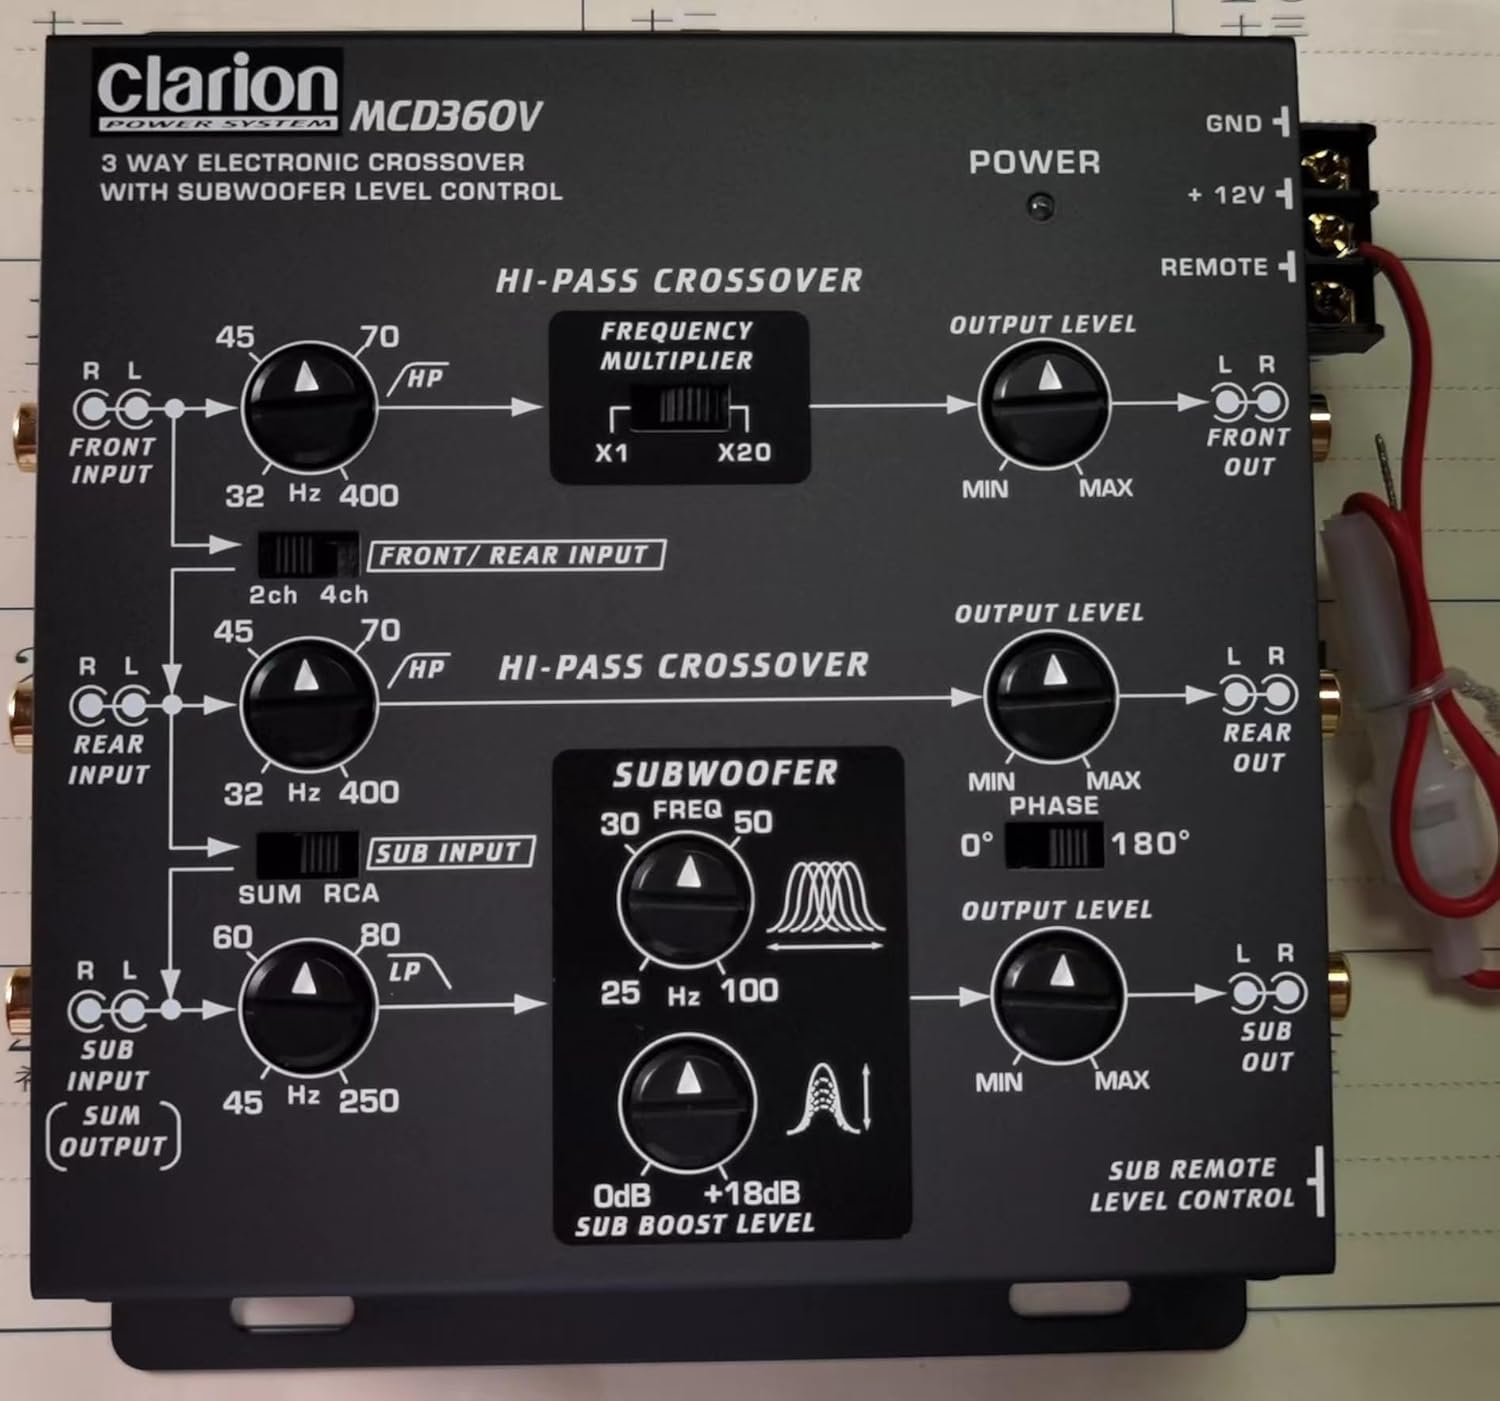
Figure 3.1: Top Panel Controls
This image displays the top panel of the MCD360V, highlighting the various control knobs for high-pass crossover, frequency multiplier, output levels, subwoofer frequency, bass boost, and phase adjustment. It also shows the input and output labels for easy identification.

Figure 3.2: Remote Subwoofer Level Control
This image shows the wired remote control unit for the subwoofer level, along with the screws and faceplates for mounting. This remote allows for convenient adjustment of the subwoofer output from the driver's seat.
4. Setup and Installation
Proper installation is crucial for optimal performance. Follow these steps carefully:
4.1 Mounting the Unit:
- Choose a dry, well-ventilated location away from direct sunlight, heat sources, and moisture.
- Ensure sufficient space around the unit for proper ventilation and cable routing.
- Secure the unit using appropriate screws to a solid surface in your vehicle.
4.2 Wiring Connections:
All connections should be made with the vehicle's battery disconnected to prevent short circuits.
- Power Connection (+12V): Connect the +12V terminal of the crossover to the positive terminal of the vehicle's battery via a fused power cable. The fuse should be located as close to the battery as possible.
- Ground Connection (GND): Connect the GND terminal to a clean, unpainted metal part of the vehicle chassis. Ensure a good electrical contact.
- Remote Turn-On (REMOTE): Connect the REMOTE terminal to the remote turn-on output of your head unit or amplifier. This will turn the crossover on and off with your audio system.
- RCA Inputs: Connect the RCA outputs from your head unit to the corresponding RCA inputs on the MCD360V (FRONT INPUT, REAR INPUT, SUB INPUT). The unit supports 6/4/2 channel RCA inputs.
- RCA Outputs: Connect the RCA outputs from the MCD360V (FRONT OUT, REAR OUT, SUB OUT) to the RCA inputs of your amplifiers.
- Remote Subwoofer Level Control: Connect the remote control cable to the dedicated port on the MCD360V and mount the remote control unit in a convenient location within reach of the driver.
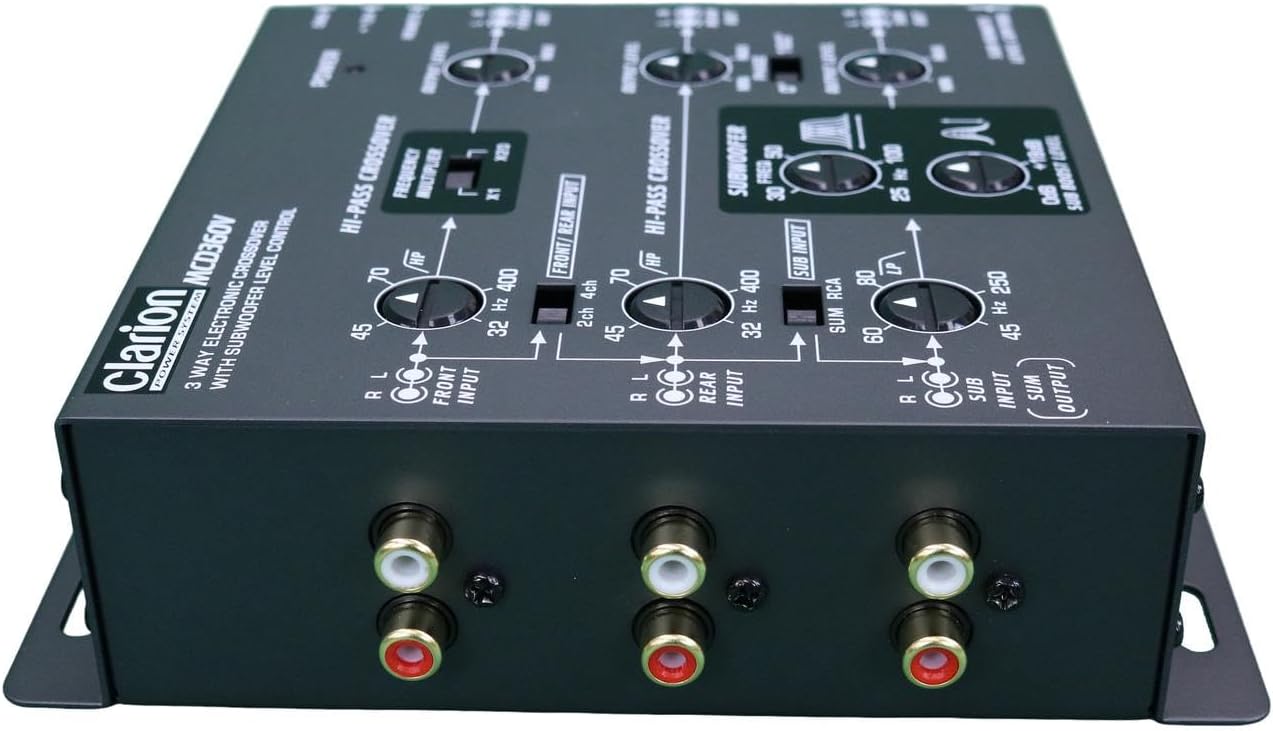
Figure 4.1: RCA Connections
This image provides a clear view of the RCA input and output jacks on the MCD360V, illustrating where to connect your head unit and amplifiers for a complete audio system setup.
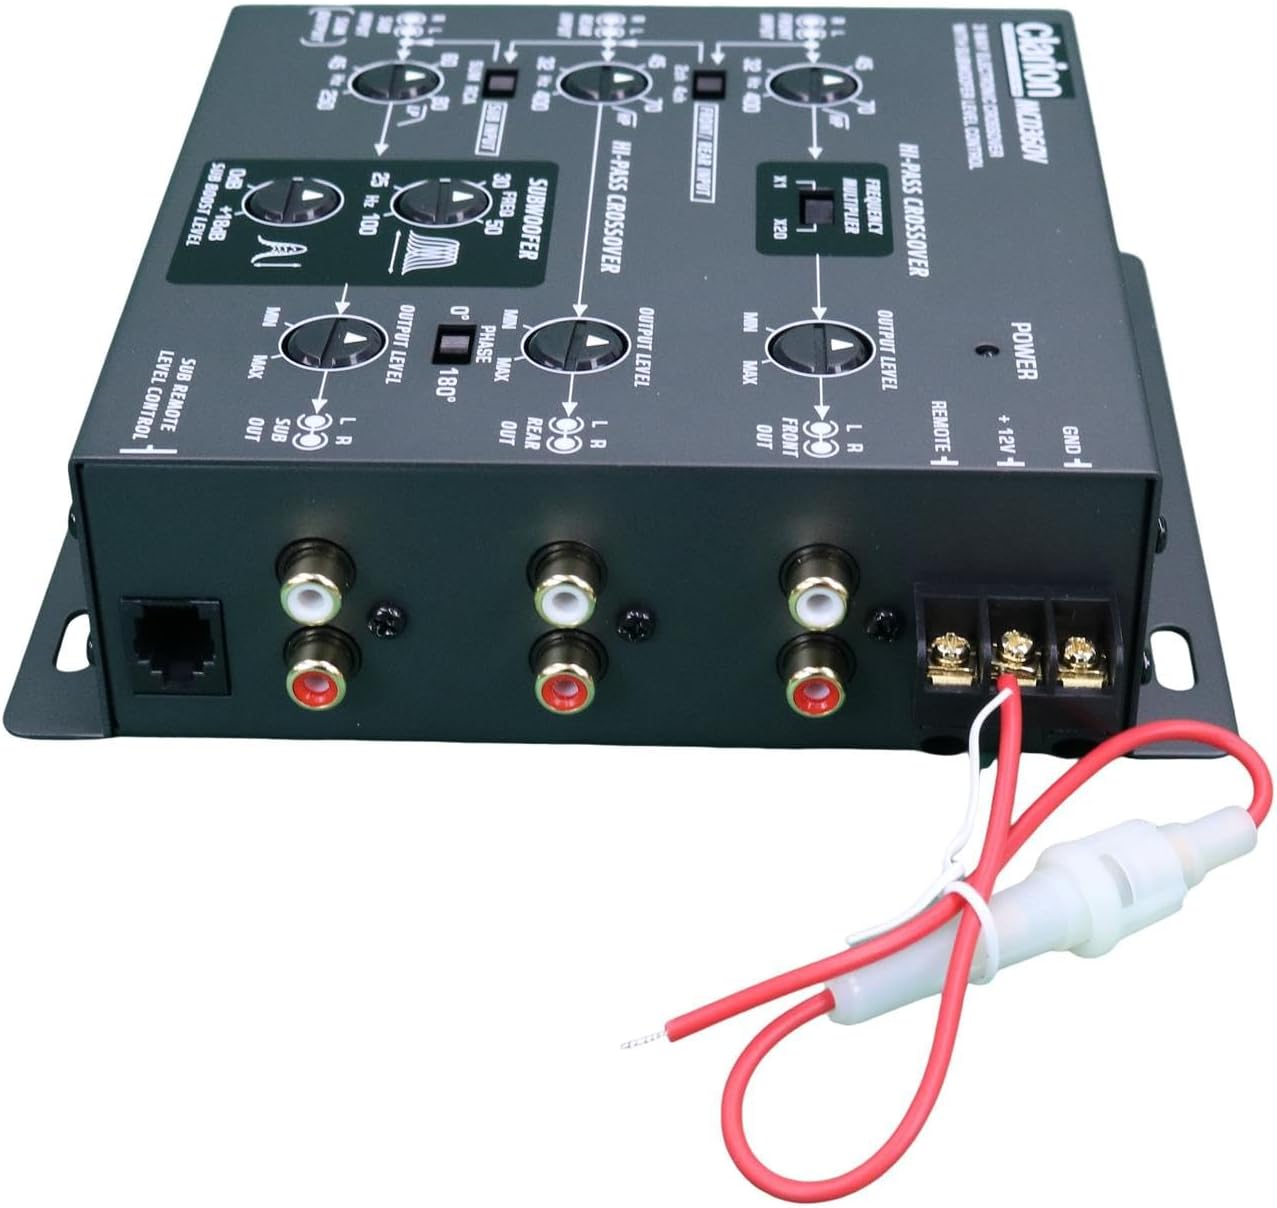
Figure 4.2: Power and Remote Wiring
This image shows the power and remote turn-on wiring harness connected to the MCD360V, demonstrating the proper connection points for the vehicle's electrical system.
5. Operating Instructions
Once installed, the MCD360V allows for fine-tuning of your audio system. Familiarize yourself with the controls:
5.1 High-Pass Crossover (FRONT/REAR):
- HP (High Pass) Frequency Knobs: Adjust the cutoff frequency for your front and rear speakers. Frequencies below this setting will be attenuated.
- Frequency Multiplier (x1 / x20): Use this switch to multiply the selected HP frequency by 1 or 20, allowing for a wider range of adjustment.
5.2 Subwoofer Crossover:
- LP (Low Pass) Frequency Knob: Adjust the cutoff frequency for the subwoofer output. Frequencies above this setting will be attenuated.
- Subwoofer Equalizer Bass Boost Control (0dB to +18dB): Adjust the level of bass boost at the selected center frequency.
- Phase Control (0° / 180°): Adjust the phase of the subwoofer output to match the phase of your main speakers, ensuring optimal bass response and integration.
5.3 Output Level Controls:
- Output Level Knobs (FRONT, REAR, SUB): Independently adjust the output level for the front, rear, and subwoofer channels to balance the sound stage.
5.4 Remote Subwoofer Level Control:
- The wired remote allows for convenient, real-time adjustment of the subwoofer output level from your listening position.
6. Maintenance
The Clarion MCD360V is designed for reliable operation with minimal maintenance. Follow these guidelines to ensure longevity:
- Cleaning: Use a soft, dry cloth to wipe the unit. Do not use harsh chemicals, solvents, or abrasive cleaners.
- Connections: Periodically check all power, ground, and RCA connections to ensure they are secure and free from corrosion.
- Ventilation: Ensure that the unit's mounting location allows for adequate airflow to prevent overheating.
- Fuse Replacement: If the fuse blows, replace it only with a fuse of the same type and rating. Refer to the installation section for fuse specifications.
7. Troubleshooting
If you experience issues with your MCD360V, refer to the following common problems and solutions:
| Problem | Possible Cause | Solution |
|---|---|---|
| No power / Unit does not turn on |
|
|
| No sound output |
|
|
| Distorted sound |
|
|
| Engine noise / Whining sound |
|
|
| Subwoofer not playing or weak bass |
|
|
If the problem persists after attempting these solutions, please contact Clarion customer support or a qualified car audio technician.
8. Specifications
| Feature | Specification |
|---|---|
| Input Channels | 6/4/2 Channel RCA Inputs |
| Output Channels | 6 Channel /5 Volt RCA Outputs |
| Frequency Response | 10 to 50,000 Hz |
| Signal to Noise Ratio | 100dB |
| High Pass Frequencies (Front) | 32 to 8,000 Hz |
| High Pass Frequencies (Rear) | 32 to 400 Hz |
| Subwoofer Line Output | 0 to 18dB |
| Center Equalizing Frequencies | 25 to 100Hz |
| Dimensions (W × H × D) | 5 1/2-in × 1 3/4-in × 5 1/2-in (approx. 14cm x 4.4cm x 14cm) |
| Item Weight | 544 g (1.2 lbs) |
| Power Source Type | Corded Electric (12V DC) |
| Connectivity Technology | RCA |
9. Warranty and Support
Clarion products are manufactured to the highest quality standards. For information regarding warranty coverage, please refer to the warranty card included with your product or visit the official Clarion website. Keep your purchase receipt as proof of purchase for warranty claims.
For technical support, troubleshooting assistance, or service inquiries, please contact Clarion customer service through their official channels. Contact information can typically be found on the Clarion website or in the product packaging.
Clarion Official Website: www.clarion.com (Please check for regional websites for specific support details)


