1. Introduction
The Fockety Seamless Seam Setter is a professional installation tool designed for precisely joining and leveling two flat, non-porous surfaces. It is ideal for materials such as granite, marble, floor tiles, glass, and plastic, ensuring accurate and professional results in various construction and fabrication applications.
2. Safety Information
- Always inspect the tool for damage before each use. Do not use if any components are damaged.
- Ensure surfaces are clean, dry, and free of dust or debris to achieve maximum suction.
- Do not exceed the maximum suction capacity of 300kg.
- Keep hands and fingers clear of moving parts during adjustment.
- Store the tool in a clean, dry place away from direct sunlight and extreme temperatures.
3. Package Contents
Verify that all items are present in the package:
- 1 x Seamless Seam Setter
- 2 x Wrench
- 2 x Rubber Ring
- 4 x Air Inlet Filter
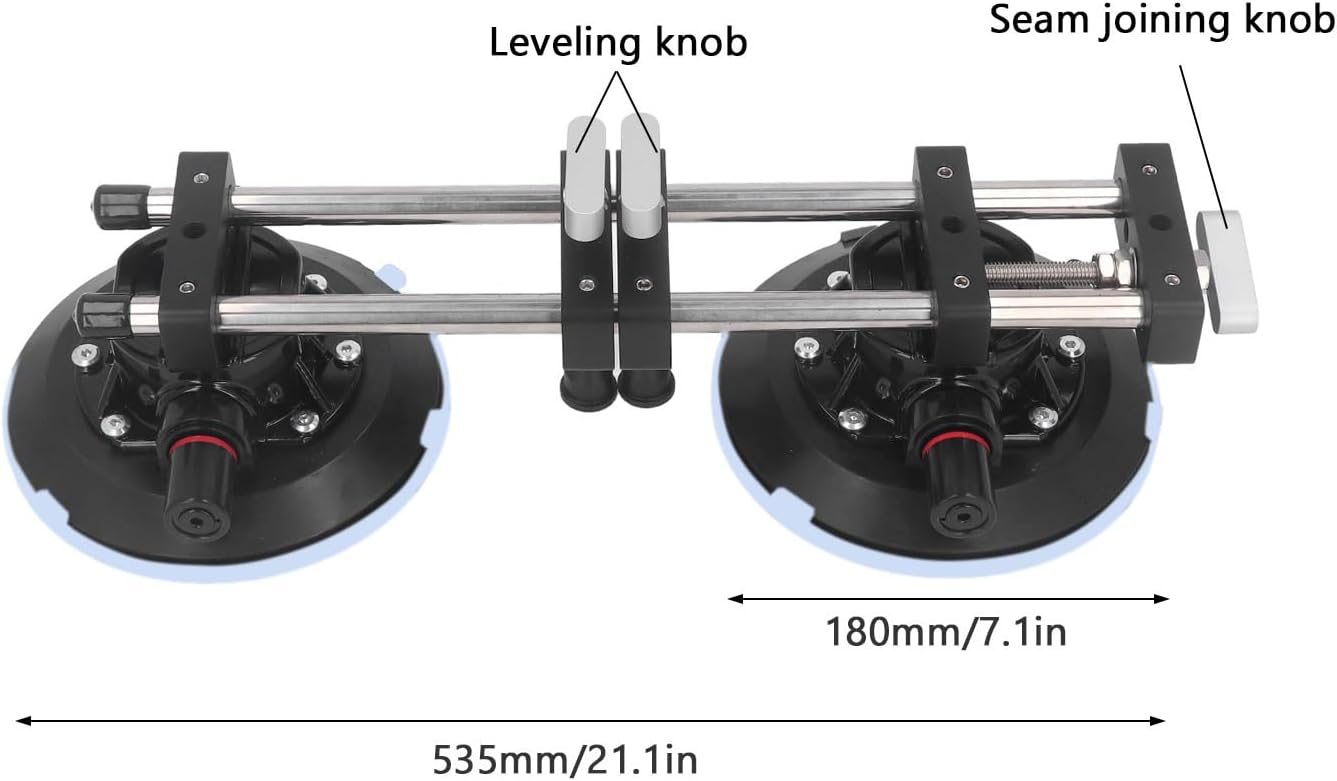
Image 3.1: Contents of the Fockety Seamless Seam Setter package, including the main unit, two wrenches, two rubber rings, and four air inlet filters.
4. Product Overview
The Seamless Seam Setter features two 7.1-inch vacuum suction cups, a robust aluminum alloy frame, and precision adjustment knobs for both leveling and tightening. Its design ensures stability and accuracy during material installation.

Image 4.1: An overhead view of the Fockety Seamless Seam Setter, showcasing its dual suction cups, aluminum frame, and adjustment mechanisms.

Image 4.2: The seam setter with text indicating it features manual vacuum suction cups for tight fixation and two fine adjustment knobs for precise leveling.

Image 4.3: The seam setter with text highlighting a suction force of over 300kg, a maximum adjustable high and low gap of 45mm, and a maximum tightening gap of 65mm.

Image 4.4: A view of the seam setter showing its overall length of 535mm (21.1 inches) and the 180mm (7.1 inches) distance between suction cups. The leveling knob and seam joining knob are clearly labeled.
Video 4.1: A short demonstration of the Fockety Seamless Seam Setter in action, showing how it effectively joins two surfaces together.
5. Setup
Before using the seam setter, ensure the surfaces to be joined are clean, dry, and free of any dust, grease, or moisture. This will ensure optimal suction and prevent slippage.
- Place the two workpieces to be joined in their approximate final positions.
- Position the Seamless Seam Setter across the seam, ensuring each suction cup is fully on a separate workpiece and not bridging the gap.
6. Operating Instructions
Follow these steps for effective use of the Seamless Seam Setter:
- Attach Suction Cups: Press the air pump on each suction cup repeatedly until the red line on the pump plunger disappears. This indicates a strong vacuum seal.
- Join Surfaces: Twist the side knobs (seam joining knobs) clockwise to gradually pull the two workpieces together, closing the seam tightly.
- Level Surfaces: Twist the top knobs (leveling knobs) to adjust the height of the workpieces, ensuring they are perfectly level with each other. The maximum height gap adjustment is 45mm, and the maximum tightening gap adjustment is 65mm.
- Verify Alignment: Visually inspect the seam and surface level. Make any final minor adjustments as needed.
- Release Tool: Once the adhesive or sealant has cured sufficiently, press the bleeder valve on each suction cup to release the vacuum. Carefully remove the tool.

Image 6.1: A close-up view of the vacuum pump on the seam setter, showing the red line indicator that disappears when sufficient vacuum is achieved.

Image 6.2: A detailed view of the release lever located on the side of the suction cup, used to break the vacuum seal.
The Fockety Seamless Seam Setter is suitable for various applications:

Image 6.3: A collage showing various materials and applications where the seam setter can be used, such as installing wall tiles, floor tiles, glass panels, and joining countertop sections.
7. Maintenance
- Cleaning: After each use, wipe down the suction cups and frame with a clean, damp cloth. Ensure no adhesive or debris remains on the rubber suction pads.
- Inspection: Regularly check the rubber suction cups for cuts, tears, or hardening. Replace damaged rubber rings or air inlet filters as needed using the provided spares.
- Storage: Store the seam setter in its original packaging or a protective case to prevent damage to the suction cups and adjustment mechanisms.

Image 7.1: The underside of one of the 7.1-inch rubber suction cups, showing its textured surface designed for strong adhesion to non-porous materials.
8. Troubleshooting
| Problem | Possible Cause | Solution |
|---|---|---|
| Suction cups do not hold | Surface is dirty, wet, or porous; rubber cup is damaged; air pump is faulty. | Clean and dry surfaces thoroughly. Inspect rubber cups for damage and replace if necessary. Ensure the red line on the pump disappears. |
| Seam does not close tightly | Side knobs not tightened sufficiently; workpieces are too far apart. | Ensure suction is firm. Tighten side knobs further. Reposition workpieces closer if initial gap is too wide. |
| Surfaces are not level | Top knobs not adjusted correctly. | Adjust top knobs incrementally until surfaces are level. |
9. Specifications
| Feature | Detail |
|---|---|
| Model Number | Focketyrigcfk71yn |
| Material | Aluminum alloy, Rubber |
| Suction Cup Diameter | 7.1 inches (approx. 180mm) |
| Maximum Suction Force | Over 300kg |
| Max. Adjustable High/Low Gap | 45mm |
| Max. Adjustable Tightening Gap | 65mm |
| Overall Dimensions | Approx. 535mm (21.1 inches) length |
| Item Weight | 8.43 pounds |
10. Warranty and Support
For warranty information or technical support, please refer to the contact details provided with your purchase or visit the official Fockety website. Keep your purchase receipt as proof of purchase.