
1. Introduction and Overview
Thank you for choosing the LuxeBath Iron EM Bathroom Radiator. This manual provides essential information for the safe and efficient installation, operation, and maintenance of your new radiator. Please read all instructions carefully before proceeding with installation or use.
The LuxeBath Iron EM radiator is designed to offer both functional heating and aesthetic appeal for bathrooms, living rooms, and other spaces. Its flat, vertical panel design integrates seamlessly into modern interiors, providing efficient and economical heating due to its high thermal conductivity and quality construction. It helps reduce humidity, minimizing the risk of mold growth and unpleasant odors.

Figure 1.1: LuxeBath Iron EM White Bathroom Radiator in a modern bathroom environment.
2. Safety Information
Please observe the following safety precautions to prevent injury or damage:
- Installation should be performed by a qualified professional in accordance with local building and plumbing codes.
- Ensure the radiator is securely mounted to a suitable wall structure capable of supporting its weight when filled with water.
- Radiator surfaces can become very hot during operation. Avoid prolonged skin contact to prevent burns. Keep children and pets away from the hot surface.
- If connecting to an electrical system (for electric heating), ensure all electrical work is carried out by a certified electrician and complies with electrical safety standards.
- Do not cover the radiator with flammable materials.
- Regularly check for leaks, especially after installation. Any leaks must be addressed immediately by a professional.
- Do not attempt to repair the radiator yourself. Contact a qualified technician for service.
For detailed safety information, refer to the 'Veiligheidsinformatie (PDF)' document available from the manufacturer or retailer.
3. Package Contents
Carefully unpack the box and ensure all components are present and undamaged. If any parts are missing or damaged, contact your retailer immediately.
Included Components:
- 1 x Radiator
- 4 x Wall brackets
- 4 x Wall plugs (dowels)
- 4 x Bracket screws
- 4 x Washers
- 2 x End caps (for connections)
- 1 x Bleed valve

Figure 3.1: Scope of supply, including radiator and wall mounting kit.

Figure 3.2: Detailed view of the wall mounting hardware.
4. Setup and Installation
The LuxeBath Iron EM radiator is designed for easy wall mounting. However, professional installation is highly recommended to ensure proper function and safety.
4.1 Wall Mounting
- Choose Location: Select a suitable wall location, ensuring sufficient space for the radiator and access for connections. The wall must be strong enough to support the radiator's weight.
- Mark Drilling Points: Use the provided wall brackets as a template to mark the drilling points on the wall. Refer to the technical drawing for precise measurements and recommended distances.
- Drill Holes: Drill holes at the marked points using an appropriate drill bit for your wall type. Insert the wall plugs (dowels).
- Attach Brackets: Secure the wall brackets to the wall using the bracket screws and washers. Ensure they are level and firmly attached.
- Mount Radiator: Carefully lift the radiator and position it onto the installed wall brackets. Secure it in place according to the bracket design.
4.2 Connection Types
The radiator offers flexible connection options:
- Wall Connection: Standard connection directly from the wall.
- Floor Connection: Connections routed from the floor.
- Universal Connection: Adaptable for various plumbing configurations.
- Electric Heater: Can be operated independently with an electric heating element (not included, sold separately).
The radiator features a G1/2" thread with a distance of 50 mm for connections. A drain valve is included for easy venting.

Figure 4.1: Connection options and drain valve for the radiator.

Figure 4.2: Detail of radiator top connections.

Figure 4.3: Technical drawing with dimensions for installation.
5. Operating Instructions
Once installed and connected to your central heating system or equipped with an electric heating element, the radiator is ready for operation.
5.1 Initial Start-up and Venting
- Fill System: Ensure your heating system is filled with water and pressurized correctly.
- Open Valves: Open the inlet and outlet valves on the radiator.
- Vent Radiator: Use a radiator key to slowly open the bleed valve (located at the top of the radiator). Air will escape, followed by water. Close the valve once a steady stream of water emerges. This removes trapped air, ensuring efficient heating.
5.2 General Operation
- Temperature Control: Adjust the room thermostat or radiator valve (if fitted) to control the heat output.
- Towel Drying: The radiator's design allows it to function as an ideal towel holder, promoting optimal drying and reducing bacteria.

Figure 5.1: Radiator functioning as a towel holder.
6. Maintenance
Regular maintenance ensures the longevity and efficient operation of your LuxeBath radiator.
- Cleaning: The radiator's smooth surface and high-quality steel construction make it easy to clean. Use a soft, damp cloth and mild detergent. Avoid abrasive cleaners or harsh chemicals that could damage the finish.
- Venting: Periodically vent the radiator (as described in Section 5.1) to remove any accumulated air, which can reduce heating efficiency.
- Leak Inspection: Regularly check all connections for any signs of leaks. Address any leaks promptly.
- System Pressure: Ensure your central heating system maintains the recommended pressure.

Figure 6.1: High-quality materials and robust wall mounting for durability and easy maintenance.
7. Troubleshooting
If you encounter issues with your radiator, consult the following troubleshooting guide:
| Problem | Possible Cause | Solution |
|---|---|---|
| Radiator not heating up or unevenly heated | Trapped air in the system | Vent the radiator using the bleed valve (Section 5.1). |
| Radiator not heating up | Thermostat or valve settings incorrect | Check and adjust your room thermostat or radiator valve settings. Ensure the heating system is active. |
| Radiator not heating up (electric model) | No power to electric heating element | Check power supply, circuit breaker, and the electric heating element's settings. |
| Water leaking from radiator | Loose connections or faulty seal | Tighten connections. If the leak persists or is from a weld, immediately shut off the water supply to the radiator and contact a qualified plumber. |
| Noisy radiator (gurgling, banging) | Air in the system or water flow issues | Vent the radiator. If noise persists, consult a heating engineer. |
If the problem persists after attempting these solutions, please contact a qualified heating engineer or customer support.
8. Specifications
Key technical specifications for the LuxeBath Iron EM 600x1600 mm White radiator:
| Feature | Specification |
|---|---|
| Brand | LuxeBath |
| Model Number | Luxe-100 |
| Dimensions (D x W x H) | 3D x 60W x 160H cm (approx. 30mm depth from wall) |
| Weight | 20.25 kg |
| Color | White |
| Material | High-quality Steel |
| Heat Output | 900 Watt |
| Heating Method | Warm water (Central Heating) / Electric (with optional element) |
| Energy Source | Wired Electric / Central Heating |
| Mounting Type | Wall Mount |
| Recommended Use | Indoor, Bathroom, Living Room, Wardrobe |
| Special Features | Anti-leak protection, Space-saving vertical design |
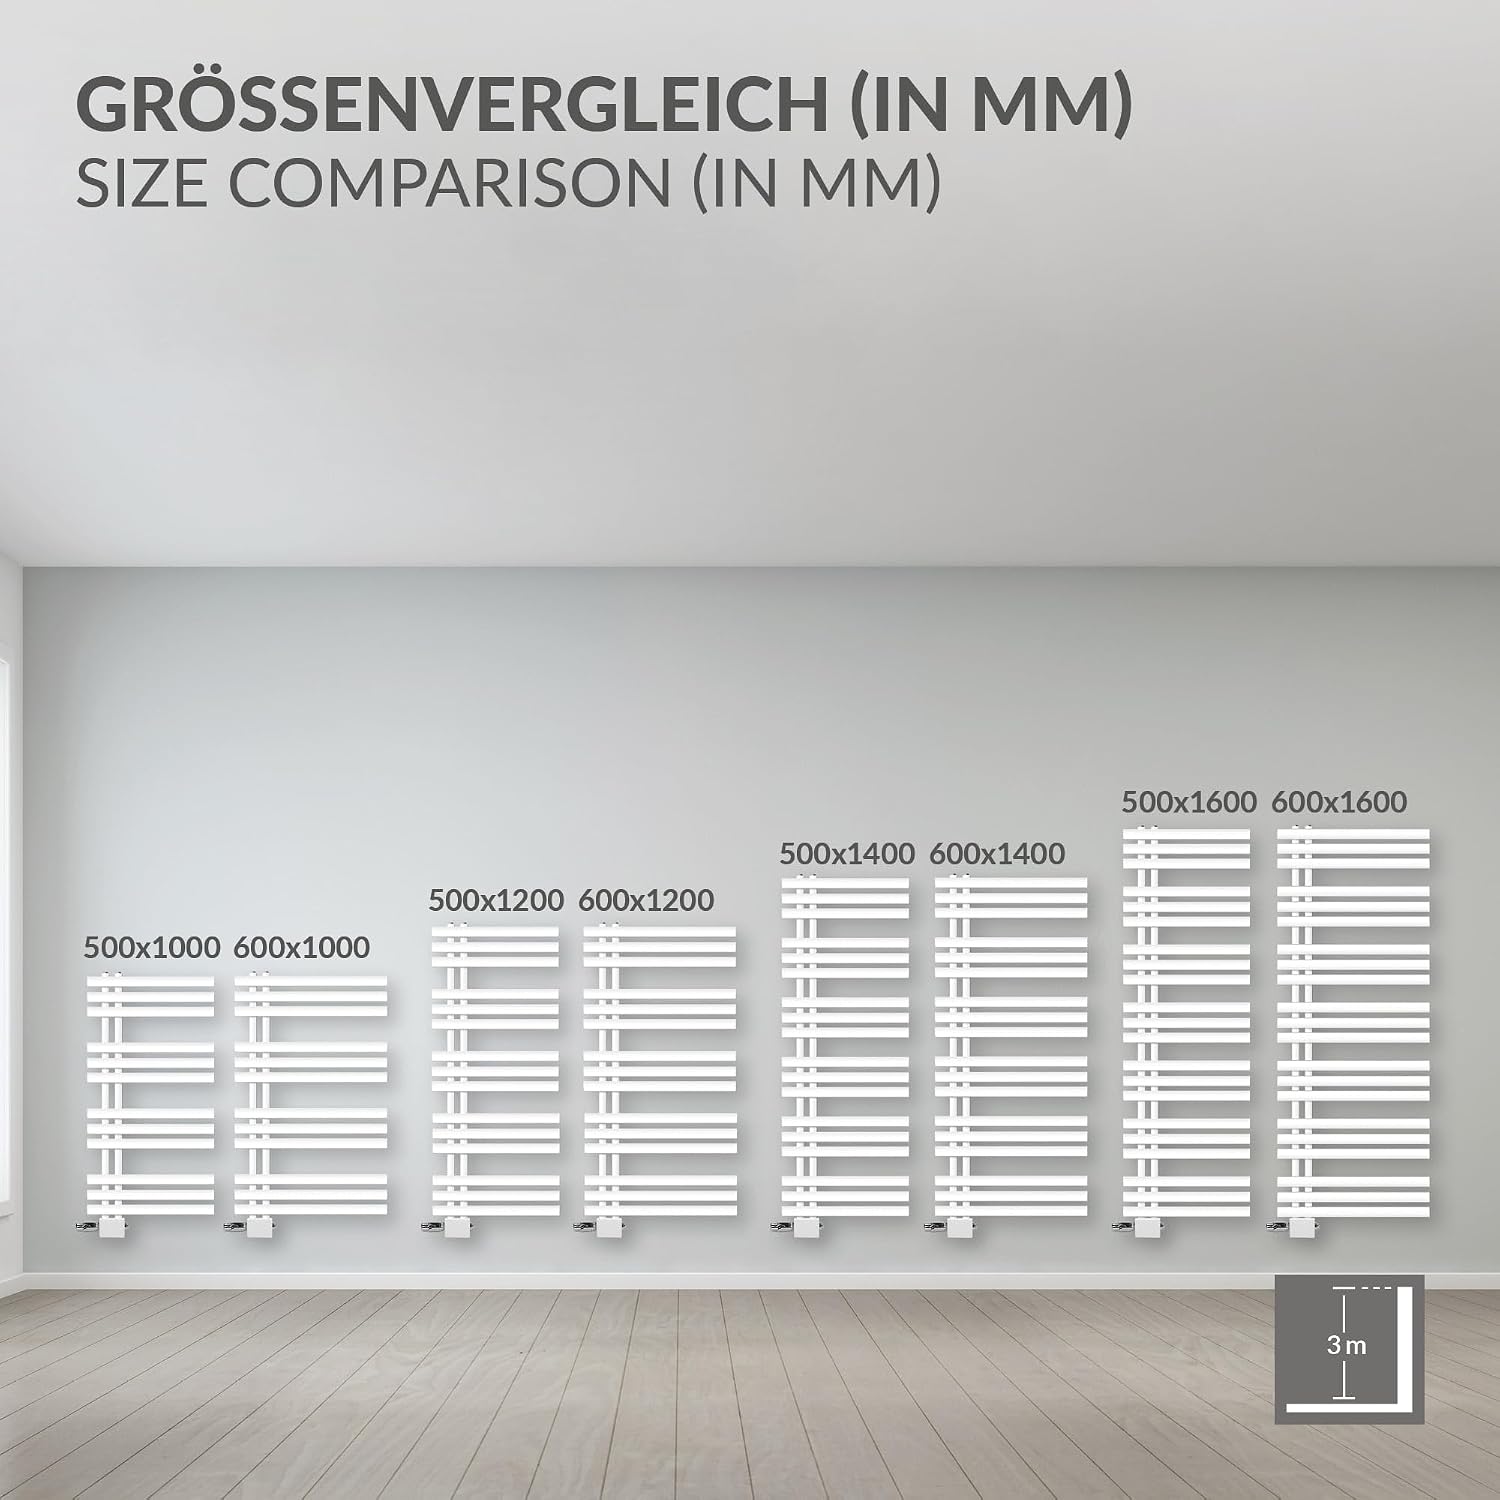
Figure 8.1: Size comparison of LuxeBath Iron EM radiators.
9. Warranty and Support
LuxeBath products are manufactured to high standards and come with a manufacturer's warranty. For specific warranty terms and conditions, please refer to the documentation provided with your purchase or contact your retailer.
For technical support, spare parts, or warranty claims, please contact your point of purchase (e.g., ECD-Germany) or LuxeBath customer service. When contacting support, please have your model number (Luxe-100) and purchase details readily available.
Additional resources, including a detailed user manual and safety information, may be available in PDF format from the manufacturer's website or your retailer.