1. Introduction
This manual provides detailed instructions for the setup, operation, and maintenance of your CLXEAST 18-inch Illuminated Outdoor/Indoor Atomic Analog Wall Clock. This clock features atomic time synchronization, a smart LED light sensor for automatic illumination, and integrated temperature and humidity displays. Designed for both indoor and outdoor use, it is UV resistant and weatherproof.

Figure 1: Front view of the CLXEAST 18-inch Atomic Analog Wall Clock.
2. Safety Information
- Ensure the clock is mounted securely to prevent falling.
- Use only the specified battery types and ensure correct polarity during installation.
- Do not expose the clock to extreme temperatures beyond its operating range (-40°F to 140°F).
- Avoid direct, prolonged exposure to harsh elements like intense sunlight or constant heavy rain to maximize product lifespan, despite its weatherproof design.
- Keep batteries out of reach of children.
3. Package Contents
- 1 x CLXEAST 18 Inch Illuminated Outdoor/Indoor Atomic Analog Wall Clock
- 1 x Instruction Manual
- Note: Batteries (1 x AA, 4 x D) are not included.
4. Setup
4.1 Battery Installation
- Locate the battery compartments on the back of the clock.
- Insert 1 AA battery into the central compartment for the clock's atomic movement. Ensure correct polarity.
- Insert 4 D-size batteries into the two larger compartments (two in each) for the LED light sensor. Ensure correct polarity.
- Securely close all battery covers.

Figure 2: Rear view of the clock with battery compartments.
4.2 Time Zone and Daylight Saving Time (DST) Settings
- On the back of the clock, locate the time zone selector switch (P, M, C, E for Pacific, Mountain, Central, Eastern). Slide the switch to your desired time zone.
- Locate the DST (Daylight Saving Time) switch. Set it to 'ON' for automatic adjustment or 'OFF' to disable DST adjustment.
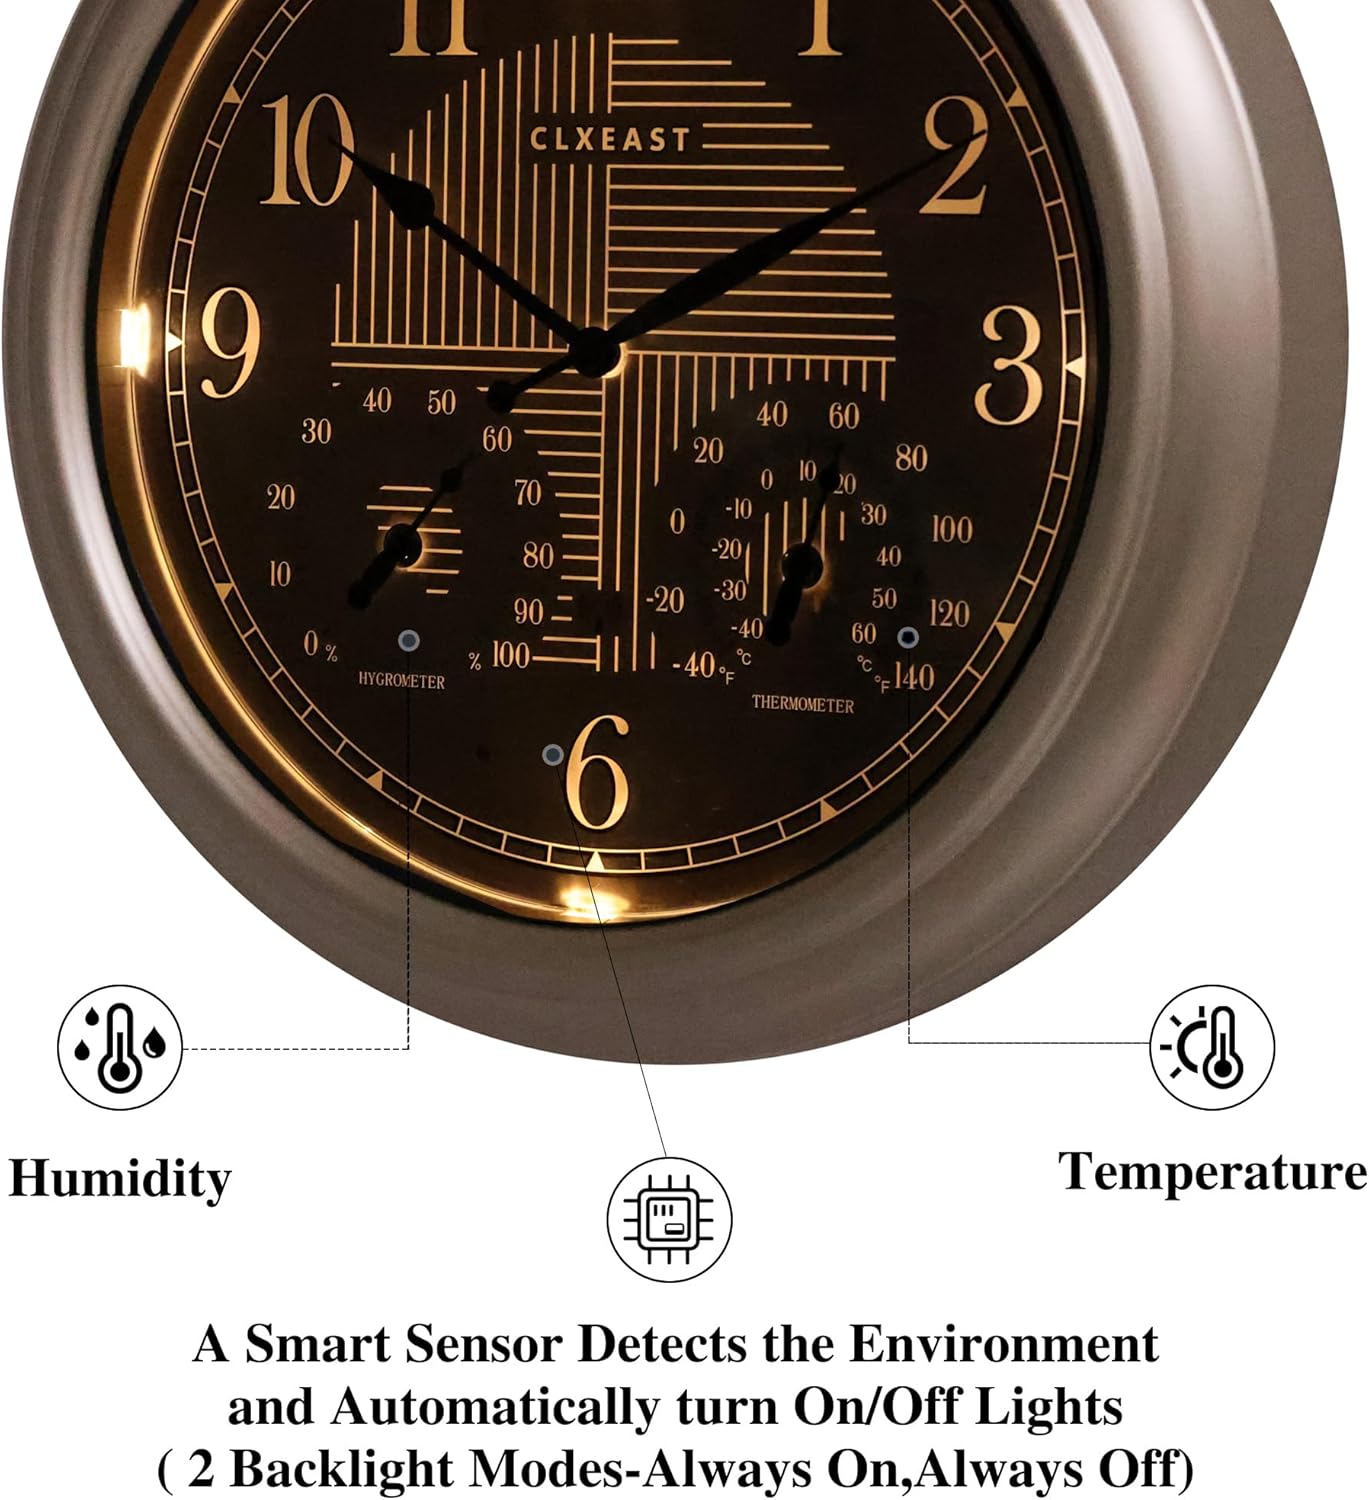
Figure 3: Time zone and DST adjustment switches.
4.3 Atomic Time Synchronization
After battery installation and setting the time zone, the clock will automatically attempt to synchronize with the WWVB radio transmission from Fort Collins, CO. This process ensures accurate timekeeping to the second. The clock hands may move rapidly as it searches for the signal and sets itself. Allow up to 24 hours for initial synchronization, especially in areas with weak signals.

Figure 4: Clock face with atomic signal indicator.
4.4 Thermometer & Hygrometer Calibration
The built-in thermometer and hygrometer sensors require approximately 3 hours to fully calibrate to the ambient environment. For accurate readings, allow this time after placing the clock in its desired location.

Figure 5: Detailed view of temperature and humidity gauges.
4.5 Mounting
The clock features a keyhole slot on the back for easy wall mounting. Choose a location that is visible and, for outdoor use, ideally protected from direct, prolonged exposure to extreme weather conditions to ensure longevity.

Figure 6: Clock displayed in an outdoor patio setting.

Figure 7: Clock displayed in an indoor living room setting.
Video 1: This video demonstrates the battery installation, setting of time zones, and the automatic time synchronization feature of the CLXEAST 18-inch Outdoor Lighted Atomic Clock with Temperature & Humidity.
5. Operating Instructions
5.1 Smart LED Light Sensor
The clock is equipped with a smart light sensor that automatically activates a warm, ambient dial backlight during dark conditions and turns off in normal daylight. There are two backlight modes: 'Always On' and 'Always Off'. You can select your preferred mode using the switch on the back of the clock.

Figure 8: Daytime and illuminated nighttime view of the clock.

Figure 9: Close-up of the illuminated clock face.
5.2 Reading Time, Temperature, and Humidity
The large analog display clearly shows the current time. The smaller gauges on the clock face indicate the ambient temperature in Fahrenheit and Celsius, and the relative humidity percentage.
6. Maintenance
- Cleaning: Wipe the clock with a soft, damp cloth. Avoid using abrasive cleaners or solvents that may damage the finish or display.
- Battery Replacement: Replace batteries when the clock hands stop moving or the LED illumination dims significantly. It is recommended to replace all D-size batteries simultaneously for optimal LED performance.
7. Troubleshooting
| Issue | Possible Cause | Solution |
|---|---|---|
| Clock not setting time automatically | Weak atomic signal, incorrect time zone, or dead battery. | Ensure clock is in an area with good signal reception. Verify time zone setting. Replace AA battery. Press the 'RESET' button on the back. |
| LED light not illuminating | Dead D-size batteries, light sensor switch off, or insufficient darkness. | Replace D-size batteries. Ensure the LED light sensor switch is set to 'ON'. Test in a completely dark environment. |
| Inaccurate temperature/humidity readings | Sensors not fully calibrated or exposed to direct elements. | Allow 3 hours for sensors to calibrate after placement. Ensure clock is not in direct sunlight or extreme heat/cold sources. |
| Clock hands stuck or moving erratically | Low battery or mechanical obstruction. | Replace AA battery. Gently check for any obstructions to the clock hands. |
8. Specifications
| Feature | Detail |
|---|---|
| Brand | CLXEAST |
| Model Number | T2888S10-N-RC |
| Display Type | Analog |
| Dimensions | 18"W x 18"H |
| Power Source | 1 x AA battery (for clock movement), 4 x D batteries (for LED light sensor) |
| Special Features | Atomic Time, Daylight Saving Time by WWVB, Illuminated, Temperature & Humidity Display, Waterproof, Weatherproof |
| Indoor/Outdoor Usage | Outdoor |
| Material | Acrylic, Acrylonitrile Butadiene Styrene (ABS), Glass |
| Temperature Range | -40°F to 140°F |
| Humidity Range | 1% to 99% Relative Humidity |
| Item Weight | 5.3 Pounds |
9. Warranty and Support
For information regarding product warranty, returns, or technical support, please refer to the retailer's policy or visit the official CLXEAST store. Extended protection plans may be available for purchase through the retailer.
Visit the CLXEAST Store for more products and support.


