GX591
GX591 Intelligent CNC Spot Welder User Manual
Model: GX591
Introduction
This manual provides comprehensive instructions for the safe and effective use of the GX591 Intelligent CNC Spot Welder. Please read this manual thoroughly before operating the device to ensure proper functionality and to prevent damage or injury. This portable spot welder is designed for DIY enthusiasts and professionals for welding 18650 lithium battery nickel sheets.
Important Safety Information
- Always wear appropriate personal protective equipment (PPE), including safety glasses, when operating the spot welder.
- Ensure the work area is well-ventilated and free from flammable materials.
- Do not operate the device with wet hands or in damp conditions.
- Verify correct polarity when connecting the power supply and welding pens to avoid short circuits or damage.
- Keep the device out of reach of children.
- Disconnect the power supply when the device is not in use or during maintenance.
- Do not attempt to modify or repair the device yourself. Contact qualified personnel for service.
Package Contents
Upon opening the package, please verify that all components are present and undamaged:
- GX591 Intelligent CNC Spot Welder Main Board
- Pair of Welding Pens (Red and Black)
- Input Power Cables (Red and Black)
- Mounting Screws (typically 4)
- Nickel Strips (for testing/initial use)
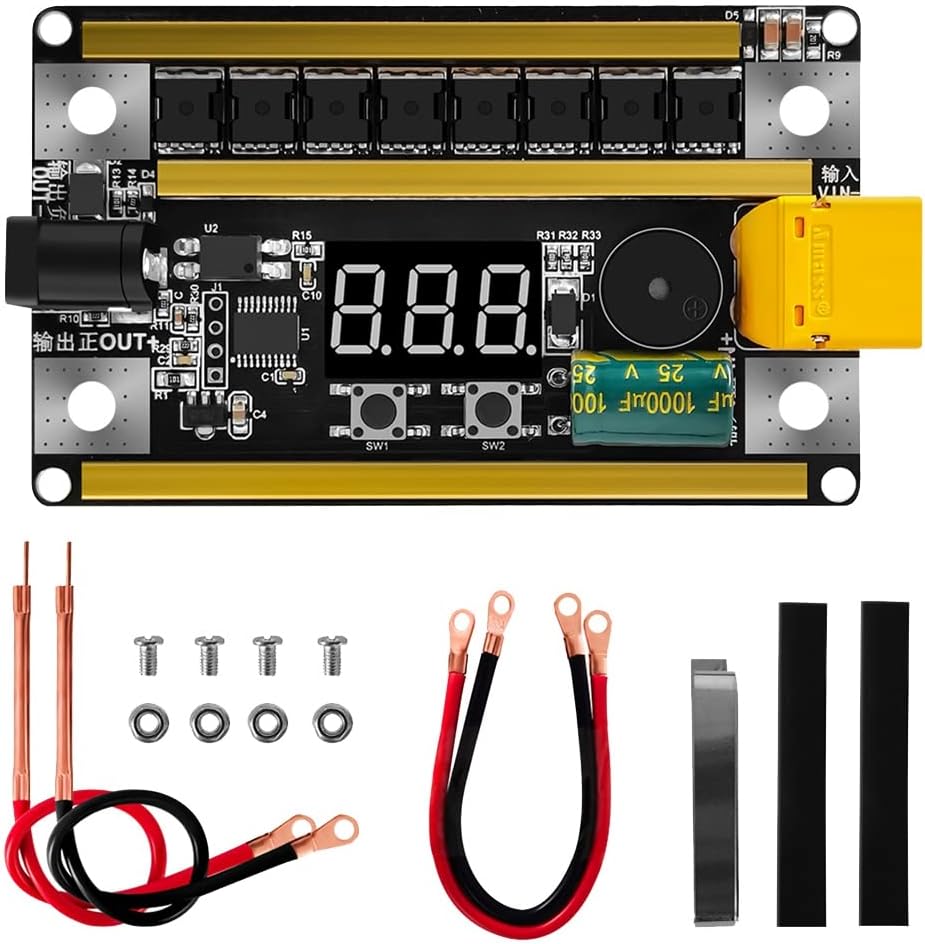
Image: The GX591 Intelligent CNC Spot Welder main board along with its included accessories, such as welding pens, power input cables, and nickel strips.
Product Overview and Components
Familiarize yourself with the various parts of the GX591 spot welder:

Image: A detailed diagram labeling the key components of the GX591 spot welder, including pen outputs, MOS tubes, power input, foot switch interface, TX60 interface, gear position buttons, and buzzer.
- Pen Output (+/-): Connection points for the welding pens.
- MOS Tubes (x8): Power switching components for welding current.
- Power Input (+/-): Connection points for the external power supply (8V-24V).
- TX60 Interface: Alternative power input connector.
- Foot Switch Interface: For connecting an optional foot switch to trigger welding.
- Digital Display: Shows current gear setting and voltage.
- SW1 (Gear Position - / Function Setting): Button to decrease gear or enter function settings.
- SW2 (Gear Position + / Turn Off): Button to increase gear or turn off the device.
- Buzzer: Provides audio feedback for operations.
Specifications
| Model | GX591 |
| Input Voltage Range | 8V - 24V DC |
| Maximum Welding Current | 2400A |
| Welding Thickness (Nickel Sheet) | 0.1mm - 0.2mm |
| Power Regulation | 99 Gears |
| MOS Tubes | 8 |
| Wiring | 12AWG wire, copper and aluminum oxide spot welding needle |
| Voltage Measurement Accuracy | Up to 0.01V (Built-in 12-bit high precision ADC) |
| Dimensions (Approx.) | 89mm x 54mm |

Image: The physical dimensions of the GX591 spot welder board, indicating a length of 89mm and a width of 54mm.
Setup Instructions
- Prepare Power Supply: Ensure your external power supply (e.g., 18650 battery pack, car battery) provides a voltage between 8V and 24V DC and can deliver sufficient current for welding.
- Connect Power Input:
- Connect the red input power cable to the positive (+) terminal of your power supply and the positive input terminal on the GX591 board.
- Connect the black input power cable to the negative (-) terminal of your power supply and the negative input terminal on the GX591 board.
- Alternatively, use the TX60 interface for power input if your power supply has a compatible connector.
- Important: Observe correct polarity to prevent damage to the device. The board is marked for correct connection.
- Connect Welding Pens:
- Connect the red welding pen to the "Pen Output +" terminal.
- Connect the black welding pen to the "Pen Output -" terminal.
- Ensure connections are secure.
- Optional Foot Switch: If using a foot switch, connect it to the designated foot switch interface.

Image: A visual guide demonstrating how to correctly connect the positive and negative terminals of an external battery power source to the GX591 spot welder, as well as the red and black welding pens to their respective output terminals.
Operating Instructions
- Power On: Once the power supply is connected, the digital display will illuminate, showing the current gear setting (e.g., "0.01" for gear 1). The device automatically displays the input voltage when connected to the power supply.
- Adjust Welding Gear:
- Press the SW2 (+) button to increase the welding gear.
- Press the SW1 (-) button to decrease the welding gear.
- There are 99 adjustable gears. Start with a lower gear (e.g., 10-20) and gradually increase until a satisfactory weld is achieved for your specific nickel strip thickness and battery type.
- Note: Higher gears provide more power, suitable for thicker nickel strips (up to 0.2mm).
- Perform Spot Welding:
- Place the nickel strip firmly against the battery terminal.
- Position both welding pen tips onto the nickel strip, ensuring good contact and even pressure. The tips should be close together but not touching each other.
- The device will automatically detect contact and initiate a weld after a short delay (usually 0.5-1 second). A buzzer sound indicates a successful weld.
- If using a foot switch, press the foot switch to trigger the weld.
- Inspect the weld. If it's too weak, increase the gear. If it burns through the nickel or battery, decrease the gear.
- Power Off: To turn off the device, press and hold the SW2 (+) button for a few seconds until the display turns off. Alternatively, disconnect the power supply.

Image: The GX591 spot welder board with the red and black welding pens securely attached, illustrating its readiness for operation.
Maintenance
- Clean Welding Tips: Regularly clean the tips of the welding pens to remove any residue or oxidation. This ensures good electrical contact and consistent welds. Fine-grit sandpaper or a file can be used.
- Inspect Cables: Periodically check all cables and connections for signs of wear, fraying, or damage. Replace any damaged cables immediately.
- Storage: Store the spot welder in a dry, cool place, away from direct sunlight and moisture, when not in use.
- General Cleaning: Wipe the main board with a dry, soft cloth to remove dust. Do not use liquids or solvents.
Troubleshooting
| Problem | Possible Cause | Solution |
|---|---|---|
| Device does not power on. | Incorrect power supply connection, low battery voltage, faulty power cable. | Check power supply voltage (8V-24V). Ensure correct polarity. Verify power cable integrity. |
| Weak or inconsistent welds. | Low gear setting, dirty welding tips, poor contact, insufficient power supply current. | Increase welding gear. Clean welding tips. Apply firm, even pressure. Use a power supply capable of higher current output. |
| Nickel strip burns through. | Too high gear setting, thin nickel strip. | Decrease welding gear. Ensure nickel strip thickness is appropriate for the chosen gear. |
| Buzzer does not sound during weld. | Poor contact, device malfunction. | Ensure good contact with welding pens. If problem persists, contact support. |
Warranty and Support
For warranty information, technical support, or service inquiries, please contact the seller or manufacturer directly through your purchase platform. Please have your model number (GX591) and purchase date available when contacting support.
Related Documents - GX591
 |
GX591 Intelligent CNC Spot Welder - 2400A Peak Current, 8-24V Detailed overview of the GX591 Intelligent CNC Spot Welder, featuring 99 precise gears, high-speed microcontroller, 2400A peak current, and 8-24V working voltage for efficient nickel sheet spot welding. |
 |
FNIRSI SWM-10 Portable Intelligent Color Screen Spot Welding Machine User Manual This user manual provides detailed instructions for the FNIRSI SWM-10 portable intelligent color screen spot welding machine, covering usage, precautions, interface introduction, operation, key functions, indicator lights, parameters, maintenance, and contact information. |
 |
Docreate-756 Portable Handheld Spot Welder User Manual and Specifications Detailed instructions, specifications, troubleshooting, and welding reference for the Docreate-756 portable handheld spot welding machine. Learn about its features, operation, and maintenance. |
 |
FNIRSI SWM-20 Intelligent Spot Welder User Manual V1.0 Comprehensive user manual for the FNIRSI SWM-20 Intelligent Spot Welder, detailing its features, operation, safety precautions, specifications, maintenance, and warranty information. |
 |
Portable Handheld Spot Welder Operation Manual Comprehensive operation manual for the Aideepen Portable Handheld Spot Welder. Includes setup, welding instructions, parameter settings, and safety guidelines for 18650 battery spot welding. |
 |
Handheld Spot Welder 99 Gears Adjustable with 2 Inch LCD Screen Technical specifications and feature overview for the Handheld Spot Welder, featuring 99 adjustable gears, a 2-inch LCD screen, and versatile welding modes for battery pack repair and DIY projects. |
Ask a question about this manual
Ask about setup, troubleshooting, compatibility, parts, safety, or missing instructions. Manuals+ will review the question and use this page’s manual context to help answer it.