
AEROPRO A608
AEROPRO Tools A608 Automotive Paint Gun, Air Regulator & Water Oil Separator User Manual
Model: A608
Introduction
This manual provides essential instructions for the safe and effective use, setup, operation, and maintenance of your AEROPRO Tools A608 Automotive Paint Gun, including the bundled air regulator and water oil separator. Please read this manual thoroughly before initial use and retain it for future reference.
Safety Information
WARNING: Failure to follow these safety instructions may result in serious injury or property damage.
- Always wear safety glasses and protective clothing, including gloves and a respirator, when operating the paint gun.
- Use only with appropriate ventilation to prevent inhalation of harmful fumes. Ensure the work area is well-ventilated.
- Avoid direct skin and eye contact with paint and cleaning solvents. In case of contact, flush immediately with water and seek medical attention if irritation persists.
- Ensure all connections are secure before operating the equipment.
- Never point the spray gun at yourself or others.
- Always disconnect the air supply before cleaning, performing maintenance, or when the gun is not in use.
- Keep children and unauthorized personnel away from the work area.
- Use only recommended air pressure. Do not exceed the maximum operating pressure.
- Dispose of paint and cleaning waste according to local regulations.
Product Overview
The AEROPRO Tools A608 bundle includes the following components:
- A608 Air Spray Gun: A high-volume, low-pressure (HVLP) spray gun with a 1.3mm nozzle, designed for automotive painting applications.
- Air Regulator: Used to control and maintain a consistent air pressure to the spray gun.
- Water Oil Separator: Filters moisture and oil from the compressed air supply, preventing contaminants from reaching the paint finish.

Figure 1: Fully assembled AEROPRO A608 paint gun system, showing the spray gun, air regulator, and water oil separator connected.
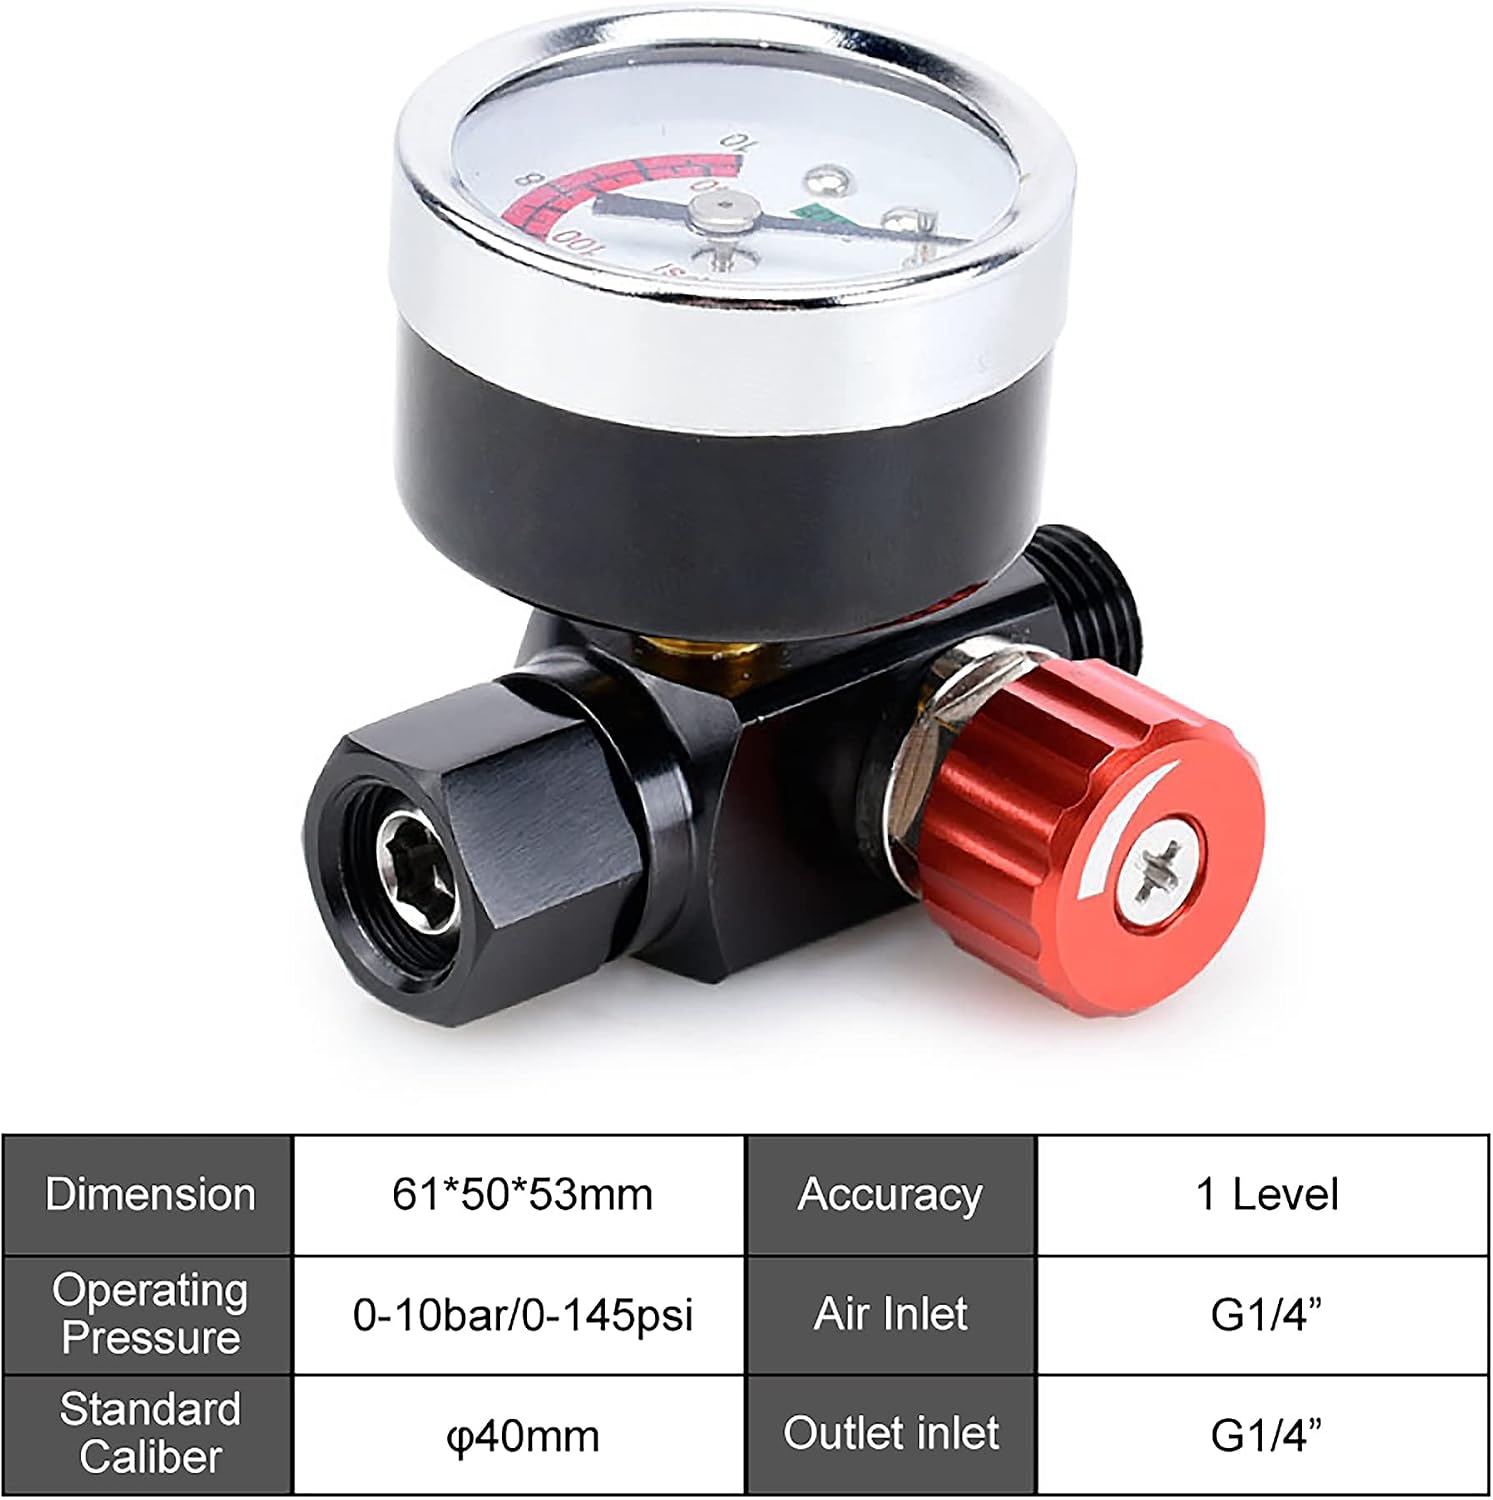
Figure 2: Close-up view of the AEROPRO A608 spray gun, highlighting its unique appearance and design features.
Setup Instructions
- Unpack Components: Carefully remove all items from the packaging and inspect for any damage.
- Assemble Water Oil Separator: Attach the water oil separator to the air inlet of the air regulator. Ensure a tight seal.
- Attach Air Regulator: Connect the assembled water oil separator and air regulator unit to the air inlet at the base of the spray gun handle.
- Connect Air Supply: Attach your compressed air hose to the inlet of the water oil separator. Ensure the air supply is off before connecting.
- Install Paint Cup: Securely screw the paint cup onto the top of the spray gun.
- Initial Air Check: With the air supply connected and turned on, check for any air leaks at connection points. Tighten as necessary.

Figure 3: The air regulator with its pressure gauge, used to set and monitor air pressure during operation.
Operating Instructions
- Prepare Paint: Mix your paint according to the manufacturer's instructions. Strain the paint to remove any impurities that could clog the nozzle. Fill the paint cup.
- Connect Air Supply: Ensure your air compressor is set to the desired pressure range (refer to specifications). Connect the air hose to the water oil separator.
- Adjust Air Pressure: Use the air regulator to set the operating pressure. The recommended operating pressure for the A608 spray gun is 29 psi (2 bar).
- Adjust Spray Pattern: The A608 features three sensitive knobs for precise control:
- Spray Width Knob: Controls the fan pattern width. Turn clockwise for a narrower pattern, counter-clockwise for a wider pattern.
- Paint Flow Knob: Adjusts the amount of paint released. Turn clockwise to decrease paint flow, counter-clockwise to increase.
- Air Volume Knob: Regulates the air volume passing through the gun.
- Test Spray: Before painting your final surface, perform a test spray on a scrap piece of material to fine-tune your settings and ensure an even pattern.
- Spraying Technique: Maintain a consistent distance from the surface and move the gun at a steady speed to achieve an even coat. Overlap each pass by approximately 50%.

Figure 4: The three sensitive knobs on the A608 spray gun allow for precise control over spray width, paint flow, and air volume.

Figure 5: The A608 HVLP spray gun in action, demonstrating its use for achieving a mirror-like finish with fine atomized particles.
Maintenance
Proper maintenance ensures the longevity and optimal performance of your AEROPRO paint gun system.
- Clean Spray Gun After Each Use:
- Empty any remaining paint from the cup.
- Pour appropriate cleaning solvent into the cup and spray it through the gun until clear solvent emerges.
- Disassemble the air cap, nozzle, and needle. Clean these components thoroughly with a brush and solvent. The multi-threading design air cap and removable air guide ring facilitate easy disassembly.
- Clean the paint cup.
- Wipe down the exterior of the gun.
- Reassemble all parts, ensuring they are dry.
- Drain Water Oil Separator: Regularly check and drain the accumulated water and oil from the separator. The thimble-type drain valve allows for quick ejection of built-up waste.
- Lubrication: Periodically apply a small amount of lubricant to the needle packing and air valve packing to maintain smooth operation.
- Storage: Store the clean and dry paint gun system in a safe, dry place away from extreme temperatures.

Figure 6: The 360° adjustable air cap, made from copper and nickel alloy, is easily removable for thorough cleaning.
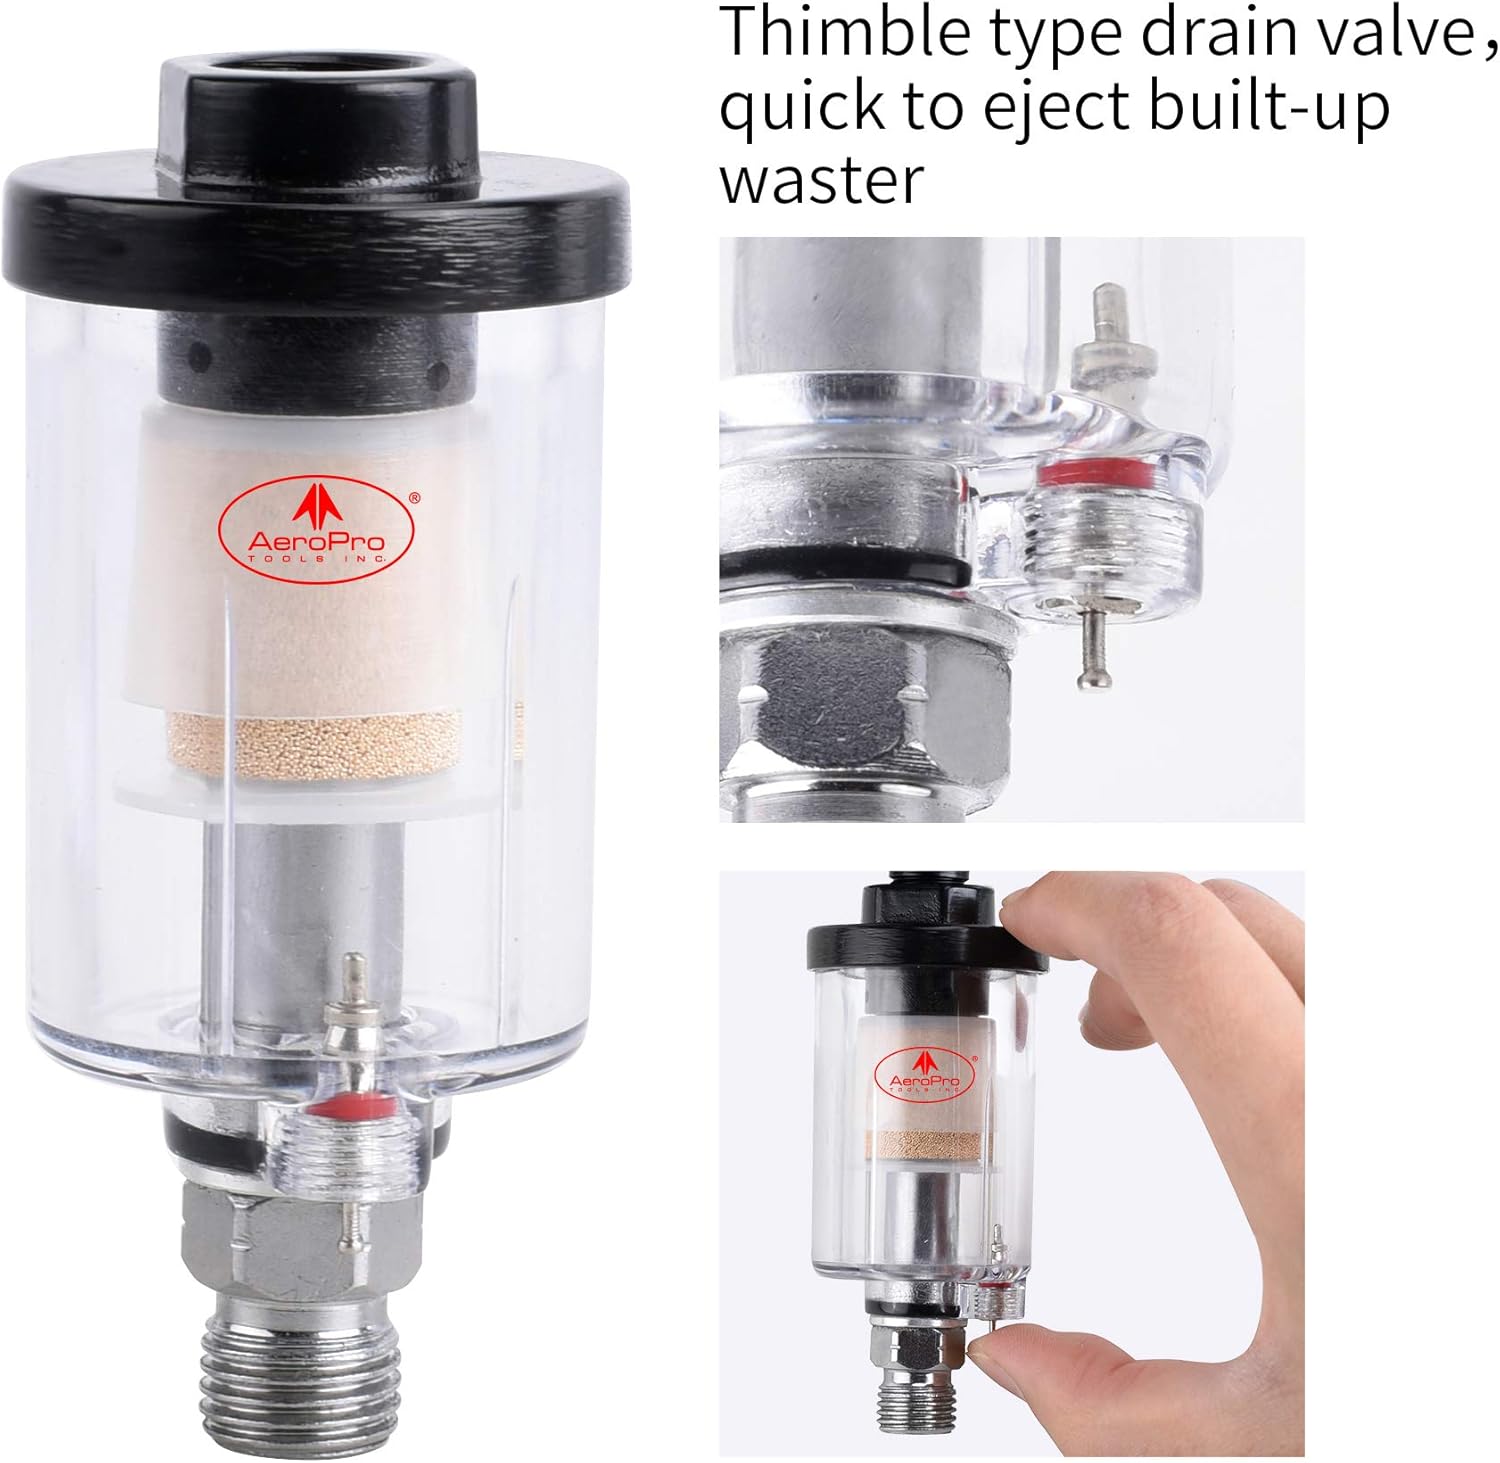
Figure 7: The thimble-type drain valve on the water oil separator allows for quick and easy removal of accumulated moisture and oil.
Troubleshooting
| Problem | Possible Cause | Solution |
|---|---|---|
| Uneven spray pattern | Clogged nozzle/air cap; incorrect air pressure; improper paint viscosity. | Clean nozzle/air cap; adjust air pressure; thin paint to recommended viscosity. |
| Paint spitting or sputtering | Low paint level; loose fluid nozzle; clogged air vent in paint cup; air leak. | Refill paint cup; tighten fluid nozzle; clear air vent; check all connections for leaks. |
| No paint flow | Clogged nozzle/fluid tip; needle not retracting; paint too thick. | Clean nozzle/fluid tip; check needle movement; thin paint. |
| Excessive overspray | Too high air pressure; gun too far from surface; paint too thin. | Reduce air pressure; move gun closer to surface; thicken paint slightly. |
| Water/Oil in paint finish | Water oil separator full or malfunctioning. | Drain water oil separator; inspect for damage or replace if necessary. |
Specifications
A608 Spray Gun
- Standard Nozzle: 1.3mm
- Paint Capacity: 600cc (0.6 Liters)
- Operating Pressure: 9.5CFM @ 29psi (2 bar)
- Pattern Width: 50-70mm (length), 260-320mm (width)
- Material: Aluminum Alloy
- Weight: 1.39 lbs
- Atomized Particles: Less than 0.16mm
- Transfer Efficiency: 65%
Air Regulator
- Inlet: 1/4" NPS (M)
- Outlet: 1/4" NPS (F) swivel
- Operating Pressure Range: 0-10 bar / 0-145 psi
- Accuracy: 1 Level
Water Oil Separator
- Included Components: A608 air spray gun, air regulator, water oil separator
- Power Source: Air Powered
Warranty and Support
AEROPRO Tools products are manufactured to high-quality standards. For warranty information, technical support, or replacement parts, please contact AEROPRO customer service through their official website or your point of purchase. Please have your product model number (A608) and purchase date available when contacting support.
For more information, visit the official AEROPRO store: AEROPRO Store
Related documentsA608

Ask a question about this manual
Ask about setup, troubleshooting, compatibility, parts, safety, or missing instructions. Manuals+ will review the question and use this page’s manual context to help answer it.