Introduction
Thank you for choosing the HOOBRO 70.9" Narrow Console Table with Charging Station. This manual provides essential information for the safe assembly, operation, and maintenance of your new console table. Please read these instructions carefully before assembly and retain them for future reference.

Image: The HOOBRO 70.9" Narrow Console Table, showcasing its slim design and integrated charging station, positioned behind a sofa in a living room setting.
Safety Information
- Weight Limit: Do not exceed the maximum weight recommendation of 80 pounds (36.3 kg) on the tabletop.
- Anti-Tip Kit: An anti-tip kit is included for wall-mount safety. It is highly recommended to install this device to prevent accidental tipping, especially in households with children or pets.
- Stable Placement: Ensure the table is placed on a flat, stable surface. Use the adjustable feet to compensate for uneven floors.
- Electrical Safety: Only use the integrated power outlets and USB ports for devices within their specified voltage and current ratings. Do not overload the charging station. Keep liquids away from electrical components.
- Assembly: Follow all assembly instructions carefully. Do not use power tools unless explicitly stated, as this may damage components.
Package Contents
Before assembly, please verify that all parts listed below are present and undamaged. If any parts are missing or damaged, contact customer support.
- Tabletop (Engineered Wood)
- Metal Frame Components
- Integrated Charging Station (2 AC Outlets, 2 USB Ports, 1 Type-C Port)
- Power Cord (59 inches / 4.9 feet)
- Adjustable Feet (4 pcs)
- Anti-Tip Kit
- Assembly Guide
- Installation Tools (Allen Key, Screwdriver)
Setup and Assembly
Assembly is required for this console table. It is recommended for 1 person to assemble. All necessary tools are included.
- Unpack: Carefully unpack all components and lay them out on a clean, soft surface to prevent scratches.
- Identify Parts: Refer to the included Assembly Guide to identify each numbered component.
- Assemble Frame: Attach the metal frame components using the provided screws and Allen key. Ensure all connections are secure but do not overtighten until fully assembled.
- Attach Tabletop: Secure the engineered wood tabletop to the assembled metal frame.
- Install Charging Station: The charging station can be placed in the middle or on the side of the tabletop. Insert the charging station into the designated cutout and secure it.
- Attach Adjustable Feet: Screw the adjustable feet into the bottom of the table legs. Adjust them to ensure the table is level.
- Install Anti-Tip Kit: Follow the instructions in the Assembly Guide to securely attach the anti-tip kit to the table and the wall.

Image: Close-up details of the console table's construction, highlighting the wooden grain tabletop, the anti-tip safety device, the sturdy metal frame, and the adjustable leveling feet.
Operating Instructions
The HOOBRO Console Table features an integrated charging station for convenient power access.
- Power Connection: Plug the 59-inch power cord from the charging station into a standard wall outlet.
- AC Outlets: Use the two standard AC outlets (120V/12A) for devices such as lamps, laptops, or other small appliances.
- USB Ports: Use the two USB ports (5V/2A) and one Type-C port (5V/2A) to charge mobile phones, tablets, and other USB-powered devices.
- Charging Station Placement: The top panel of the table allows for rotation, enabling you to position the charging station either in the middle or on the side of the table as per your preference and accessibility needs.

Image: Illustration showing the two possible assembly positions for the integrated charging station: centrally located or positioned towards one end of the tabletop.
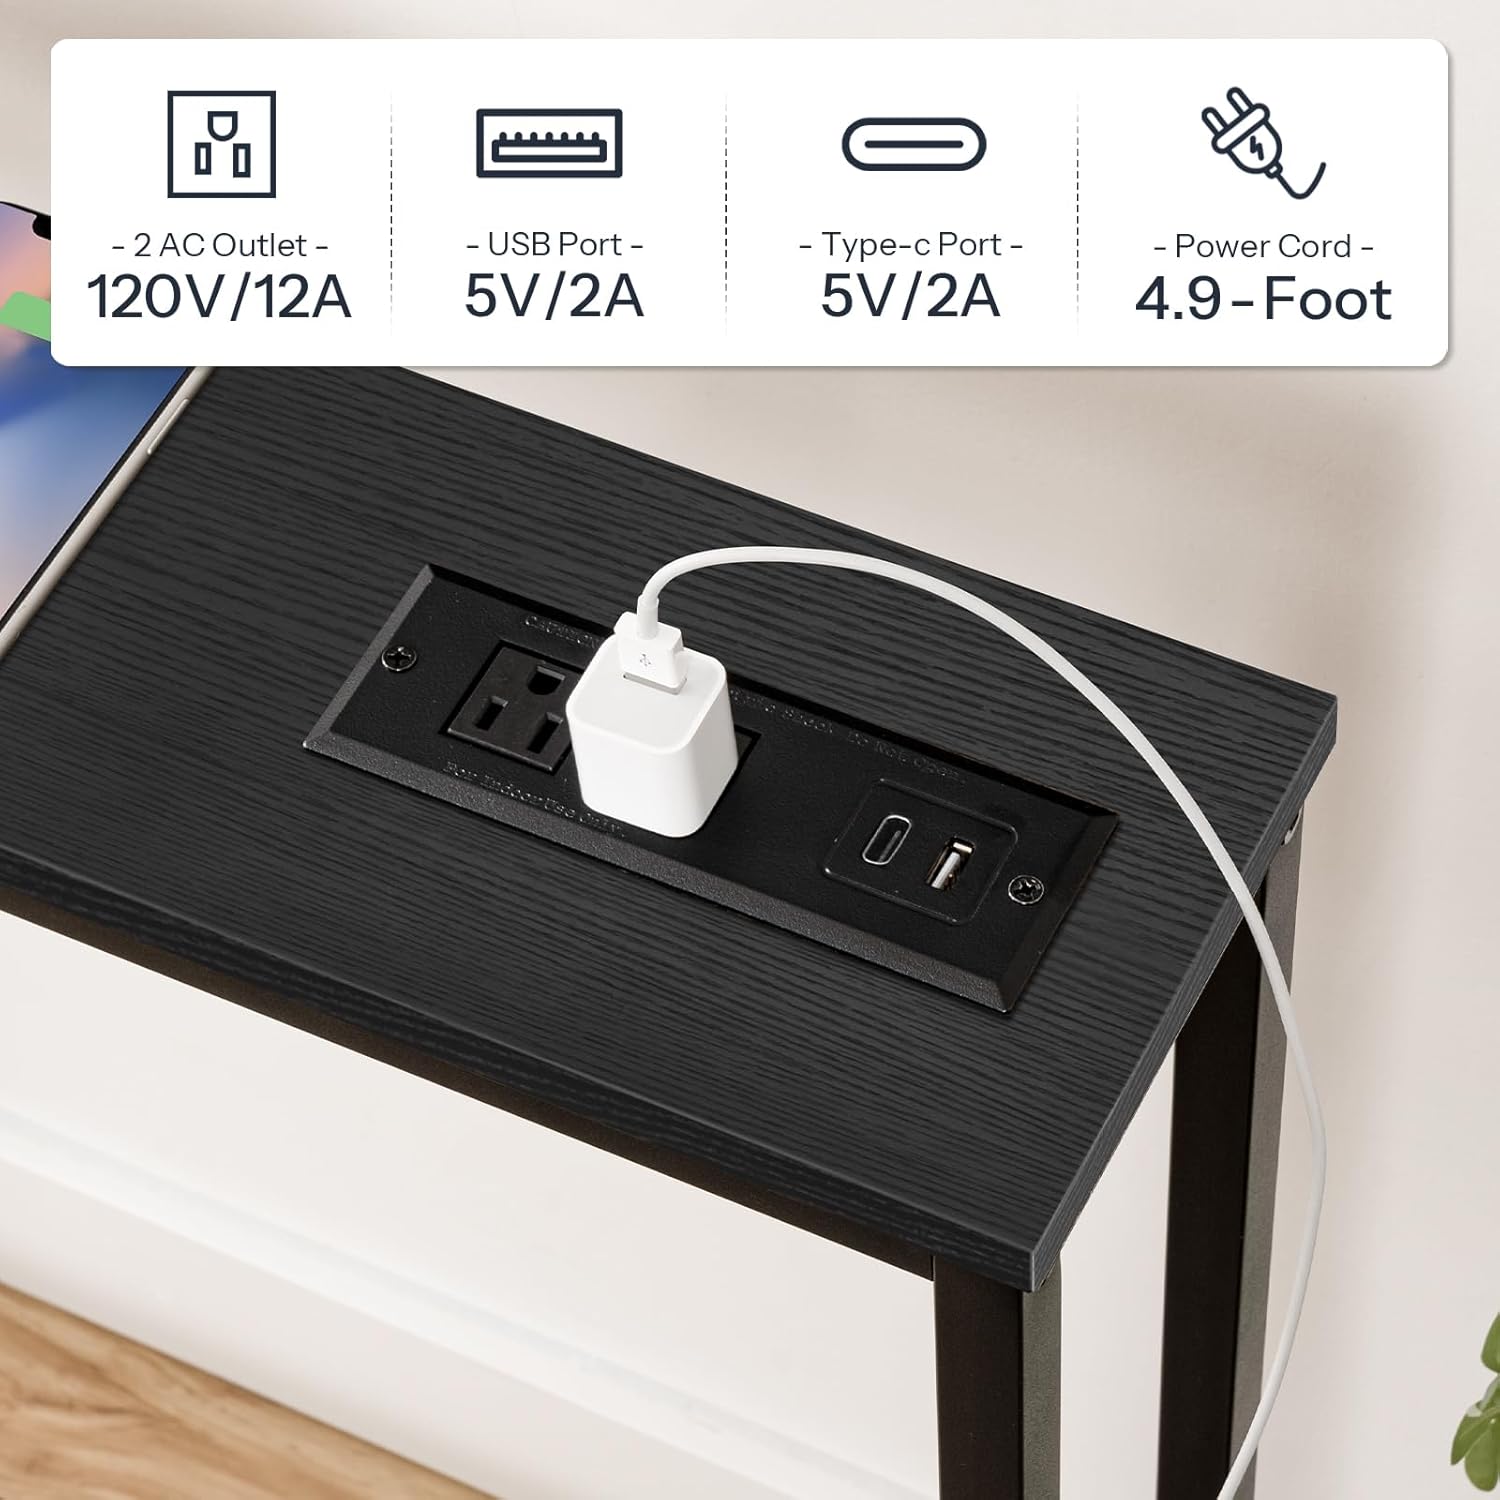
Image: A detailed view of the charging station, featuring two standard AC power outlets, two USB-A ports, and one USB-C port, with a connected power adapter.
Maintenance
- Cleaning: Wipe the table surfaces with a dry cloth. Avoid using harsh chemicals or abrasive cleaners that may damage the finish.
- Spills: Immediately wipe up any spills to prevent damage to the engineered wood and electrical components.
- Inspection: Periodically check all screws and connections to ensure they remain tight. Retighten if necessary.
- Electrical Components: Ensure the charging station and power cord are free from damage. Do not use if frayed or broken.
Troubleshooting
| Problem | Possible Cause | Solution |
|---|---|---|
| Table is wobbly. | Uneven floor or loose connections. | Adjust the leveling feet. Tighten all assembly screws. |
| Charging station not working. | Power cord not plugged in, wall outlet not active, or device issue. | Ensure power cord is securely plugged into a working wall outlet. Test the wall outlet with another device. Check your device's charging cable. |
| Missing parts during assembly. | Packaging error. | Contact HOOBRO customer support with your purchase details. |
Specifications
| Feature | Detail |
|---|---|
| Brand | HOOBRO |
| Model Number | BB185UXG01 |
| Dimensions (L x W x H) | 70.9" x 5.9" x 31.5" (180cm x 15cm x 80cm) |
| Item Weight | 17.4 Pounds (7.9 kg) |
| Maximum Weight Recommendation | 80 Pounds (36.3 kg) |
| Frame Material | Metal |
| Top Material | Engineered Wood (P2 Particleboard) |
| Color | Black |
| AC Outlets | 2 (120V/12A) |
| USB Ports | 2 (5V/2A) |
| Type-C Port | 1 (5V/2A) |
| Power Cord Length | 59 inches (4.9 feet) |
| Assembly Required | Yes |
| Includes All Assembly Tools | Yes |

Image: A technical diagram illustrating the precise dimensions of the console table, including length, depth, and height, along with the power cord length.
Warranty and Support
For warranty information, technical support, or to report missing/damaged parts, please contact HOOBRO customer service. Refer to your purchase documentation for specific contact details or visit the official HOOBRO website.
Online Support: Visit the HOOBRO Store on Amazon


