1. Introduction
The Acogedor LGA 1151 H310 Micro ATX Motherboard is designed to provide a stable and efficient platform for your desktop PC. It supports 8th and 9th generation Intel Core processors, offering a balance of performance and value for various computing needs. This manual will guide you through the installation, setup, and maintenance of your motherboard.
Key Features:
- Wide CPU Compatibility: Utilizes the LGA 1151 socket, supporting 8th and 9th generation Intel Core processors.
- Dual Channel DDR4 Memory: Features 2 DIMM slots, supporting up to 32GB per slot (64GB total) of DDR4 memory at various frequencies (up to 2666MHz, depending on CPU and module).
- Stable Power Delivery: Equipped with a three-phase power supply, all-solid-state capacitor design, and 24+8 pin power sockets for reliable operation.
- High-Speed Intel H310 Chipset: Ensures stable performance for diverse computing tasks.
- Integrated Graphics Support: Includes DVI, HDMI, and VGA display ports for multi-monitor setups.
- Storage Options: Supports NVMe M.2 and SATA 6Gb/s connectors.
Note: This motherboard is not officially compatible with Windows 11.
2. Safety Information
Please read and follow these safety guidelines to prevent damage to the motherboard or injury to yourself:
- Always disconnect the power supply from the wall outlet before installing or removing any components.
- Wear an anti-static wrist strap or frequently touch a grounded metal object to discharge static electricity before handling components.
- Handle the motherboard by its edges to avoid touching sensitive components.
- Ensure proper ventilation in your PC case to prevent overheating.
- Keep the motherboard away from moisture and extreme temperatures.
3. Package Contents
Verify that all items are present in your package:
- Acogedor LGA 1151 H310 Micro ATX Motherboard
- I/O Shield (Back Panel)
- SATA Data Cable (Quantity may vary)
Note: Additional accessories such as a user manual or driver CD may not be included. Drivers can typically be downloaded from the manufacturer's website.
4. Setup and Installation
4.1 Motherboard Overview
Familiarize yourself with the layout of the motherboard and its various connectors.

Figure 4.1: Motherboard layout with key components and ports labeled.
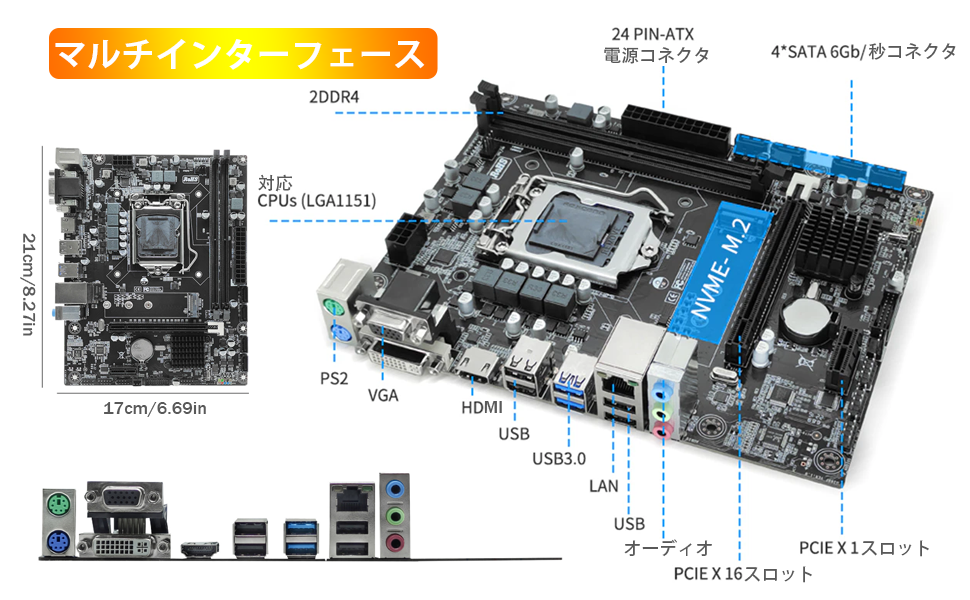
Figure 4.2: Detailed view of motherboard ports and connectors.
4.2 CPU Installation
Carefully install your LGA 1151 processor into the CPU socket.

Figure 4.3: LGA 1151 CPU Socket.
- Open the CPU socket lever.
- Align the CPU with the socket, ensuring the golden triangle on the CPU matches the triangle on the socket.
- Gently place the CPU into the socket without forcing it.
- Close the socket lever to secure the CPU.
4.3 CPU Cooler Installation
Apply thermal paste and install the CPU cooler. Refer to the cooler's specific instructions for detailed steps.
Video 4.1: SYY Thermal Paste Application and Cooler Installation Guide (Intel & AMD). This video demonstrates the general process of applying thermal paste and installing a CPU cooler, which is applicable to this motherboard.
4.4 Memory (RAM) Installation
Install DDR4 memory modules into the DIMM slots.

Figure 4.4: DDR4 Memory Slots.
- Open the clips at both ends of the DIMM slot.
- Align the memory module with the slot, ensuring the notch on the module matches the key in the slot.
- Press down firmly on both ends of the module until the clips snap into place.
4.5 Storage Device Installation (NVMe M.2 / SATA)
Connect your storage devices.
- NVMe M.2 SSD: Locate the M.2 slot. Insert the NVMe M.2 SSD at an angle and secure it with the provided screw.
- SATA Drives: Connect SATA data cables from your SSDs/HDDs to the SATA 6Gb/s ports on the motherboard. Connect power cables from your power supply to the drives.
Important: This motherboard's M.2 slot supports NVMe SSDs only. SATA M.2 SSDs are not compatible.
4.6 Power Supply Connections
Connect the main power cables from your power supply to the motherboard.
- Connect the 24-pin ATX main power connector.
- Connect the 8-pin CPU power connector (EPS12V).
4.7 Front Panel Connections
Connect the front panel headers for power button, reset button, HDD LED, power LED, and USB ports.
- Refer to your PC case manual for specific front panel cable identification.
- Carefully align the small connectors with the corresponding pins on the motherboard's front panel header (JFP1). Note that while the pins may be color-coded, printed labels might be absent, requiring careful attention to the pinout.
4.8 I/O Shield Installation
Install the I/O shield into your PC case before mounting the motherboard.
Video 4.2: H310 LGA 1151 Motherboard Overview. This video provides a visual overview of the motherboard and its components, including the I/O shield.
5. Operating Instructions
5.1 First Boot and BIOS Setup
After assembling your PC, connect a monitor, keyboard, and mouse. Power on the system.
- Press the designated key (usually DEL or F2) during startup to enter the BIOS/UEFI setup.
- Configure boot order, date/time, and other system settings as needed.
- Save changes and exit BIOS to boot into your operating system installer.
5.2 Driver Installation
For optimal performance and stability, install the latest drivers for your motherboard components.
- Visit the official website of the chipset manufacturer (Intel) to download the latest H310 chipset drivers.
- Download and install drivers for integrated graphics, LAN, and audio.
- For Windows operating systems, many drivers may be automatically installed via Windows Update. Check for updates after OS installation.
6. Maintenance
Regular maintenance helps ensure the longevity and stable operation of your motherboard.
- Dust Removal: Periodically clean dust from the motherboard and components using compressed air. Ensure the system is powered off and unplugged.
- BIOS Updates: Check the manufacturer's website for BIOS updates. Only update BIOS if necessary and follow instructions carefully to avoid system instability.
- Driver Updates: Keep your drivers updated to the latest versions for improved performance and compatibility.
7. Troubleshooting
This section addresses common issues you might encounter.
- No Display: Ensure all power cables (24-pin ATX, 8-pin CPU, GPU) are securely connected. Check monitor cable connections. Reseat RAM modules.
- System Not Booting: Verify CPU and RAM installation. Check front panel connections, especially the power button header.
- M.2 SSD Not Detected: Confirm that you are using an NVMe M.2 SSD, as SATA M.2 SSDs are not supported by this motherboard. Check if the M.2 SSD is properly seated and secured.
- No Sleep Mode (S3 Suspend to RAM): This motherboard does not support S3 sleep mode. Attempting to use it may result in system unresponsiveness, requiring a hard reset.
- Driver Issues: If experiencing issues with peripherals or system stability, ensure all necessary drivers are installed and updated. Use Windows Update or download directly from Intel's website.
- Windows 11 Installation: While the product is not officially compatible with Windows 11, some users have reported successful installations after manually updating drivers via Windows Update. However, full compatibility and stability are not guaranteed.
8. Specifications
| Feature | Specification |
|---|---|
| Brand | Acogedor |
| Manufacturer | Acogedor |
| Product Model Number | Acogedorbg74n2apwi |
| CPU Socket | LGA 1151 |
| Compatible CPUs | 8th and 9th Generation Intel Core Processors |
| Chipset | Intel H310 |
| Memory Type | DDR4 |
| Memory Slots | 2 x DIMM (Dual Channel) |
| Max Memory Capacity | Up to 64GB (32GB per slot) |
| Memory Clock Speed | Up to 2666 MHz (CPU dependent) |
| Storage Interfaces | 1 x NVMe M.2, 4 x SATA 6Gb/s |
| Integrated Graphics | Yes (CPU dependent) |
| Display Outputs | VGA, DVI, HDMI |
| Form Factor | Micro ATX (17cm x 21.5cm) |
| Product Weight | 550 g |
| ASIN | B0CP6BT5CT |
9. Warranty and Support
For warranty information and technical support, please refer to the documentation provided with your purchase or contact Acogedor customer service. Keep your proof of purchase for warranty claims.


