1. Important Safety Instructions
Please read these instructions carefully before using the Vonyx VSP200 speaker. Keep this manual for future reference.
- Power Source: Connect the unit only to a grounded mains outlet with the correct voltage. Ensure the power cord is not damaged.
- Battery Care: The VSP200 contains a rechargeable battery. Do not expose the battery to excessive heat, direct sunlight, or fire. Do not attempt to replace the battery yourself.
- Moisture: Do not expose the unit to rain or moisture to prevent fire or electric shock. Do not place objects filled with liquids, such as vases, on the apparatus.
- Ventilation: Ensure adequate ventilation. Do not block ventilation openings.
- Cleaning: Clean the unit only with a dry cloth. Do not use solvents or abrasive cleaners.
- Servicing: Do not attempt to repair the unit yourself. Refer all servicing to qualified personnel.
- Placement: Place the unit on a stable, flat surface. Avoid placing it near heat sources or in direct sunlight.
- Microphones: The wireless microphones operate on specific frequencies. Ensure no interference with other devices.
2. Product Overview
The Vonyx VSP200 is a versatile 200W portable self-amplified speaker system designed for various audio applications. It features a built-in rechargeable battery, Bluetooth connectivity, an FM radio, a USB/SD MP3 player, and comes with two wireless UHF microphones for karaoke or public speaking.
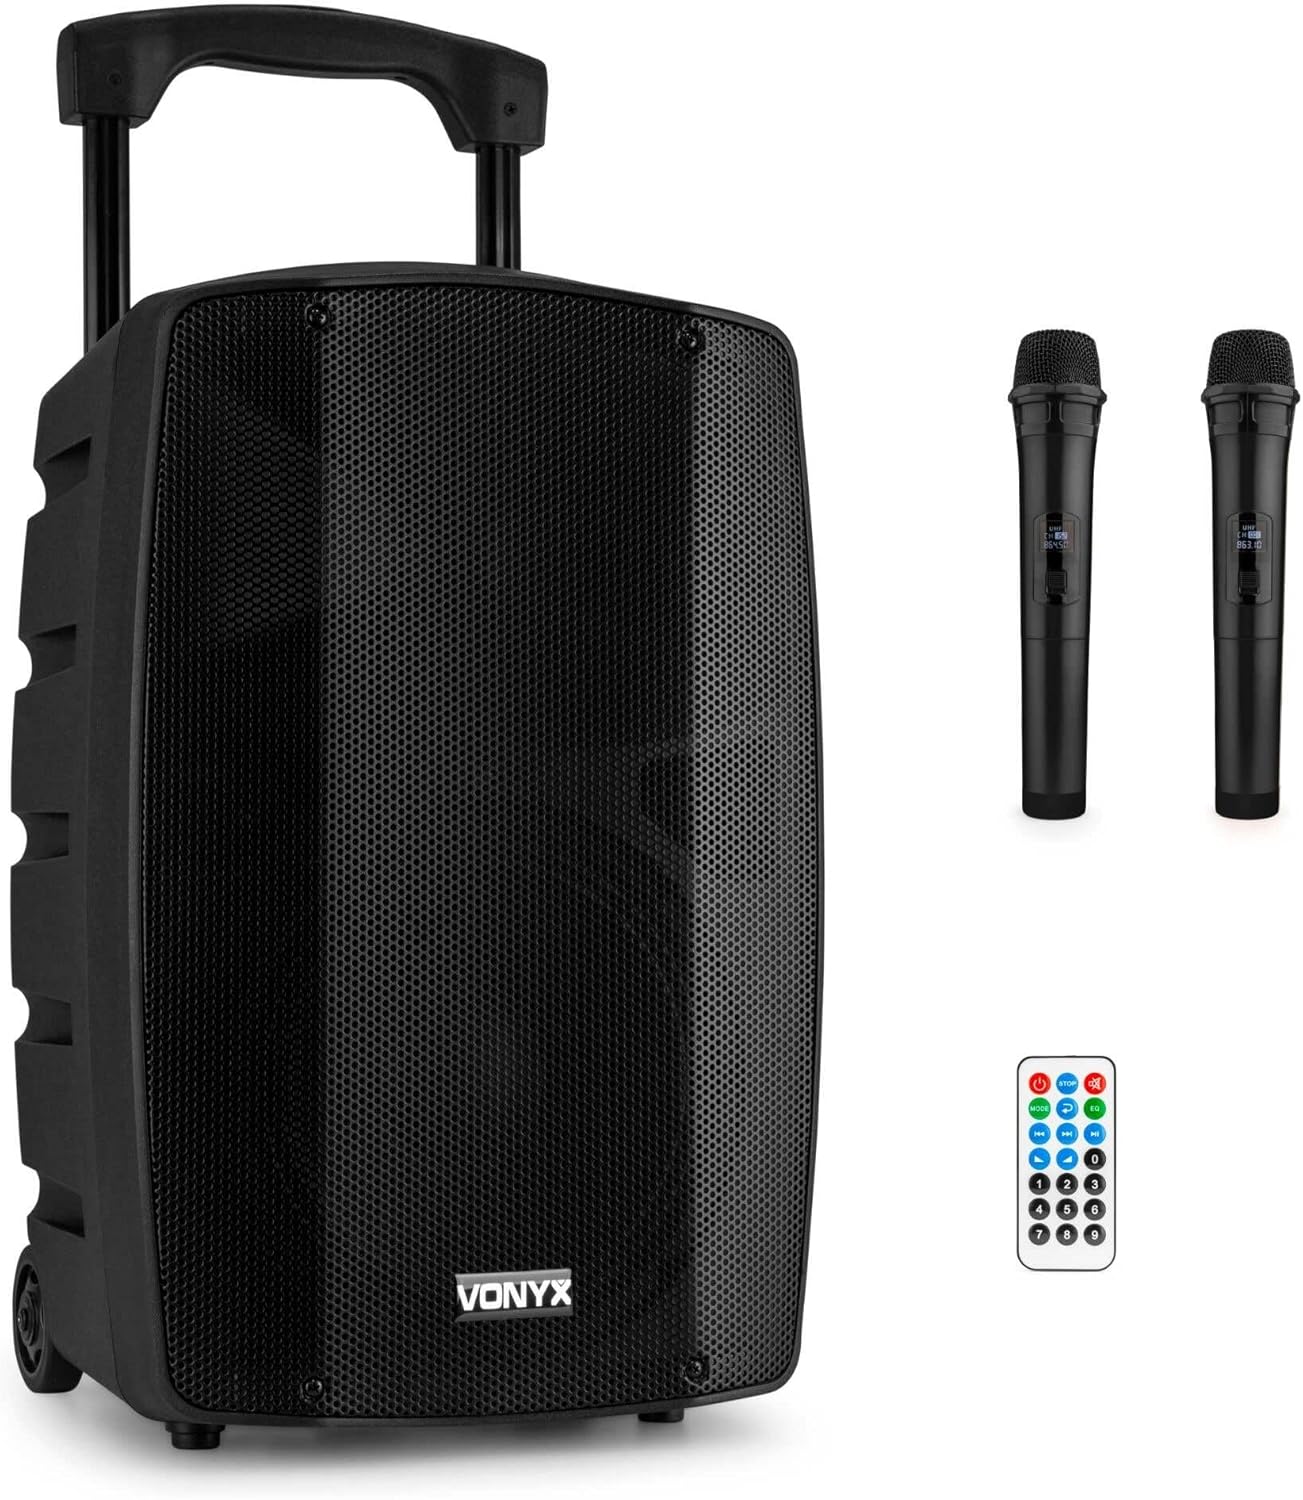
Figure 2.1: The Vonyx VSP200 speaker system, including the main unit, two wireless microphones, and a remote control.
2.1 Main Features
- 200W peak power output.
- Integrated rechargeable battery for portable use.
- Bluetooth 5.0 for wireless audio streaming.
- Built-in USB/SD MP3 player.
- FM radio tuner.
- Two UHF wireless microphones included.
- Echo, Bass, and Treble controls.
- Multiple input options: 2x Microphone (XLR/Jack combo), AUX (3.5mm Jack).
- Extendable handle and transport wheels for easy mobility.
- 35mm pole mount for stand installation.
2.2 Rear Panel Controls and Connections
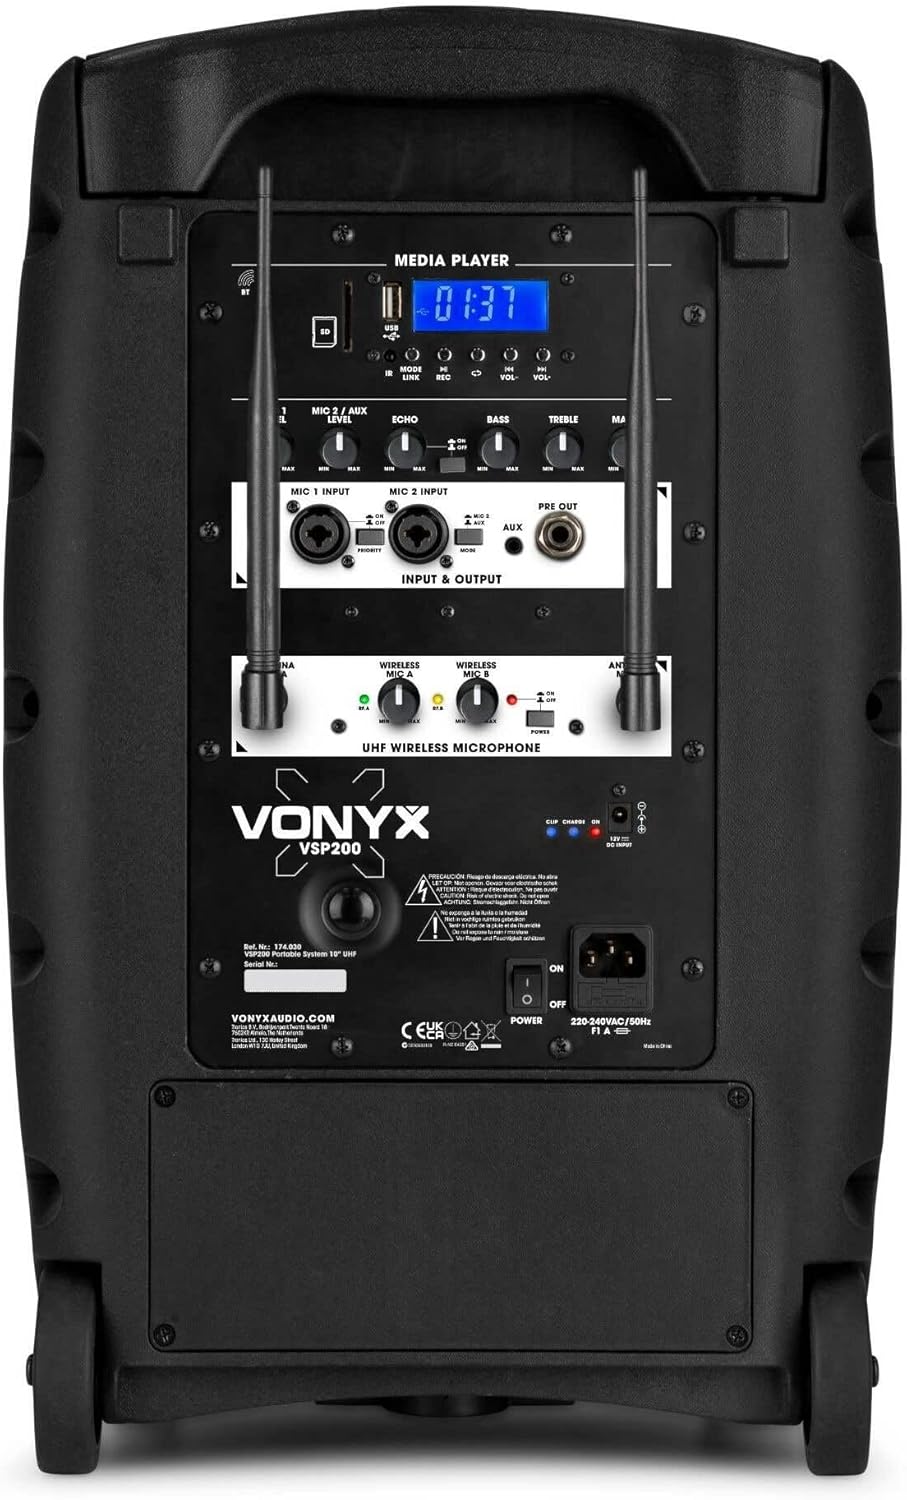
Figure 2.2: Detailed view of the VSP200's rear control panel, featuring media player controls, microphone inputs, and audio adjustments.
The rear panel provides access to all essential controls and input/output connections:
- Media Player: USB/SD card slots, LCD display, and control buttons for MP3 playback and FM radio.
- MIC 1 Input: Combo XLR/6.3mm Jack input for wired microphone.
- MIC 2 Input: Combo XLR/6.3mm Jack input for wired microphone.
- MIC/ECHO/LEVEL: Controls for microphone volume and echo effect.
- BASS/TREBLE: Equalizer controls for adjusting low and high frequencies.
- VOLUME: Master volume control for the speaker output.
- AUX Input: 3.5mm Jack input for connecting external audio devices (e.g., smartphone, laptop).
- UHF Wireless Microphone Receiver: Integrated receiver for the included wireless microphones.
- Power Switch: On/Off switch for the unit.
- AC Input: Power connection for charging and mains operation.
3. Setup
3.1 Unpacking and Initial Charge
- Carefully remove the VSP200 speaker and all accessories from the packaging.
- Inspect the unit for any signs of damage. If damaged, do not use and contact your dealer.
- Before first use, fully charge the internal battery. Connect the supplied power cable to the AC input on the rear panel and plug it into a suitable mains outlet. The charging indicator will illuminate.
- Allow several hours for a full charge. The indicator will change or turn off once charging is complete.
3.2 Positioning the Speaker
The VSP200 is designed for portability and can be used in various settings:
- On a Flat Surface: Place the speaker on a stable, level surface to ensure stability.
- Using the Extendable Handle and Wheels: For transport, extend the handle and tilt the speaker to roll it on its integrated wheels.
- On a Tripod Stand: The speaker features a 35mm pole mount on its base, allowing it to be placed on a compatible speaker stand for elevated sound projection.

Figure 3.1: The VSP200 speaker mounted on a standard 35mm tripod stand for optimal sound dispersion.

Figure 3.2: The VSP200 showing its extendable handle and transport wheels, highlighting its portability.
4. Operating Instructions
4.1 Powering On/Off
Locate the Power Switch on the rear panel of the speaker. Flip it to the 'ON' position to power on the unit. Flip it to 'OFF' to power down.
4.2 Bluetooth Connectivity
- Power on the VSP200 speaker.
- Press the 'MODE' button on the media player control panel (or remote) until 'Bluetooth' mode is selected. The display will show 'BT' and a pairing indicator will flash.
- On your smartphone, tablet, or other Bluetooth-enabled device, enable Bluetooth and search for available devices.
- Select 'Vonyx VSP200' from the list of devices.
- Once paired, the speaker will emit a confirmation tone, and the Bluetooth indicator will stop flashing. You can now stream audio wirelessly to the speaker.
4.3 USB/SD MP3 Player
- Insert a USB flash drive or SD card (containing MP3 audio files) into the corresponding slot on the media player panel.
- The speaker will automatically switch to USB/SD mode and begin playing the first track. If not, press the 'MODE' button to select USB or SD mode.
- Use the media player controls (Play/Pause, Next/Previous Track) on the speaker or remote control to manage playback.
4.4 FM Radio
- Press the 'MODE' button until 'FM' mode is selected.
- Press and hold the 'Play/Pause' button to initiate an automatic scan for FM radio stations. The speaker will scan and save available stations.
- Use the 'Next/Previous Track' buttons to navigate through the saved stations.
4.5 Using the Wireless Microphones
The VSP200 includes two UHF wireless microphones for vocal performances or announcements.

Figure 4.1: A single Vonyx wireless UHF microphone, featuring a display for channel information.
- Ensure the speaker is powered on.
- Insert 2x AA batteries (not included) into each wireless microphone, observing correct polarity.
- Turn on each microphone using its power switch. The microphone display should illuminate, indicating it's active.
- The microphones should automatically connect to the speaker's integrated UHF receiver.
- Adjust the 'MIC LEVEL' and 'ECHO' controls on the rear panel to achieve the desired vocal volume and effect.
4.6 AUX Input
To connect an external audio device via cable:
- Connect a 3.5mm audio cable from the headphone output or line-out of your external device (e.g., laptop, smartphone) to the 'AUX Input' on the speaker's rear panel.
- Press the 'MODE' button until 'AUX' mode is selected.
- Adjust the volume on both your external device and the VSP200 speaker.
4.7 Tone Controls (Bass/Treble)
Use the 'BASS' and 'TREBLE' knobs on the rear panel to adjust the low and high frequencies of the audio output. Turn clockwise to increase, counter-clockwise to decrease.
4.8 Remote Control
The included remote control provides convenient access to media player functions and mode selection.

Figure 4.2: The remote control for the VSP200, offering various playback and mode selection buttons.
- Power Button: Turns the media player on/off (does not power off the entire speaker).
- MODE: Switches between Bluetooth, USB, SD, FM, and AUX modes.
- Play/Pause: Starts or pauses playback.
- Next/Previous: Skips to the next or previous track/station.
- Volume Up/Down: Adjusts the media player volume.
- EQ: Selects equalizer presets (if available).
- Number Buttons: Direct track selection for USB/SD mode.
5. Maintenance
5.1 Cleaning
- Always disconnect the speaker from the power outlet before cleaning.
- Use a soft, dry cloth to wipe the exterior surfaces of the speaker.
- Do not use liquid cleaners, sprays, or solvents, as these may damage the finish or internal components.
- For the microphone grilles, use a soft brush to gently remove dust or debris.
5.2 Battery Care and Storage
- To prolong battery life, avoid fully discharging the battery frequently.
- If storing the speaker for an extended period, charge the battery to approximately 50-70% and recharge it every 3-6 months to prevent deep discharge.
- Store the speaker in a cool, dry place, away from direct sunlight and extreme temperatures.
- Remove batteries from wireless microphones if they will not be used for an extended period to prevent leakage.
6. Troubleshooting
| Problem | Possible Cause | Solution |
|---|---|---|
| No power | Power cable not connected; Battery discharged; Power switch off. | Ensure power cable is securely connected and plugged in. Charge the battery. Turn the power switch to 'ON'. |
| No sound output | Master volume too low; Input source not selected; External device volume too low; Cables not connected properly. | Increase master volume. Select correct input mode (Bluetooth, USB, AUX). Increase volume on external device. Check all cable connections. |
| Bluetooth not pairing | Speaker not in Bluetooth mode; Device too far; Previous device still connected. | Ensure speaker is in Bluetooth mode. Move device closer to speaker. Disconnect from any previously paired devices. |
| Wireless microphones not working | Microphone batteries low/dead; Microphone power off; Interference. | Replace microphone batteries. Turn on microphones. Move away from other wireless devices that may cause interference. |
| USB/SD playback issues | Incorrect file format; USB/SD card corrupted; USB/SD card not inserted correctly. | Ensure files are in MP3 format. Try a different USB/SD card. Reinsert the USB/SD card. |
7. Specifications
- Brand: VONYX
- Model: VSP200
- Power Output: 200W (Peak)
- Color: Black
- Connectivity: Bluetooth 5.0, USB, SD, AUX (3.5mm Jack)
- Microphone Inputs: 2x Combo XLR/6.3mm Jack
- Wireless Microphones: 2x UHF (batteries not included)
- Features: FM Radio, MP3 Player, Echo, Bass, Treble controls, Extendable handle, Transport wheels, 35mm pole mount
- Battery: 1x Rechargeable non-standard battery (included)
- Manufacturer: Tronios B.V.
8. Warranty and Support
Vonyx products are designed and manufactured to the highest quality standards. In the unlikely event of a problem with your VSP200 speaker, please refer to the troubleshooting section first. If the issue persists, contact your retailer for assistance.
Information regarding specific warranty terms and conditions can typically be found with your purchase documentation or on the official Vonyx website. Please retain your proof of purchase for any warranty claims.


