1. Introduction
The Hagibis Mini 3.5-inch IPS USB Screen with USB-C Hub is a versatile 2-in-1 device designed to enhance your computing experience. It combines a compact IPS display with a multi-functional USB-C docking station, offering expanded connectivity and real-time data monitoring capabilities. This manual provides detailed instructions for setup, operation, and maintenance of your device.

Figure 1: Hagibis Mini 3.5-inch IPS USB Screen with USB-C Hub.
2. Package Contents
Please check the package contents upon unboxing to ensure all items are present and in good condition.
- 1 x Hagibis Mini Monitor USB C Docking Station
- 1 x Silicone Pad
- 1 x Full Function Cable (USB-C to USB-C)
- 1 x User Manual

Figure 2: Contents of the product packaging, including the main unit, silicone pad, cable, and manual.
3. Product Features
- 2-in-1 Design: Combines a USB-C docking station with a 3.5-inch IPS mini display.
- IPS Mini Screen: 3.5-inch IPS display with a wide 178° viewing angle, offering accurate color presentation. Native resolution of 960x640, with virtual resolutions up to 1920x1080 supported.
- Multi-functional Display: Capable of showing time, weather, temperature, dynamic wallpapers, electronic photo albums, video playback, floating lyrics, and computer performance monitoring (CPU, RAM, HDD data via AIDA64).
- Extensive Connectivity:
- 2 x USB 3.0 ports (5Gbps)
- 1 x USB-C port (5Gbps)
- 1 x SD 3.0 card slot
- 1 x Micro SD 3.0 card slot
- 1 x 3.5mm AUX audio port
- 1 x HDMI-IN port
- 1 x 5V/2A Power Input port
- One Cable Connection Mode: Connects via a single USB 3.1 Gen2 Type-C cable to compatible laptops (Thunderbolt 3/4, USB4, or USB-C with DisplayPort protocol support) for simultaneous display and interface expansion.
- HDMI-Compatible Mode: Connects to a computer's USB or Type-C port for power and interface expansion, and uses the HDMI-IN port for secondary screen display.
- Silicone Pad: Includes a silicone pad to adjust the device angle by approximately 5 degrees for improved viewing comfort.
4. Setup Guide
4.1 Understanding the Interfaces and Buttons

Figure 3: Front and rear views of the device highlighting ports and controls.
- Front Ports: TF(3.0) card slot, SD(3.0) card slot, USB-C (5Gbps) port, 2 x USB3.0 (5Gbps) ports.
- Rear Ports: 5V/2A Power Input, HDMI-IN, HOST (USB-C), 3.5mm AUX.
- Side Buttons: Brightness Adjustment knob, Screen Switch button.
Note: The 5V/2A power input is a supplementary power supply port. If the power supply from the expansion port is insufficient, connect an external charger here. The HDMI-compatible IN port is for external video signal input and does not support output.
4.2 Connection Modes
4.2.1 One Cable Connection Mode (USB-C)
This mode allows simultaneous display on the mini screen and expansion of interfaces using a single USB-C cable.
- Connect one end of the provided Full Function Cable (USB-C) to the HOST port on the Hagibis Mini Monitor.
- Connect the other end of the cable to a compatible USB-C port on your laptop or PC.
Important: The USB-C interface on your computer must support Thunderbolt 3/4, USB4, or a USB-C port that supports the DisplayPort (DP) protocol for this mode to function correctly.

Figure 4: Connecting the device to a laptop via a single USB-C cable for display and hub functionality.
4.2.2 HDMI-Compatible Mode
This mode is used when your computer does not have a full-featured USB-C port or you prefer to use HDMI for video output.
- Connect a standard USB cable from your computer's USB-A or USB-C port to the HOST port on the Hagibis Mini Monitor for power and data transfer (for the hub functions).
- Connect an HDMI cable from your computer's HDMI output port to the HDMI-IN port on the Hagibis Mini Monitor for video display.

Figure 5: Connecting the device to a desktop PC using separate USB and HDMI cables.
4.3 Initial Power On and Display Settings
Once connected, the mini screen should power on automatically. You may need to adjust display settings on your computer.
- Windows: Go to Display Settings (right-click desktop > Display settings). You can extend or duplicate your main display to the Hagibis Mini Monitor. Adjust resolution as needed.
- macOS: Go to System Settings > Displays. Arrange displays and set resolution.
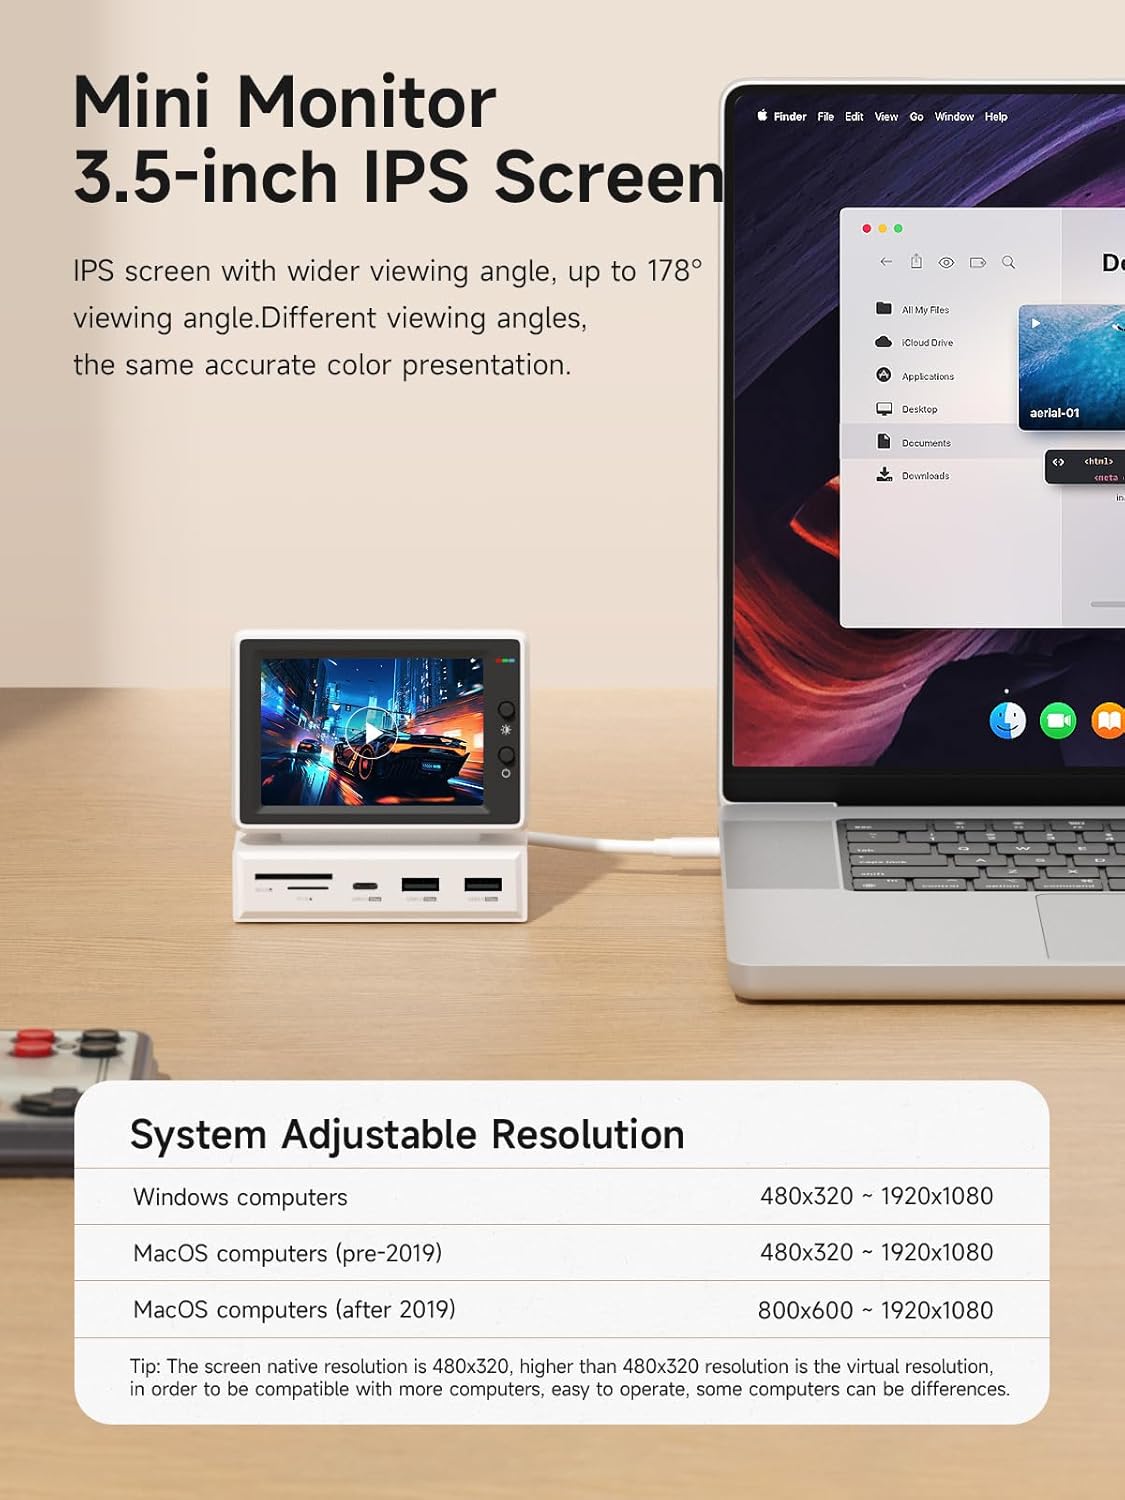
Figure 6: The mini monitor displaying content, with a table indicating supported resolutions for Windows and macOS.
Resolution Note: The native resolution of the IPS screen is 960x640. Resolutions higher than 960x640 are virtual resolutions. Compatibility may vary slightly with different computer systems.
5. Operating Instructions
5.1 Using the Docking Station Features
The integrated docking station provides convenient access to various peripherals.

Figure 7: The device functioning as a multi-port docking station, connecting various external devices.
- USB Ports: Connect external keyboards, mice, USB drives, or other USB devices to the USB 3.0 or USB-C ports.
- Card Readers: Insert SD or Micro SD cards into the respective slots for data transfer.
- Audio Output: Connect headphones or speakers to the 3.5mm AUX port for audio output from the connected computer.
5.2 Adjusting Display Settings on the Device
- Brightness Adjustment: Use the Brightness Adjustment knob on the side of the device to increase or decrease the screen brightness.
- Screen Switch: Press the Screen Switch button to cycle through different display modes or turn the screen on/off.
5.3 Utilizing the Silicone Pad
The included silicone pad can be used to adjust the viewing angle of the mini monitor.

Figure 8: The device shown with and without the silicone pad, illustrating the 5-degree angle increase when the pad is used.
- To increase the angle by approximately 5 degrees, place the silicone pad underneath the main unit.
- For a flat placement, simply use the device without the silicone pad.
6. Maintenance
- Cleaning: Use a soft, dry, lint-free cloth to clean the screen and exterior surfaces. Do not use liquid cleaners or aerosol sprays directly on the device.
- Storage: When not in use for extended periods, store the device in a cool, dry place away from direct sunlight and extreme temperatures.
- Handling: Avoid dropping the device or subjecting it to strong impacts. Do not attempt to disassemble the unit, as this will void the warranty.
7. Troubleshooting
| Problem | Possible Cause | Solution |
|---|---|---|
| Screen does not turn on. | No power or incorrect connection. |
|
| Display is flickering or distorted. | Cable issue, resolution mismatch, or insufficient power. |
|
| USB ports or card readers are not working. | Driver issue, insufficient power, or incorrect connection. |
|
| No audio from 3.5mm AUX port. | Audio output settings on computer. |
|
8. Specifications

Figure 9: Product dimensions and basic parameters.
| Brand | Hagibis |
| Model Number | X86 |
| Color | White |
| Screen Size | 3.5 inches |
| Screen Type | IPS |
| Native Resolution | 960 x 640 |
| Max Supported Resolution | 1920 x 1080 (Virtual) |
| Interface Hardware | USB 3.1 Type C (HOST), HDMI-IN, 2x USB 3.0, 1x USB-C (5Gbps), SD 3.0, Micro SD 3.0, 3.5mm AUX, 5V/2A Power Input |
| Data Transfer Rate | 5 Gigabits per second (USB 3.0/USB-C) |
| Compatible Devices | MacBook Air, MacBook Pro, Microsoft Surface Go 2, PCs with compatible USB-C or HDMI ports |
| Material | ABS |
| Product Dimensions (L x W x H) | 9.9 x 7.1 x 9.4 cm (approx. 3.9 x 2.8 x 3.7 inches) |
| Item Weight | 8.8 Ounces (approx. 249 grams) |
9. Warranty and Support
For warranty information and technical support, please refer to the official Hagibis website or contact their customer service directly. Keep your purchase receipt as proof of purchase for warranty claims.
Manufacturer: Shanghai Xinxie Industrial Co., Ltd.


