1. Introduction
The SIMSONN NEW PRO Pedals (SPRO-P3) are high-performance sim racing pedals designed for PC racing simulators. Featuring pressure sensor load cells and hydraulic damping, these pedals offer a realistic and immersive driving experience. This manual provides essential information for setup, operation, maintenance, and troubleshooting to ensure optimal performance and longevity of your pedals.

For a general overview of the product, please watch the following video:
Video 1.1: SIMSONN Racing Pedals for PC Windows - This video provides a brief demonstration of the pedals in use with a PC racing simulator.
2. Product Features
- High-Quality Construction: Made of high-quality steel with CNC precision laser cut stainless steel (3mm thickness), ensuring durability and anti-rust properties. Features a metal brushing and magnetic grinding finish.
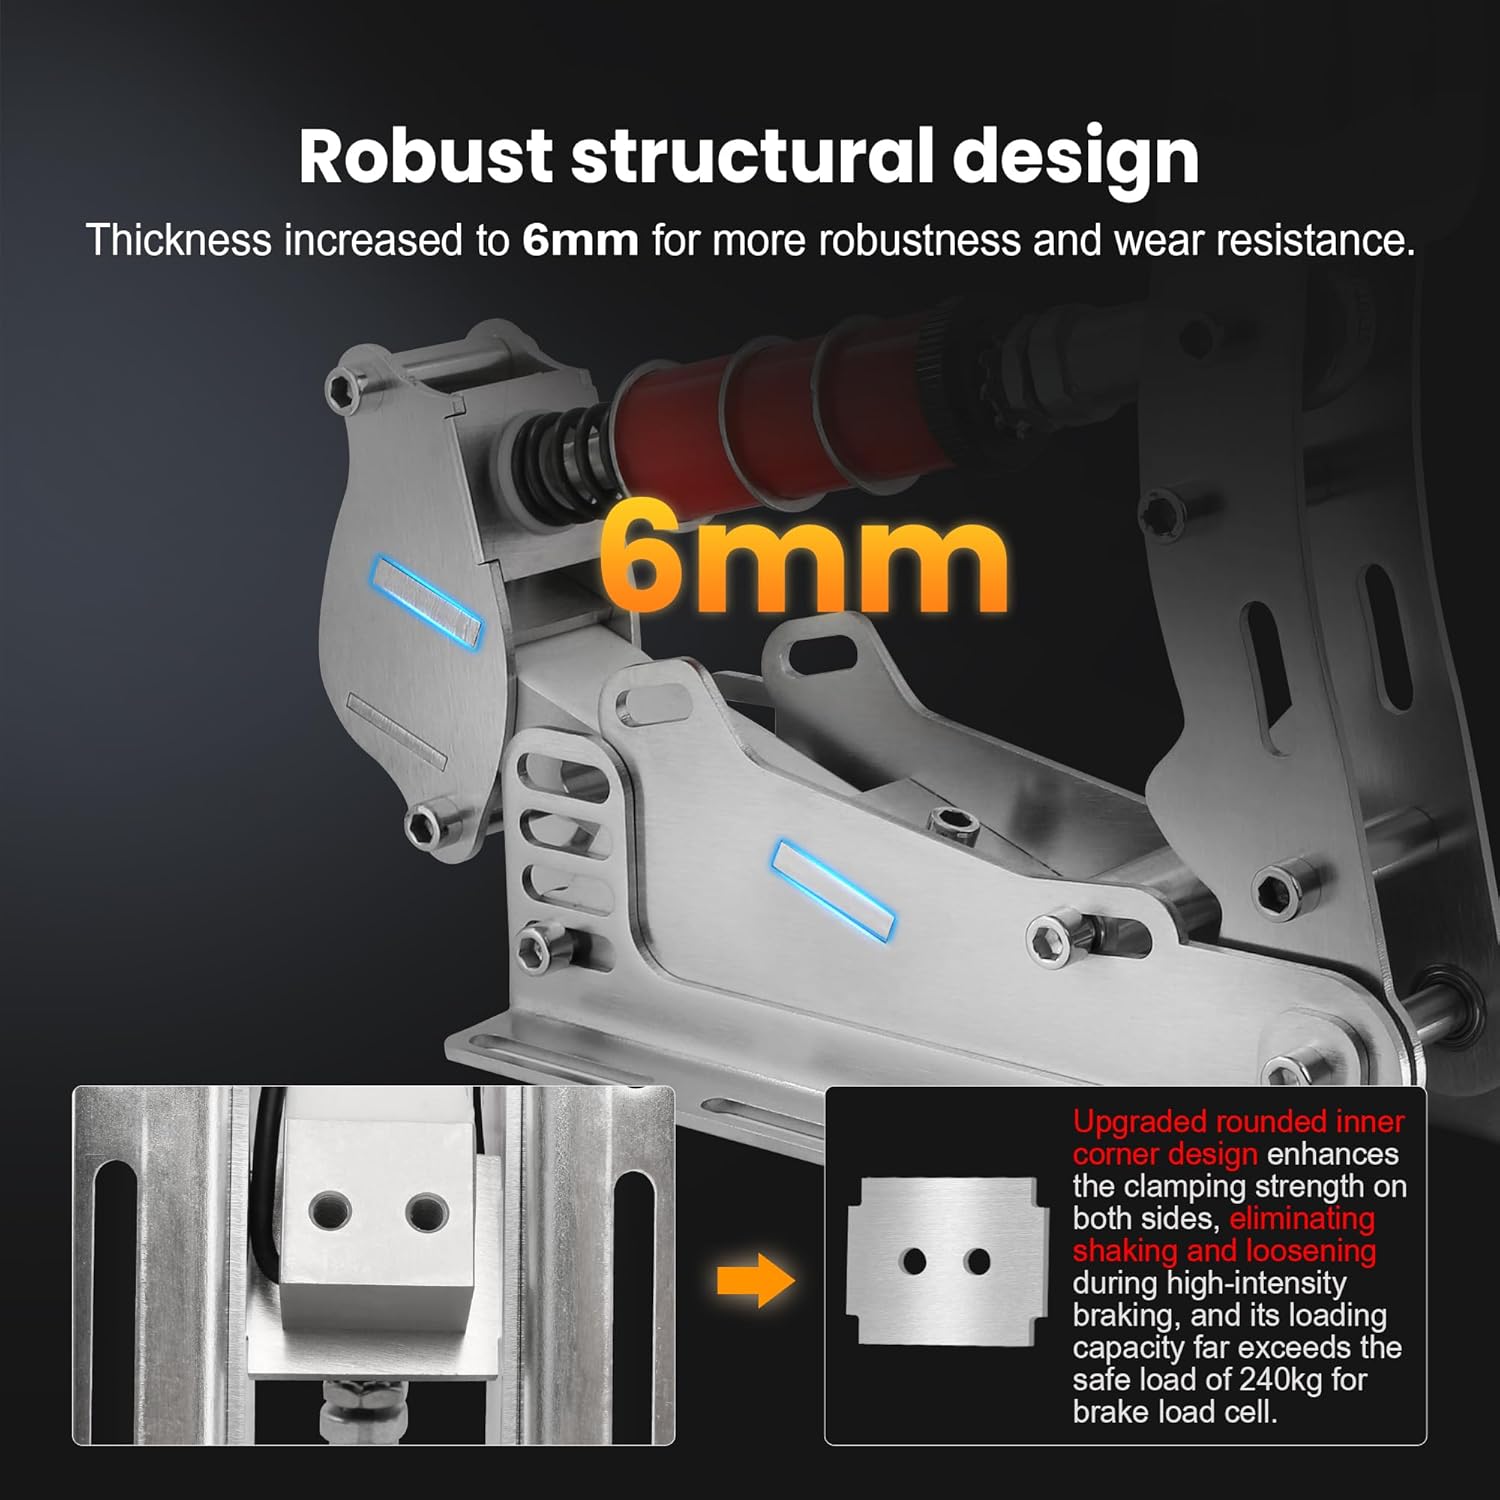
- Robust Structural Design: Increased plate thickness to 6mm for enhanced robustness and wear resistance. Upgraded rounded inner corner design improves clamping strength and eliminates shaking during high-intensity braking.
- Upgraded Ball Bearings: Design tolerances have been optimized, and all key pivot points feature ball bearings for no noise, rust-proof, anti-corrosion, no wobble, and smoother running after millions of duty cycles.
- Adjustable Brake Damping: Utilizes Red polyurethane damping with a hardness of 55, providing a progressive braking feel.
- Adjustable Pedal Strength & Angle: The strength of each pedal can be adjusted by modifying the height of the hole, and the inclination angle can also be adjusted for personalized feel.
- Optimized Pedal Panels: Added heel and toe position on the throttle panel, and the brake panel is widened for easy heel-toe operation.
- Integrated Calibration Data: Pedal calibration data is stored directly in the controller, eliminating the need for repeated calibrations once set.


3. Compatibility
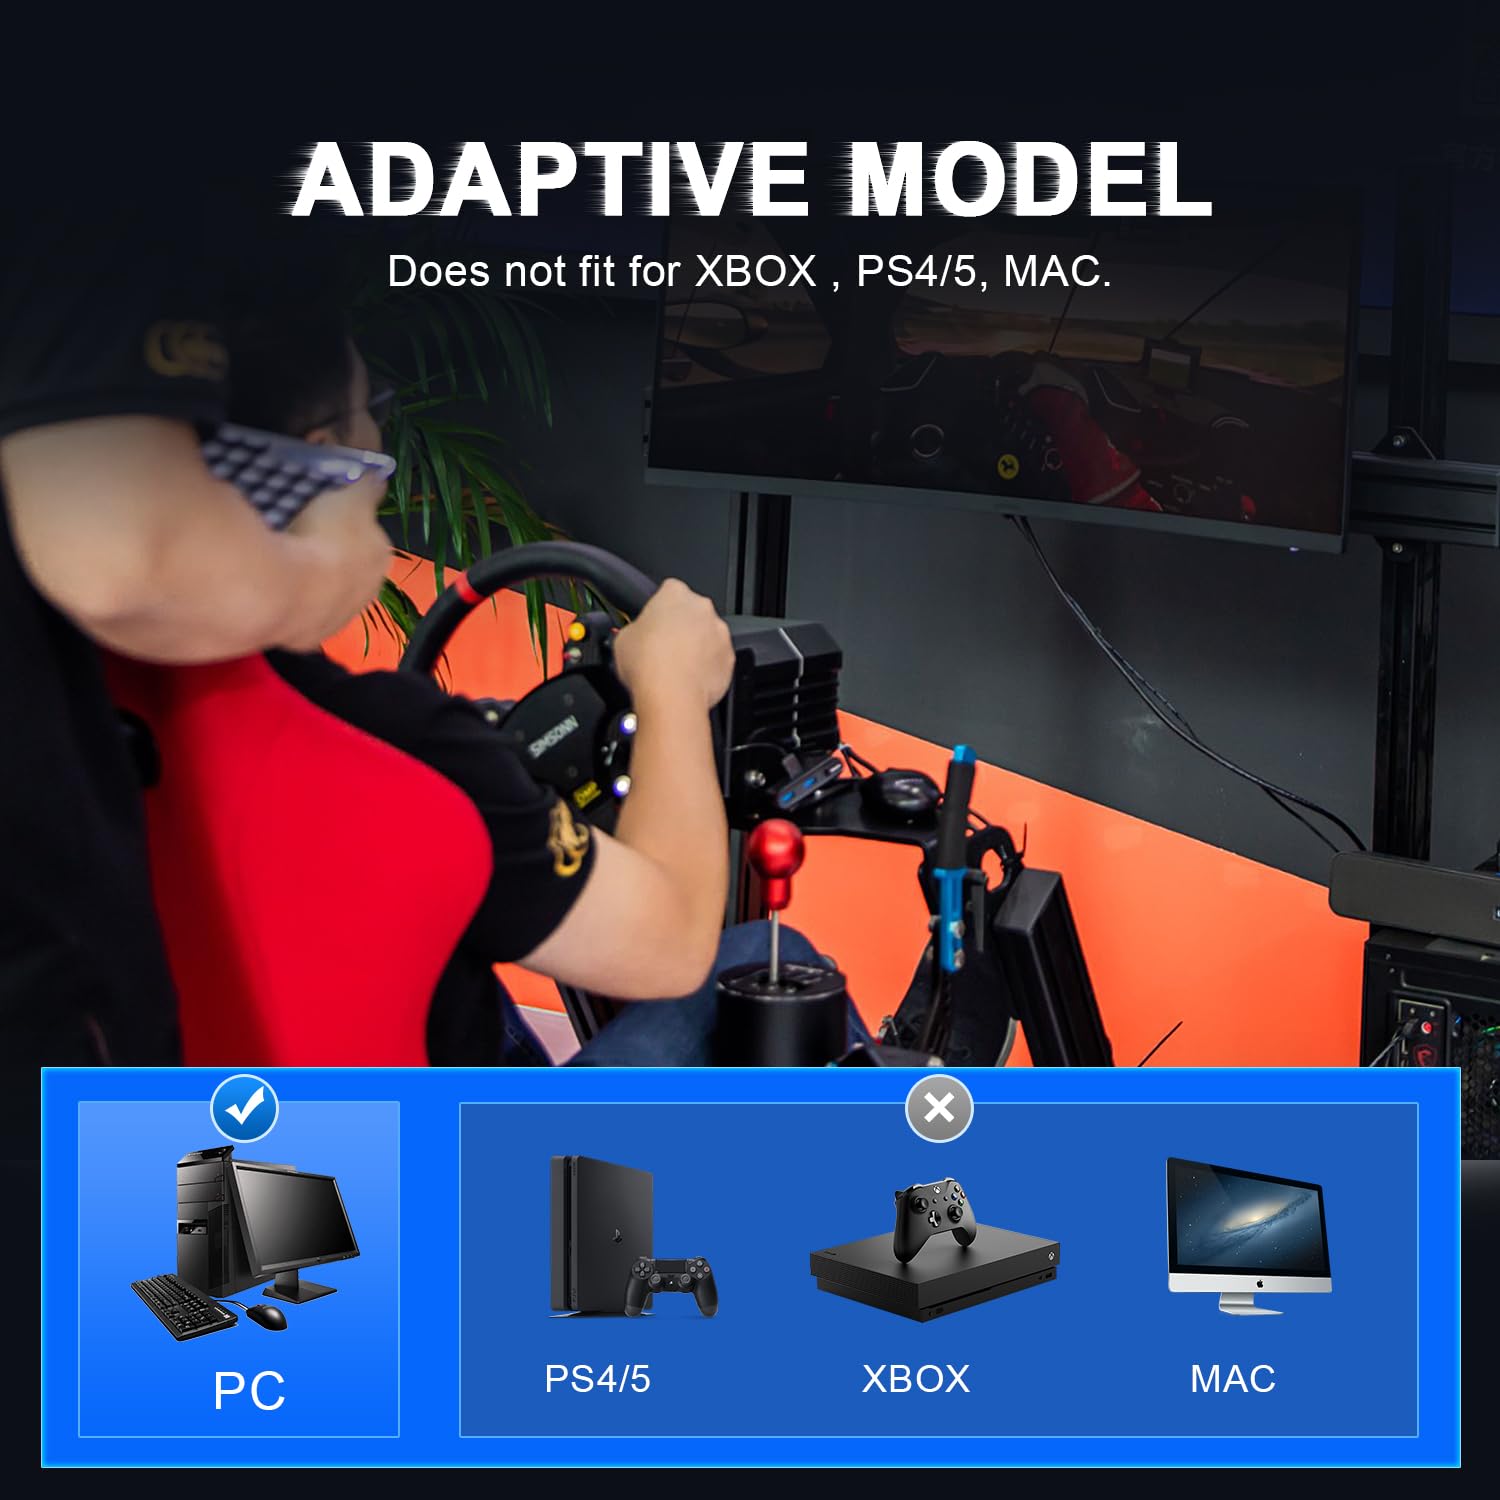
The SIMSONN NEW PRO Pedals are designed exclusively for PC use and are compatible with Windows 11 and earlier versions. They are not compatible with PlayStation (PS4/PS5), Xbox, or Mac operating systems.
- PC Compatibility: Windows 11 and below.
- Console/OS Incompatibility: PS4/5, XBOX, MAC.
- Cockpit Compatibility: Compatible with all Steam ESR (Extreme Sim Racing) wheel stands and cockpits.

4. Setup & Installation
4.1. Unboxing and Initial Inspection
Upon receiving your SIMSONN NEW PRO Pedals, carefully unbox all components. Verify that all parts listed in the packaging are present and inspect for any visible damage. If any components are missing or damaged, please contact SIMSONN support immediately.
An unboxing video is available for reference:
Video 4.1: SIMSONN Pro Pedals [UNBOXING] - This video guides you through the unboxing process and shows the contents of the package.
4.2. Physical Installation
Mount the pedals securely to your sim racing cockpit or wheel stand. The large slots on the side of the pedal base provide ample flexibility for various mounting configurations. Ensure the pedals are firmly attached to prevent movement during use.
For detailed installation steps, please refer to the following video:
Video 4.2: SIMSONN Pedals Installation - This video demonstrates the physical installation process of the pedals onto a rig.
4.3. Software Connection
Connect the pedal set to your PC using the provided USB cable. The pedals are plug-and-play, requiring no driver installation. They will be recognized as a standard game controller by your Windows operating system.
4.4. Calibration
Calibration is essential for accurate pedal response. The pedal calibration data is stored in the controller itself, so it only needs to be calibrated once. Customers purchasing after March 13th should use the SimPedalsConfig_V4 calibration software.

Follow these steps for calibration using the FreeJoy Configurator (v1.7 or SimPedalsConfig_V4):
- Download Software: Obtain the FreeJoy Configurator v1.7 or SimPedalsConfig_V4 software from the official SIMSONN download page.
- Connect Device: Ensure your pedals are connected to your PC via USB.
- Open Software: Launch the FreeJoy Configurator. Select your pedal device (e.g., SIMSONN v1.7) from the dropdown menu, ensuring you choose the correct device name.
- Read Configuration: Click "Read config from Device" to load the current settings.
- Access Axes Config: Navigate to the "Axes Config" tab.
- Step on Pedals: Step on each pedal (throttle, brake, clutch) individually to ensure the corresponding axes are moving on the interface.
- Calibrate Each Axis: For each axis, click "Calibrate" and then step on the pedal with normal pressure three times. This sets the minimum and maximum values.
- Stop & Save: After calibrating each axis, click "Stop & Save".
- Write Configuration: Click "Write config to Device" to save the new calibration data to the pedal controller.
- Set Dead Zone: After calibration, it is recommended to set a dead zone. Click "Read config from Device" again. For each axis, subtract approximately 1000 from the minimum value data to create a small dead zone at the start of the pedal travel.
- Write Dead Zone: Click "Write config to Device" to save the dead zone settings.
For visual guidance on calibration, please watch these videos:
Video 4.3: FreeJoy Calibration Steps of SIMSONN PRO Pedals - This video demonstrates the calibration process using FreeJoy software.
Video 4.4: SIMSONN PRO Pedals V4.0 Software Calibration Steps - This video shows the calibration process using the V4.0 software.
Important Note: It is essential to perform the final "Write config to Device" step after calibration and dead zone setting. Otherwise, the pedals may be overwritten by FreeJoy's default configuration, causing them to malfunction. In such a case, restore the configuration files provided in the software package and follow the configuration steps again.
Software download link: http://download.simsonn.com/freejoy
Recovery File Download Link: http://download.simsonn.com/recoveryfile
5. Operating Instructions
Once installed and calibrated, your SIMSONN NEW PRO Pedals are ready for use with your favorite PC sim racing titles. The pedals are designed to provide a highly customizable and realistic feel.
5.1. Adjusting Pedal Feel
The pedals offer extensive adjustability to match your preference:
- Pedal Strength: Adjust the physical height of the hole on each pedal to modify the leverage and perceived strength.
- Inclination Angle: The angle of the pedal faces can be adjusted to suit your ergonomic needs and driving style.
- Brake Damping: The brake pedal features Red polyurethane damping with a hardness of 55. Experiment with different elastomers (if included or purchased separately) to fine-tune the progressive feel.
- Throttle & Brake Panel Position: The throttle panel includes a dedicated heel and toe position, and the brake panel is widened for easier heel-toe maneuvers.


6. Maintenance
To ensure the longevity and consistent performance of your SIMSONN NEW PRO Pedals, follow these general maintenance guidelines:
- Cleaning: Regularly wipe down the pedals and base with a soft, dry cloth to remove dust and debris. Avoid using harsh chemicals or abrasive cleaners.
- Connection Check: Periodically check all cable connections to ensure they are secure.
- Moving Parts: While the pedals feature upgraded ball bearings for smooth operation, occasional inspection of moving parts for any signs of wear is recommended.
- Storage: If storing the pedals for an extended period, keep them in a dry, dust-free environment.
7. Troubleshooting
If you encounter issues with your SIMSONN NEW PRO Pedals, consider the following troubleshooting steps:
- Pedals Not Responding:
- Ensure the USB cable is securely connected to both the pedals and your PC.
- Try connecting to a different USB port on your PC.
- Restart your PC.
- Verify that the pedals are recognized in Windows Game Controller settings.
- Incorrect Pedal Readings/Spikes:
- Recalibrate the pedals using the FreeJoy Configurator or SimPedalsConfig_V4 software as described in Section 4.4.
- Ensure you have correctly set the dead zone during calibration.
- If experiencing Electromagnetic Interference (EMI) issues, particularly with direct drive wheelbases, consider using a USB isolator inline with the pedal set's USB cable.
- Pedals Malfunctioning After Software Use:
- This can occur if the configuration was not properly written to the device. Restore the configuration files provided in the software package and follow the calibration steps (Section 4.4) again, ensuring the final "Write config to Device" step is completed.
- Physical Issues (e.g., loose parts):
- Inspect all screws and fasteners for tightness. Tighten any loose components.
If these steps do not resolve your issue, please contact SIMSONN customer support for further assistance.
8. Specifications
| Feature | Detail |
|---|---|
| Model | SPRO-P3 |
| Compatibility | PC (Windows 11 and below) |
| Connectivity | USB (Plug-and-play, no drivers required) |
| Material | High-quality steel, CNC precision laser cut stainless steel (3mm & 6mm thickness) |
| Brake Damping | Red polyurethane (55 hardness) |
| Adjustability | Pedal strength, inclination angle, damping (via elastomers/springs) |
| Product Dimensions | 18.11 x 13.39 x 5.51 inches |
| Item Weight | 12.54 pounds |
9. Warranty & Support
9.1. Warranty Information
SIMSONN provides the following warranty coverage for your NEW PRO Pedals:
- Product Warranty: A 12-month warranty is provided for defective products. This warranty does not cover any damage or misuse caused by the buyer.
- Accessories Warranty: Accessories included with the pedals are covered by a 3-month warranty.
9.2. Customer Support
For any questions, technical assistance, or warranty claims, please contact SIMSONN customer support. Remote support is available to assist customers with setup and troubleshooting. If you require assistance with calibration, please contact us, and we will provide the necessary software information and guidance.


