
1. Introduction
The JJC MSG-U1 Phone Camera Grip with Wireless Remote is designed to enhance your mobile photography and videography experience. It provides a comfortable, ergonomic grip for increased stability, reduces camera shake, and offers versatile mounting options for accessories. The detachable wireless remote allows for convenient remote shutter control, making it ideal for selfies, group photos, and stable video recording. This manual provides instructions for setup, operation, maintenance, and troubleshooting.
2. Package Contents
Verify that all items listed below are included in your package:
- Phone Grip x1
- Wireless Remote x1
- Type-C Cable x1
- Detachable Hex Tool x1
- Lanyard x1
- Safety String x1

Image: All components included in the JJC MSG-U1 Phone Camera Grip package.
3. Product Overview & Features
The JJC MSG-U1 offers several features designed for ease of use and versatility:
- One-Hand Phone Grip Design: Ergonomic design for stable, comfortable handling, reducing shake during photo or video capture. The handle is silicone-wrapped for a secure feel.
- Universal Phone Clamp with Two Cold Shoe Mounts: The clamp extends from 2.2 to 3.5 inches (55-90mm) to accommodate various smartphones. Two cold shoe mounts allow attachment of accessories like LED lights or external microphones.
- Phone Grip and Stand Functionality: The phone clamp is detachable. When detached and re-mounted with the hex tool, it supports both landscape and portrait shooting. The grip can also serve as a tabletop stand for hands-free viewing or recording.
- Magnetic Wireless Remote: The detachable remote pairs instantly with iOS and Android smartphones via Bluetooth, requiring no additional app. It operates up to 32.8 feet (10m) away and features a rechargeable Type-C battery.
- Additional DIY Scenarios: A magnetic round ring on the back allows for mounting magnetic accessories (sold separately). A 1/4" tripod screw on the bottom enables tripod mounting.

Image: Detailed view of the JJC MSG-U1 components and their functions.
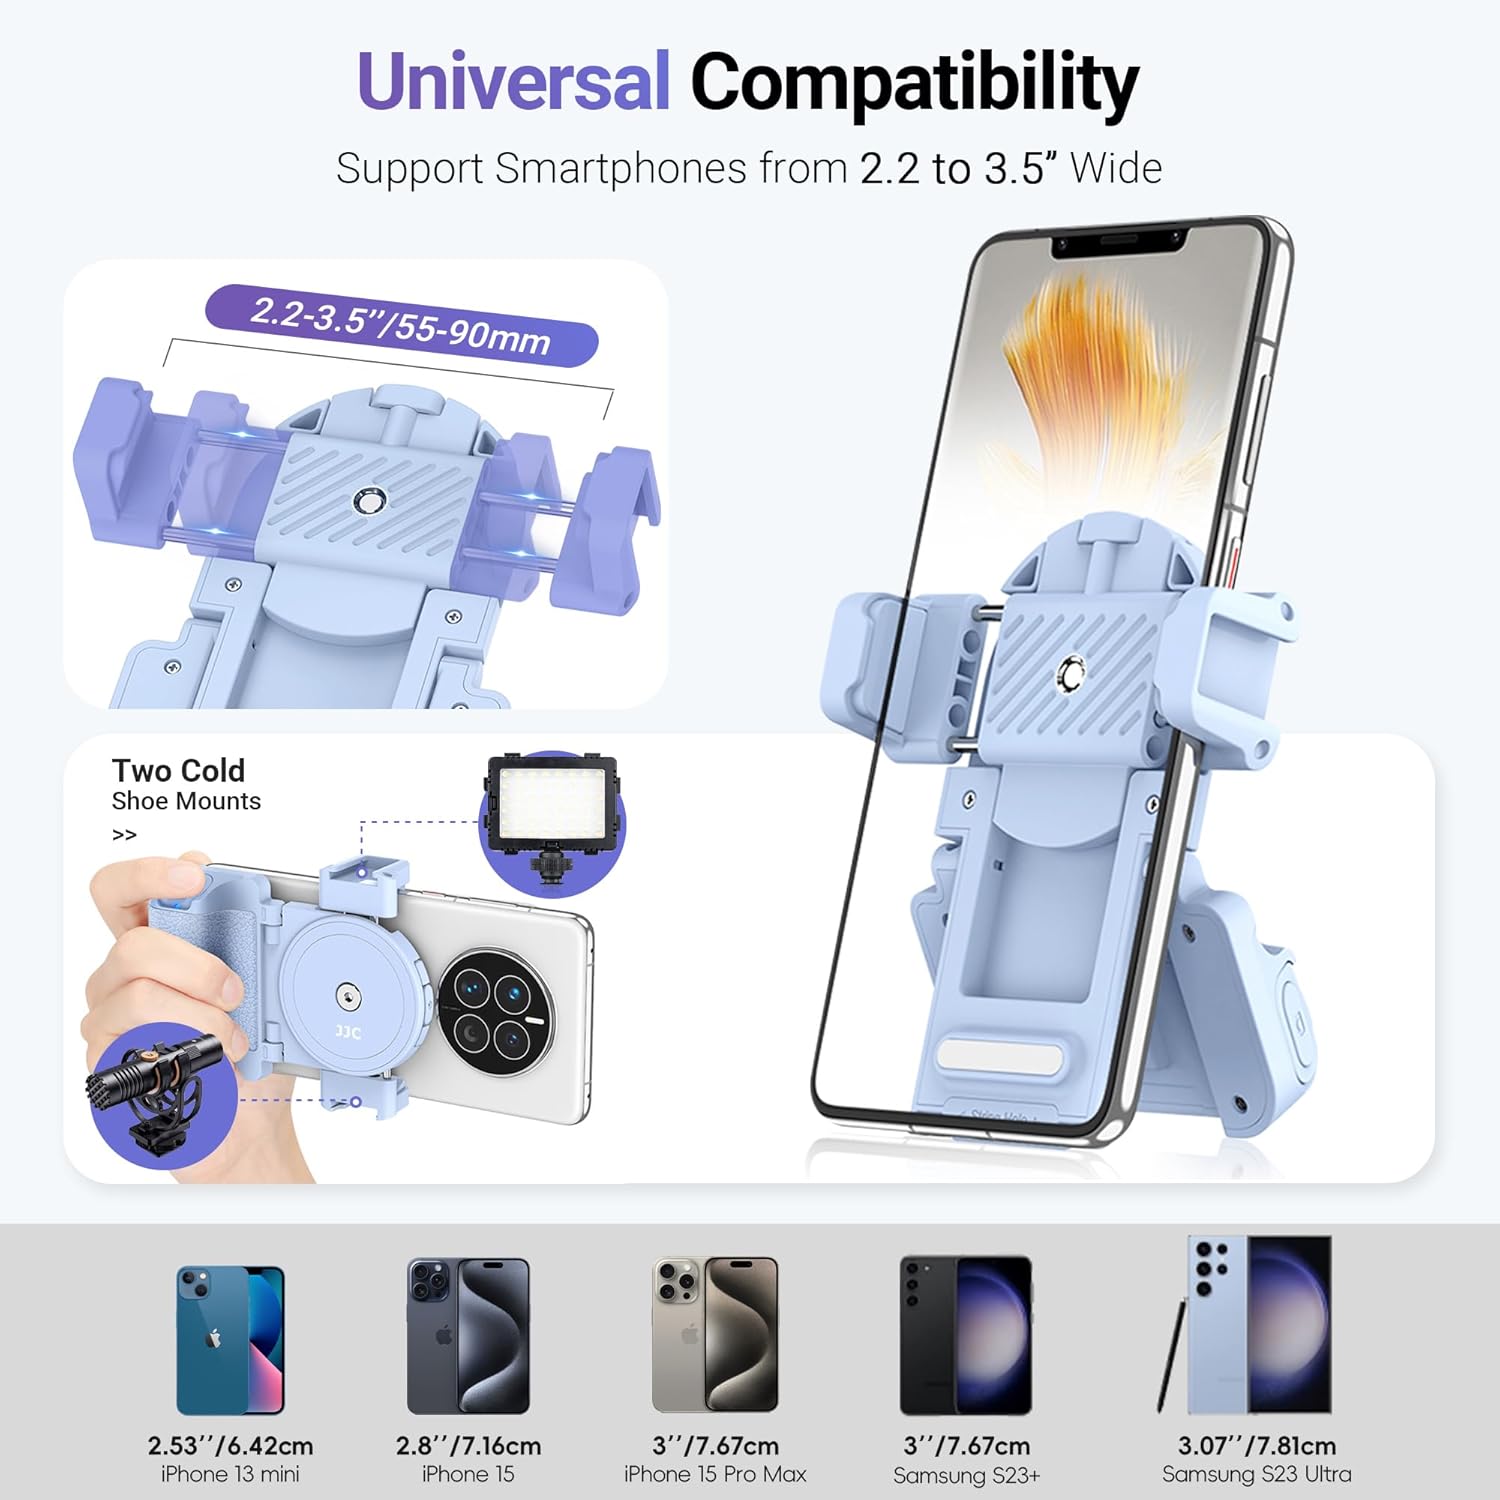
Image: Illustration of the universal phone clamp's adjustable width and dual cold shoe mounts.
4. Setup & Assembly
4.1 Attaching Your Smartphone
- Gently pull apart the spring-loaded phone clamp.
- Insert your smartphone into the clamp, ensuring it is securely held. The clamp supports phones from 2.2 to 3.5 inches (55-90mm) wide.
- Ensure the phone is centered for optimal balance and access to controls.

Image: Smartphone attached to the grip, ready for use as a hand grip.
4.2 Pairing the Wireless Remote
- Remove the wireless remote from its magnetic slot in the grip.
- Turn on Bluetooth on your smartphone.
- Press and hold the button on the remote until its indicator light flashes, indicating it's in pairing mode.
- On your smartphone, search for available Bluetooth devices and select "MSG Remote" (or similar name) to pair.
- Once paired, the indicator light on the remote will stop flashing.

Image: Steps for pairing the wireless remote with a smartphone.
4.3 Adjusting Orientation (Landscape/Portrait)
- To switch between landscape and portrait modes, detach the phone clamp from the grip.
- Rotate the clamp 180 degrees.
- Re-attach the clamp to the grip using the included hex tool, ensuring it is securely fastened.

Image: Visual guide for changing phone orientation on the grip.
4.4 Attaching Accessories (Cold Shoe Mounts)
The grip features two cold shoe mounts for attaching external accessories:
- Locate the cold shoe mounts on the top of the phone clamp.
- Slide your cold shoe compatible accessory (e.g., LED light, microphone) into the mount until it clicks into place.
- Ensure the accessory is firmly seated before use.
Video: This video demonstrates the assembly of the JJC MSG-U1, including attaching a smartphone, pairing the wireless remote, and mounting accessories like an LED light and microphone using the cold shoe mounts. It also shows the grip being used with a tripod.
4.5 Attaching to a Tripod
The grip includes a 1/4"-20 female thread for tripod compatibility:
- Locate the 1/4"-20 female thread on the bottom of the grip.
- Screw the grip onto a compatible tripod or monopod.
- Ensure the connection is secure before placing your setup on an uneven surface.

Image: The phone grip mounted on a tripod, demonstrating stability for remote shooting.
5. Operation
5.1 Taking Photos/Videos with the Remote
- Ensure the wireless remote is paired with your smartphone (refer to Section 4.2).
- Open your smartphone's camera application.
- Press the button on the wireless remote to trigger the shutter or start/stop video recording.

Image: Demonstrating remote photo capture using the wireless remote.
5.2 Using as a Tabletop Stand
- With your smartphone attached, fold out the grip's base to create a stable stand.
- Place the grip on a flat surface. This allows for hands-free viewing of content, video calls, or live streaming.

Image: The grip configured as a stable tabletop stand.
6. Maintenance
- Clean the grip and remote with a soft, dry cloth. Avoid abrasive cleaners or solvents.
- Store the device in a cool, dry place away from direct sunlight and extreme temperatures.
- Ensure the wireless remote is charged periodically, especially if not used for extended periods.
- Regularly check the tightness of the hex screw if the clamp is frequently detached and re-attached.
7. Troubleshooting
| Issue | Possible Cause | Solution |
|---|---|---|
| Wireless remote not pairing. | Remote battery low; Bluetooth off on phone; remote not in pairing mode. | Charge the remote. Ensure phone Bluetooth is on. Press and hold remote button to enter pairing mode. |
| Phone not fitting in clamp. | Phone width exceeds clamp's maximum extension. | Verify phone width is between 2.2 and 3.5 inches (55-90mm). Remove bulky phone cases if necessary. |
| Grip feels unstable on tripod. | Grip not securely screwed onto tripod; tripod itself is unstable. | Ensure the 1/4" screw is tightened. Use a stable tripod on a flat surface. |
8. Specifications
| Feature | Detail |
|---|---|
| Model Number | MSG-U1 |
| Compatible Phone Width | 2.2 - 3.5 inches (55 - 90mm) |
| Wireless Remote Range | Up to 32.8 feet (10m) |
| Remote Battery Type | 1 Lithium Ion battery (included) |
| Charging Port | Type-C |
| Tripod Mount | 1/4"-20 Female Thread |
| Cold Shoe Mounts | 2 |
| Item Weight | 4.8 ounces |
| Package Dimensions | 5 x 3.4 x 1.9 inches |
9. Warranty and Support
For warranty information or technical support, please refer to the product packaging or contact JJC customer service directly. Keep your purchase receipt for warranty claims.
