
1. Introduction
This manual provides essential information for the proper installation, operation, and maintenance of the Maxx Cold XR60CX-4R0F1 Dixell Thermostat. This 115V thermostat is designed for use with specific Maxx Cold refrigeration units, including models MXCF-23FD and MXCF48U. Please read this manual thoroughly before attempting any installation or operation to ensure safe and efficient use of the device.
2. Safety Information
Important Safety Instructions:
- Always disconnect power to the unit before performing any installation, maintenance, or troubleshooting.
- Installation and wiring should only be performed by qualified personnel in accordance with all local and national electrical codes.
- Ensure the power supply voltage matches the thermostat's requirements (115V).
- Do not expose the thermostat to water or excessive moisture.
- Do not attempt to modify or repair the thermostat yourself. Contact qualified service personnel.
3. Product Overview
The Maxx Cold XR60CX-4R0F1 is a digital electronic thermostat designed for refrigeration applications. It features a clear display and intuitive controls for precise temperature management. This unit is a direct replacement part for compatible Maxx Cold refrigeration equipment.

Figure 1: Front view of the Maxx Cold XR60CX-4R0F1 Dixell Thermostat. This image shows the digital display, the 'SET' button, and the up/down arrow buttons for navigation and parameter adjustment. The 'Dixell' brand name is visible at the bottom.
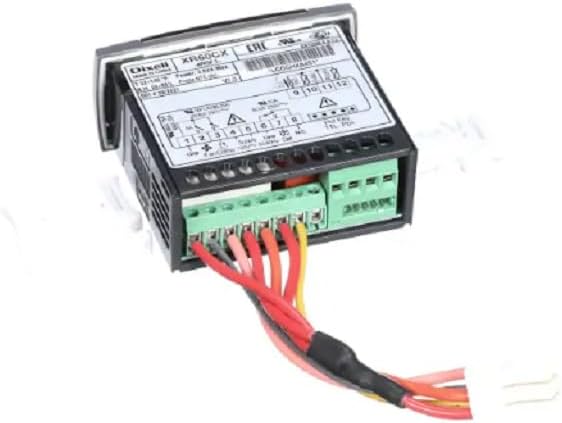
Figure 2: Rear view of the Maxx Cold XR60CX-4R0F1 Dixell Thermostat. This image highlights the various wiring terminals and connectors, indicating where power input, sensor connections, and output loads (e.g., compressor, fan) are to be connected. Wires are shown connected to some terminals.
4. Setup and Installation
Note: Installation should only be performed by a qualified technician.
- Power Disconnection: Ensure the main power supply to the refrigeration unit is completely disconnected before beginning installation.
- Mounting: The thermostat is designed for panel mounting. Carefully insert the thermostat into the designated opening in the control panel.
- Wiring: Refer to the wiring diagram provided with your refrigeration unit or the thermostat's specific wiring instructions. Connect the power supply (115V), temperature sensors, and output loads (compressor, fan, defrost heater, etc.) to the appropriate terminals on the rear of the thermostat (refer to Figure 2). Ensure all connections are secure and correctly polarized.
- Sensor Placement: Position the temperature sensors in the designated locations within the refrigeration compartment and evaporator coil as specified by the refrigeration unit manufacturer.
- Power Connection: Once all wiring is complete and verified, restore power to the refrigeration unit.
5. Operating Instructions
The XR60CX-4R0F1 thermostat provides intuitive control over your refrigeration unit's temperature and operational parameters.
5.1. Display and Basic Functions
- The display shows the current temperature measured by the probe.
- Press the SET button briefly to view the set point temperature.
- Press the UP or DOWN arrows to navigate through parameters or adjust values.
5.2. Changing the Set Point
- Press and hold the SET button for more than 2 seconds to enter the set point modification mode. The set point value will flash.
- Use the UP or DOWN arrow buttons to adjust the desired temperature.
- Press the SET button again to confirm the new value and exit the modification mode.
5.3. Manual Defrost (if applicable)
Consult your refrigeration unit's specific operating instructions for manual defrost initiation, as this function may be integrated or controlled by other parameters within the thermostat.
6. Maintenance
Regular maintenance ensures the longevity and optimal performance of your thermostat.
- Cleaning: Periodically clean the front panel of the thermostat with a soft, damp cloth. Do not use abrasive cleaners or solvents.
- Inspection: Annually, or as part of routine refrigeration unit maintenance, have a qualified technician inspect the wiring connections for tightness and signs of wear or corrosion.
- Sensor Check: Ensure temperature sensors are clean and properly positioned.
7. Troubleshooting
Before contacting service, review the following common issues and solutions:
| Problem | Possible Cause | Solution |
|---|---|---|
| Display is blank | No power supply; loose wiring | Check power connection to the unit and thermostat. Verify wiring connections. |
| Incorrect temperature reading | Faulty sensor; sensor improperly placed | Check sensor wiring and placement. Replace sensor if faulty. |
| Unit not cooling/heating | Set point too high/low; compressor issue; thermostat fault | Verify set point. Check compressor operation. If issues persist, contact service. |
| Error code on display | Internal fault; sensor error | Refer to Dixell thermostat error code documentation or contact service. |
If troubleshooting steps do not resolve the issue, contact a qualified service technician.
8. Specifications
- Model: XR60CX-4R0F1
- Manufacturer: Maxx Cold (Dixell)
- Voltage: 115 Volts
- Backlight: No
- Included Components: No additional components (thermostat unit only)
- Compatibility: Maxx Cold MXCF-23FD, MXCF48U, and other compatible refrigeration units.
9. Warranty and Support
For warranty information and technical support, please refer to the documentation provided with your original Maxx Cold refrigeration unit or contact Maxx Cold customer service directly. Keep your purchase receipt for warranty claims.