1. Important Safety Instructions
When using electrical appliances, basic safety precautions should be followed, including the following:
- Read all instructions before using the appliance.
- Do not attempt to operate this oven with the door open as this can result in harmful exposure to microwave energy.
- Do not place any object between the oven front face and the door or allow soil or cleaner residue to accumulate on sealing surfaces.
- Do not operate the oven if it is damaged. It is particularly important that the oven door closes properly and that there is no damage to the: (1) door (bent), (2) hinges and latches (broken or loosened), (3) door seals and sealing surfaces.
- The oven should not be adjusted or repaired by anyone except properly qualified service personnel.
- Always ensure proper ventilation around the microwave.
- Do not heat liquids or other foods in sealed containers since they are liable to explode.
- This appliance is intended for household use only.
2. Product Overview
The SHARP SMC0761KS is a compact 0.7 cubic feet countertop microwave oven, featuring 700 watts of cooking power and a removable 10-inch carousel turntable. Its stainless steel finish and child lock function provide both style and safety for your kitchen.

Front view of the SHARP SMC0761KS Compact Countertop Microwave Oven in stainless steel.
Key Features:
- Compact Design: 0.7 cu. ft. capacity, ideal for small spaces.
- 700 Watts Power: Efficient heating for various foods.
- 10" Carousel Turntable: Ensures even cooking results.
- Child Lock: Enhances safety by preventing unintended operation.
- Express Cook: Quick start cooking with single press up to 6 minutes.
- Auto Cook Menu: Pre-programmed settings for popular items like potato, popcorn, and beverages.
- Time/Weight Defrost: Flexible defrosting options.
- White LED Display: Clear and modern display.
- LED Interior Lighting: Provides visibility inside the oven.

Interior view of the microwave showing the removable glass carousel turntable.

Close-up of the control panel with digital display and function buttons.
3. Setup and Installation
Unpacking and Placement:
- Remove all packing materials from inside the oven cavity and from the oven door.
- Check the oven for any damage, such as dents or a misaligned door. Do not operate the oven if it is damaged.
- Place the microwave on a flat, stable surface that can support its weight and the heaviest food item likely to be cooked in it.
- Ensure adequate ventilation: Leave a minimum of 4 inches (10 cm) of space on the top, back, and sides for proper airflow. Do not block any ventilation openings.
- Keep the microwave away from heat sources and strong magnetic fields.
Turntable Assembly:
- Place the turntable ring inside the oven cavity.
- Position the glass turntable plate securely on top of the turntable ring, ensuring it sits properly on the center hub.
Electrical Connection:
Plug the microwave into a properly grounded 3-prong outlet. Ensure the voltage and frequency match the specifications of the appliance (120V, 60Hz).
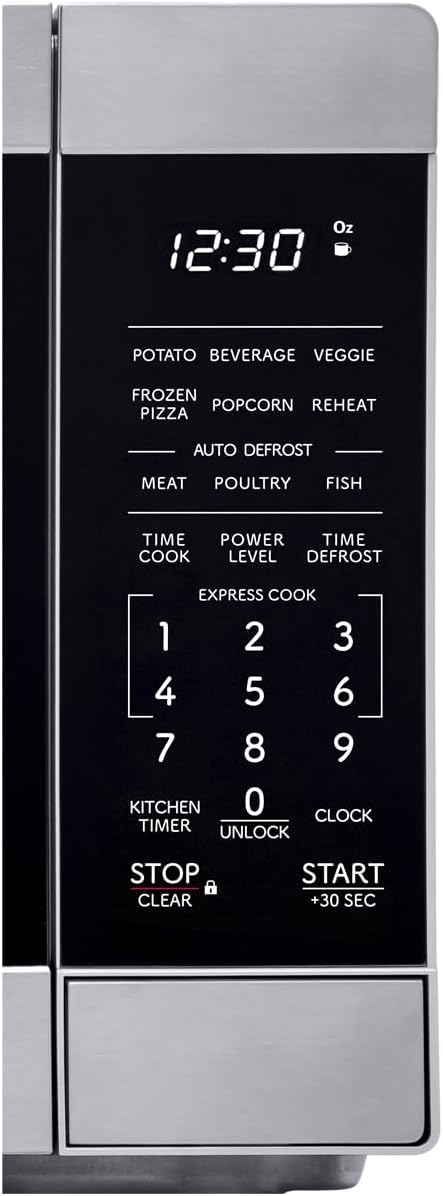
Diagram illustrating the dimensions of the SHARP SMC0761KS microwave oven.
4. Operating Instructions
Setting the Clock:
- Press the CLOCK button once.
- Use the number pad to enter the current time (e.g., 1-2-3-0 for 12:30).
- Press the CLOCK button again to confirm.
Basic Microwave Cooking:
- Place food in a microwave-safe container on the turntable.
- Close the oven door.
- Press the TIME COOK button.
- Enter the desired cooking time using the number pad (e.g., 1-0-0 for 1 minute).
- To adjust power level (default is 100%): Press POWER LEVEL, then enter a number from 1 to 10 (10 for 100%, 1 for 10%).
- Press START/+30 SEC to begin cooking.
Using the +30 SEC Button:
For instant start at 100% power, simply press the START/+30 SEC button. Each press adds 30 seconds to the cooking time. This can also be used to add 30 seconds during an ongoing cooking cycle.
Child Lock Function:
- To Activate: Press and hold the STOP/CLEAR button for 3 seconds. A lock indicator will appear on the display.
- To Deactivate: Press and hold the STOP/CLEAR button for 3 seconds again. The lock indicator will disappear.
5. Cooking Functions
Auto Cook Menu:
The microwave features pre-programmed settings for common food items. Simply press the desired auto cook button and follow the prompts.
- POTATO: For baking potatoes.
- BEVERAGE: For heating drinks.
- VEGGIE: For cooking vegetables.
- FROZEN PIZZA: For reheating frozen pizza.
- POPCORN: For popping popcorn.
- REHEAT: For reheating various dishes.
Defrosting:
The microwave offers two defrosting methods:
- TIME DEFROST: Press TIME DEFROST, enter the desired defrosting time, then press START/+30 SEC.
- WEIGHT DEFROST: Press WEIGHT DEFROST, enter the weight of the food in ounces or grams, then press START/+30 SEC.
Express Cook:
For quick cooking, press any number button (1-6) to start cooking immediately for that many minutes at 100% power. For example, pressing '1' will cook for 1 minute.
Two-Stage Cooking:
This feature allows you to program two different cooking stages (e.g., defrost then cook). Program the first stage (e.g., defrost time/weight), then program the second stage (e.g., cook time and power level), and finally press START/+30 SEC.
6. Care and Maintenance
Cleaning the Oven:
- Interior: Wipe the inside of the oven with a damp cloth after each use. For stubborn stains, use a mild detergent or microwave-safe cleaner. Do not use abrasive cleaners or scouring pads.
- Exterior: Clean the exterior surfaces with a soft, damp cloth. Avoid getting water into the ventilation openings.
- Door Seals: Keep the door seals and adjacent parts clean. Wipe with a damp cloth to remove any spills or splatters.
- Turntable: The glass turntable and turntable ring can be washed in warm, soapy water or in the dishwasher. Ensure they are completely dry before placing them back in the oven.
General Tips:
- Always unplug the microwave before cleaning.
- Do not use harsh chemicals or steam cleaners.
- Regular cleaning helps maintain performance and extends the life of the appliance.
7. Troubleshooting
If you encounter issues with your microwave, refer to the following common problems and solutions:
| Problem | Possible Cause | Solution |
|---|---|---|
| Oven will not start | Door not closed properly; Power cord unplugged; Fuse blown or circuit breaker tripped; Child lock activated. | Ensure door is firmly closed; Check power cord connection; Reset circuit breaker; Deactivate child lock. |
| Food not heating | Incorrect cooking time/power level set; Microwave-safe dish not used. | Adjust cooking time and power level; Use appropriate microwave-safe cookware. |
| Turntable not rotating | Turntable not correctly placed; Obstruction under turntable ring; Motor malfunction. | Ensure turntable and ring are correctly seated; Remove any obstructions; Contact service if issue persists. |
| Display shows error code | Internal malfunction. | Unplug the oven for 1 minute, then plug it back in. If the error persists, contact customer support. |
For more detailed troubleshooting or issues not listed here, please refer to the complete user manual PDF or contact Sharp customer support.
8. Specifications
| Feature | Specification |
|---|---|
| Model Number | SMC0761KS |
| Capacity | 0.7 Cubic Feet |
| Wattage | 700 watts |
| Voltage | 120 Volts |
| Product Dimensions (D x W x H) | 12.8" x 17.3" x 10.2" |
| Item Weight | 24.2 pounds |
| Color | Stainless Steel |
| Special Feature | Child Safety Lock |
| Installation Type | Countertop |
| Included Components | Turntable |
9. Warranty and Support
Warranty Information:
This SHARP microwave oven comes with a limited manufacturer's warranty. Please refer to the warranty card included with your product or visit the official Sharp website for detailed terms and conditions regarding coverage, duration, and service procedures.
Customer Support:
For technical assistance, service inquiries, or to order replacement parts, please contact Sharp customer support. You can typically find contact information on the Sharp official website or in the product's packaging.
For a comprehensive guide, you can download the official user manual in PDF format: Download User Manual (PDF)


