
Introduction
The MOOER MVP3 LOOPATION is a versatile vocal effects looper pedal designed for musicians, vocalists, and content creators. It integrates looping capabilities with vocal effects, allowing for simultaneous recording of vocals and instruments. This manual provides detailed instructions for setup, operation, and maintenance to ensure optimal performance of your device.
Key features include:
- 11 memory slots for recording, offering up to 70 minutes of total recording time.
- Auto Rec function for automatic recording initiation upon vocal signal detection.
- Unlimited dub layers for creative sound layering.
- Three distinct vocal tone settings.
- High-quality individual reverbs for both vocal and instrument signals.
- Reverse function for audio playback.
- Adjustable volume level ratio for vocal and instrument signals.
- Support for external microphone amplifiers via LINE IN.
- XLR balanced output and 6.35mm unbalanced output.
- Optional 48V phantom power for condenser microphones.
Setup
Proper setup is crucial for the functionality of your LOOPATION pedal. Follow these steps to connect your device.
1. Power Connection
Connect the provided power supply to the DC 9V input jack on the pedal. Ensure the power supply meets the specified voltage and amperage requirements (9V DC, 300mA).
2. Microphone and Instrument Connections
The LOOPATION pedal features inputs for both microphones and instruments.
- Microphone Input: Connect your microphone to the XLR input. If using a condenser microphone, ensure the 48V phantom power switch is engaged.
- Instrument Input: Connect your instrument (e.g., guitar) to the 6.35mm LINE IN jack. If using an external microphone amplifier, connect it to the LINE IN jack and turn the LINE IN switch to 'On'.

Image: Front view of the MOOER MVP3 LOOPATION pedal, showing the main controls and footswitches.

Image: Close-up of the MOOER MVP3 LOOPATION pedal's side panel, illustrating the LINE IN switch, 48V phantom power switch, and GND/LIFT switch for input and output management.
3. Output Connections
The pedal offers two output modes:
- Individual Mode: The 6.35mm output carries only the instrument signal, while the XLR output carries only the microphone signal.
- Mixed Mode: Both the 6.35mm output and the XLR output will carry a mix of both the microphone and instrument signals.
To switch between output modes, press and hold the right footswitch while plugging in the power supply.
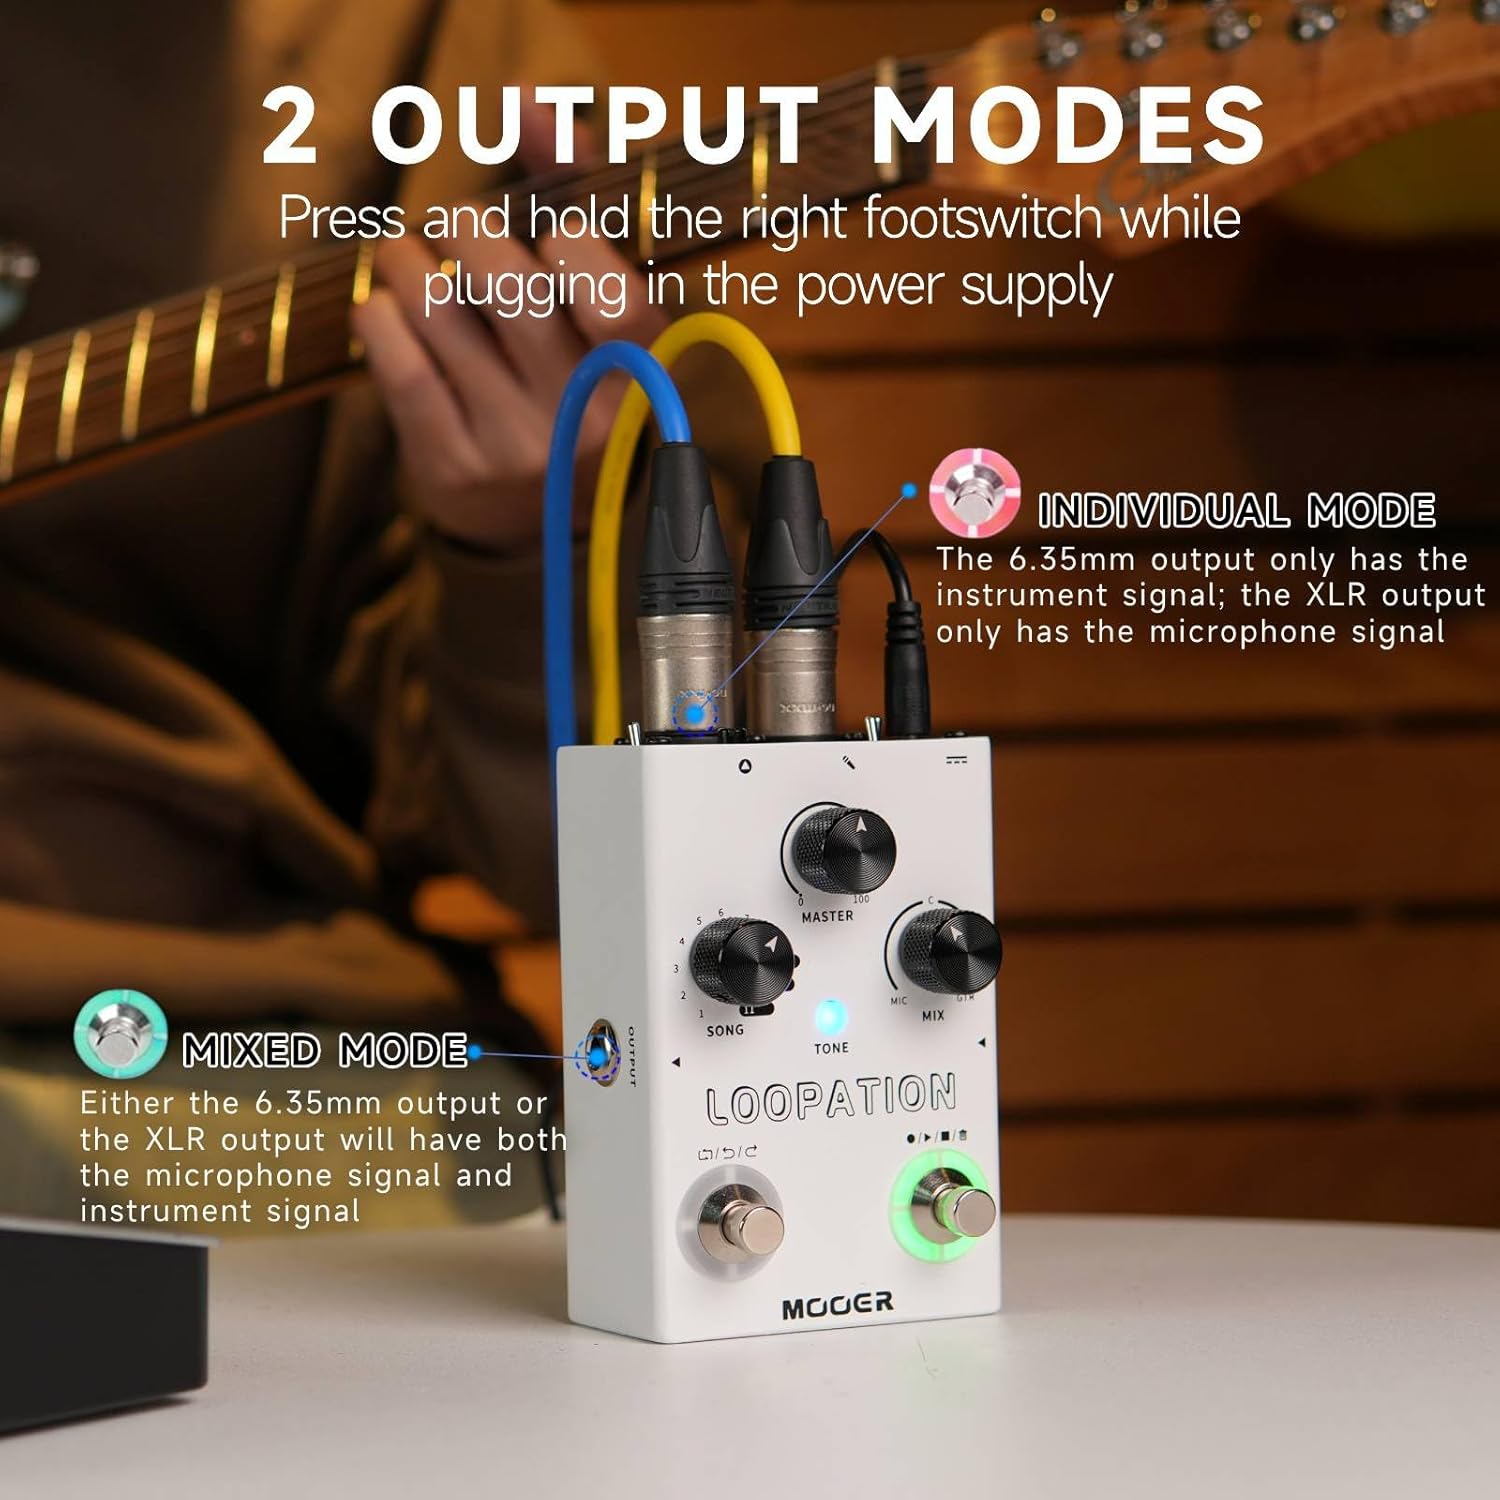
Image: The MOOER MVP3 LOOPATION pedal connected to a guitar and microphone, illustrating the two output modes: Individual Mode (instrument out 6.35mm, vocal out XLR) and Mixed Mode (both signals on both outputs).
4. Ground/Lift Switch
If you experience background noise in the XLR output, try adjusting the GND/LIFT switch to 'GND' to reduce noise caused by improper grounding.
Operating Instructions
This section details how to use the various functions of your LOOPATION pedal.
1. Controls Overview
- MASTER Knob: Controls the overall output volume level of the pedal.
- MIX Knob: Adjusts the volume ratio between the microphone input signal and the instrument input signal. Turn towards 'MIC' for more vocal, towards 'GTR' for more guitar.
- SONG Knob: Selects one of the 11 memory slots for recording and playback. Slots 1-8 offer 5 minutes each, and slots 9-11 offer 11 minutes each.
- TONE Button: Cycles through three unique vocal tone settings: Flat-Off, Warm-Red, and Bright-Blue.

Image: Close-up of the MOOER MVP3 LOOPATION pedal, highlighting the MASTER knob for overall volume control and the MIX knob for adjusting the balance between microphone and instrument signals.
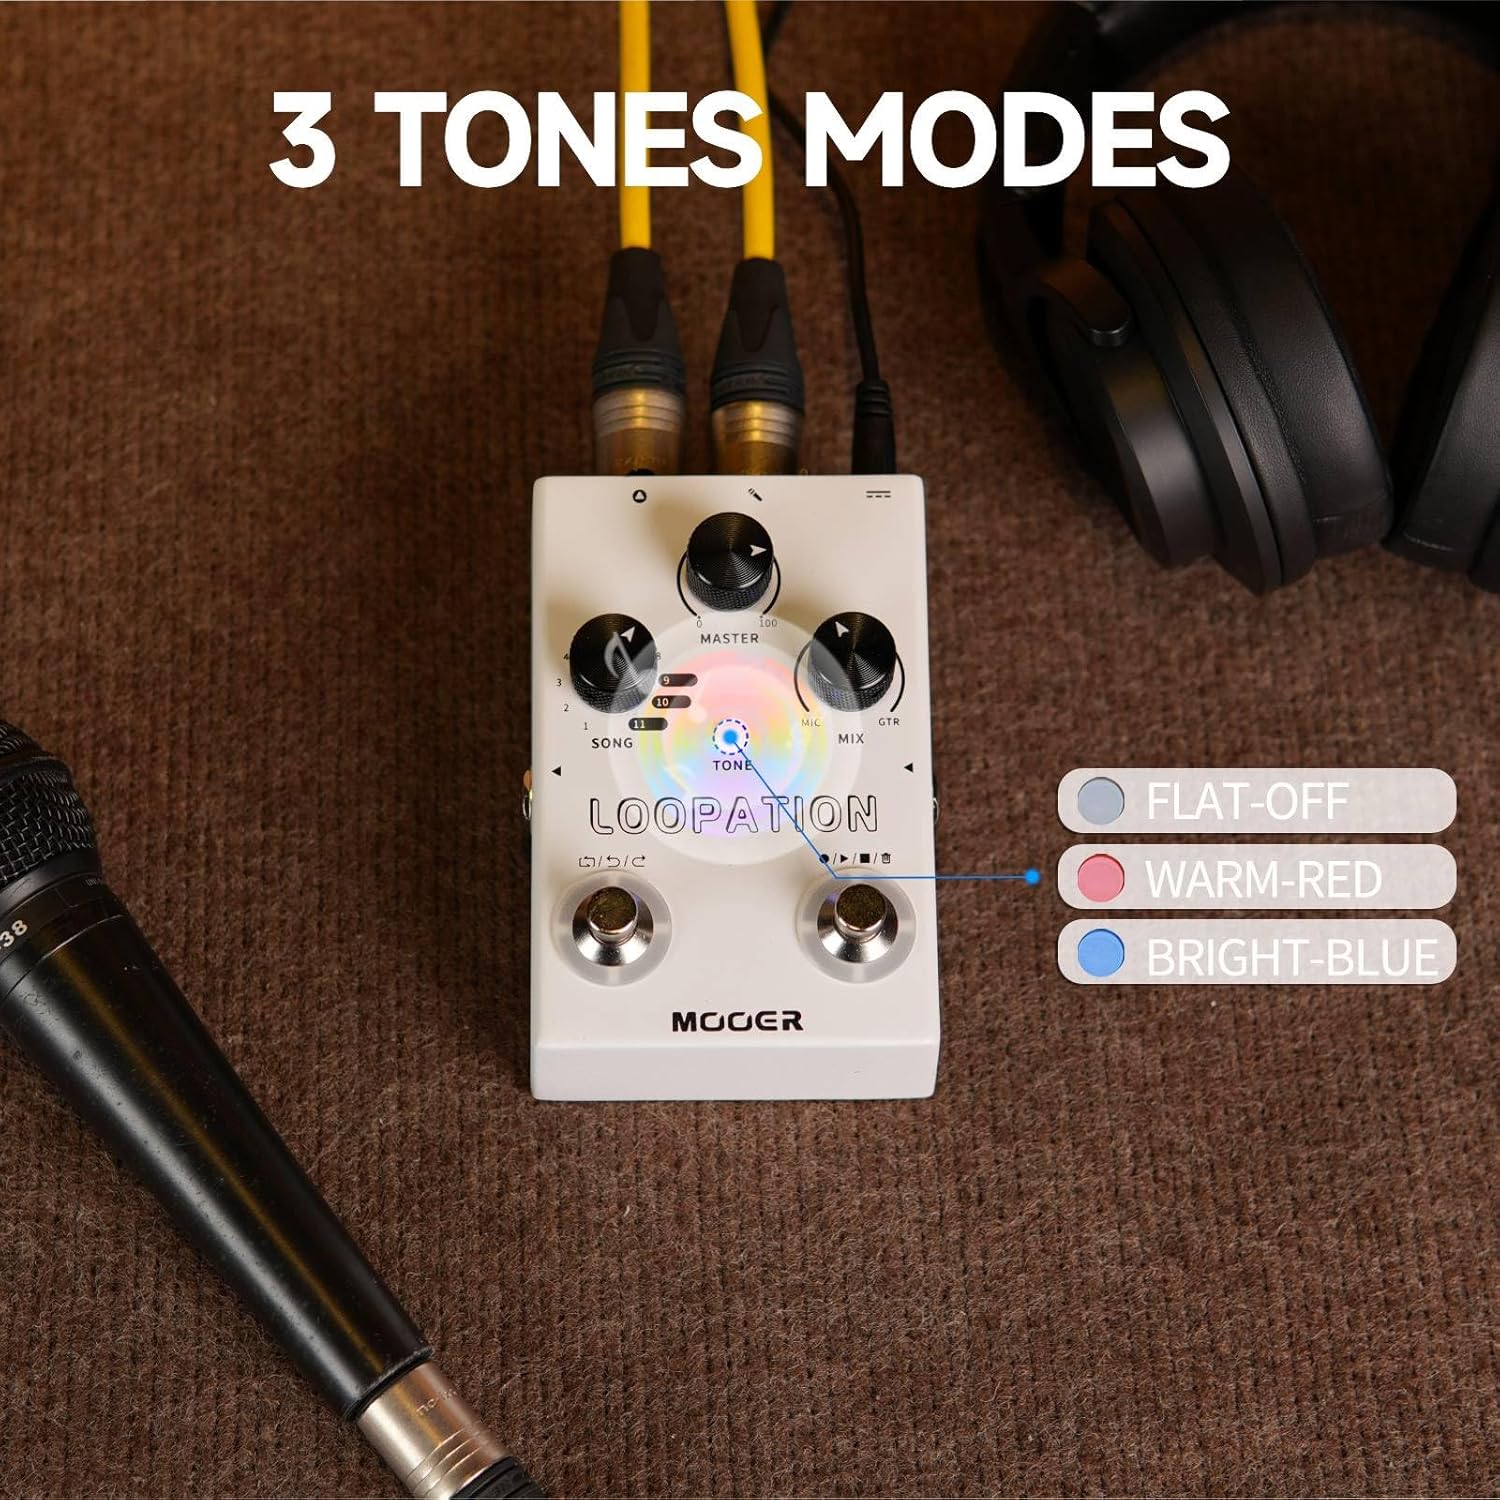
Image: The MOOER MVP3 LOOPATION pedal with the TONE button illuminated, indicating the selection of one of the three available vocal tone modes: Flat-Off, Warm-Red, or Bright-Blue.
2. Looping Functions (Footswitches)
The pedal features two footswitches for controlling looping functions.
- Right Footswitch: Controls Record, Play, Dub, Stop, and Clear functions.
- Left Footswitch: Controls Reverse, Undo, and Redo functions.

Image: The MOOER MVP3 LOOPATION pedal, highlighting the left and right footswitches and their respective functions for looping control.

Image: A visual representation of the MOOER MVP3 LOOPATION pedal's footswitches, detailing the functions of the Right Footswitch (REC/PLAY/DUB/STOP/CLEAR) and the Left Footswitch (REVERSE/UNDO/REDO).
3. Recording and Playback
- Start Recording: Press the Right Footswitch once. The LED will indicate recording status.
- Auto Rec: The looper can automatically start recording when a vocal signal is detected, eliminating the need for manual activation.
- Dubbing: While a loop is playing, press the Right Footswitch again to add an overdub. You can add an unlimited number of dub layers.
- Stop: Press the Right Footswitch twice quickly to stop playback.
- Clear: Press and hold the Right Footswitch to clear the current loop.
- Reverse: Press the Left Footswitch to play the current loop in reverse.
- Undo/Redo: Press and hold the Left Footswitch to undo the last overdub. Press again to redo.

Image: The MOOER MVP3 LOOPATION pedal in use, illustrating the 11 memory slots with their respective recording times (1-8 slots for 5 minutes each, 9-11 slots for 11 minutes each) and two recording modes (real-time & auto).

Image: The MOOER MVP3 LOOPATION pedal demonstrating its capabilities for unlimited dub layers of recording and a reverse function for audio playback.
4. Reverb Effects
The pedal includes high-quality individual reverbs specifically designed for both vocal and instrument performance. These reverbs are automatically applied based on the input signals and can be adjusted via the MIX knob to balance their presence.

Image: The MOOER MVP3 LOOPATION pedal highlighting its individual reverbs designed for vocal and instrument performance, along with the adjustable volume level ratio for vocal and instrument signals.
Maintenance
To ensure the longevity and optimal performance of your MOOER MVP3 LOOPATION pedal, follow these maintenance guidelines:
- Cleaning: Use a soft, dry cloth to clean the pedal's surface. Avoid using abrasive cleaners, solvents, or waxes, as these can damage the finish and internal components.
- Storage: When not in use for extended periods, store the pedal in a cool, dry place away from direct sunlight and extreme temperatures. Disconnect the power supply.
- Handling: Handle the pedal with care. Avoid dropping it or subjecting it to strong impacts, which can damage internal circuitry or external components.
- Power Supply: Always use the original or a compatible power supply (9V DC, 300mA). Incorrect power supplies can cause damage.
Troubleshooting
If you encounter issues with your LOOPATION pedal, refer to the following troubleshooting tips:
- No Power: Ensure the power supply is correctly connected and functioning. Check the power outlet.
- No Sound Output:
- Verify all cables (microphone, instrument, output) are securely connected.
- Check the MASTER volume knob and MIX knob settings.
- Ensure your amplifier or PA system is powered on and its volume is up.
- If using a condenser microphone, confirm 48V phantom power is enabled.
- Background Noise/Hum:
- Try adjusting the GND/LIFT switch on the side of the pedal to 'GND' to address ground loop issues.
- Ensure all cables are in good condition and properly shielded.
- Test with different power outlets or power conditioners.
- Looper Not Recording/Playing:
- Check the selected memory slot using the SONG knob.
- Ensure the input signals (microphone/instrument) are strong enough.
- Verify footswitch functionality.
- Effects Not Working:
- Confirm the TONE button is cycling through the desired vocal tone.
- Adjust the MIX knob to ensure the vocal signal is present in the output.
Specifications
| Item Weight | 1.26 pounds |
| Package Dimensions | 6.1 x 5.24 x 2.95 inches |
| Model Number | VP3 LOOPATION |
| Body Material | Plastic, Metal |
| Connector Type | LINE IN, XLR, 6.35mm jack |
| Hardware Interface | HP-HSC |
| Signal Format | Analog |
| Power Source | Corded Electric |
| Voltage | 48 Volts (for phantom power) |
| Amperage | 300 Milliamps |
| Included Components | Power supply |
Warranty and Support
This product is covered by a standard manufacturer's warranty. For specific warranty details, please refer to the documentation included with your purchase or contact MOOER customer support.
For technical assistance, troubleshooting, or further inquiries, please visit the official MOOER store or support channels:
- MOOER Official Store: https://www.amazon.com/stores/MOOER/page/222A45CC-9BB4-46ED-8976-B70197F1F283