
1. Introduction
This manual provides essential instructions for the safe and efficient operation, maintenance, and troubleshooting of your Morphy Richards Autopresso 3-in-1 Coffee Maker and Milk Frother. Please read this manual thoroughly before first use and retain it for future reference.

Image 1.1: The Morphy Richards Autopresso 3-in-1 Coffee Maker.
Key Features:
- 3-in-1 functionality: Prepares espresso, latte, and cappuccino.
- Integrated milk frothing system.
- One-touch buttons for various coffee types (small and large cups).
- Dishwasher-safe milk tank (700 ml) and water tank (1200 ml).
- 15 bar powerful pressure for optimal coffee extraction.
- Flowmeter and temperature control for consistent results.
2. Safety Instructions
Always follow basic safety precautions when using electrical appliances to reduce the risk of fire, electric shock, and injury.
- Read all instructions before operating the appliance.
- Do not immerse the appliance, cord, or plug in water or other liquids.
- Ensure the voltage rating on the appliance matches your mains supply.
- Keep the appliance out of reach of children.
- Unplug from the outlet when not in use and before cleaning.
- Do not operate any appliance with a damaged cord or plug.
- Use only ground espresso coffee powder; coffee beans cannot be used directly with this product.
- Do not touch hot surfaces. Use handles or knobs.
- Place the appliance on a stable, level surface away from hot surfaces or open flames.
3. Product Components
Familiarize yourself with the parts of your coffee maker before use.

Image 3.1: Overview of the Autopresso Coffee Maker with feature callouts.
- Main Unit
- Water Tank (1200 ml capacity)
- Milk Tank (700 ml capacity)
- Portafilter
- Single Shot Coffee Filter
- Double Shot Coffee Filter
- Coffee Tamp/Scoop
- Drip Tray
- Control Panel with One-Touch Buttons
- Steam Wand (for frothing)
4. Setup
- Unpacking: Carefully remove all packaging materials and ensure all components are present.
- Initial Cleaning: Before first use, wash the water tank, milk tank, portafilter, and filters with warm soapy water. Rinse thoroughly and dry. Wipe the main unit with a damp cloth.
- Placement: Place the appliance on a flat, stable, heat-resistant surface. Ensure adequate ventilation around the unit.
- Fill Water Tank: Open the water tank lid and fill with fresh, cold water up to the MAX level. Close the lid securely.
- Fill Milk Tank (for milk-based drinks): Open the milk tank lid and fill with cold milk up to the desired level. Close the lid securely.
- Power Connection: Plug the power cord into a grounded electrical outlet.
- First Use Cycle (Priming):
- Ensure the water tank is filled.
- Place a large cup under the coffee spout.
- Press the Espresso button without any coffee in the portafilter. Let water run through until the tank is almost empty. This primes the pump and cleans the internal system.
- Repeat this process for the milk frothing system by running a cycle with water in the milk tank.
5. Operating Instructions

Image 5.1: The Autopresso Coffee Maker brewing a beverage.
5.1. Making Espresso
- Ensure the water tank is filled.
- Insert the desired filter (single or double shot) into the portafilter.
- Using the coffee scoop, add ground espresso coffee powder to the filter. Do not use coffee beans.
- Tamp the coffee firmly with the coffee tamp.
- Attach the portafilter to the brewing head by aligning it and twisting it to the right until secure.
- Place your cup(s) on the drip tray under the portafilter spouts.
- Press the desired Espresso button (small or large cup). The machine will brew the coffee and stop automatically.
- Once brewing is complete, carefully remove the portafilter and discard the used coffee grounds.
5.2. Making Latte or Cappuccino
- Follow steps 1-6 for making Espresso.
- Ensure the milk tank is filled with cold milk.
- Position the milk frothing nozzle into your cup.
- Press the desired Latte or Cappuccino button (small or large cup). The machine will first froth the milk, then brew the espresso into the same cup.
- Once complete, carefully remove the cup.
- After each use, clean the milk frothing system as described in the Maintenance section.
5.3. Manual Milk Frothing
For manual frothing, use the steam wand.
- Fill a separate pitcher with cold milk.
- Turn the steam knob to the steam position. Wait for the steam indicator light to illuminate.
- Immerse the steam wand tip just below the surface of the milk.
- Turn the steam knob to release steam. Move the pitcher up and down to create foam.
- Once desired foam is achieved, turn off the steam knob.
- Wipe the steam wand immediately with a damp cloth to prevent milk residue from drying.
6. Cleaning and Maintenance
Regular cleaning ensures optimal performance and extends the life of your appliance.
6.1. Daily Cleaning
- Drip Tray: Empty and clean the drip tray after each use or when the indicator shows it's full.
- Portafilter and Filters: Remove used coffee grounds and rinse the portafilter and filters under running water.
- Steam Wand: After each use, wipe the steam wand with a damp cloth. Run a short burst of steam to clear any milk residue from inside.
- Milk Tank: The milk tank is dishwasher safe. Alternatively, wash with warm soapy water, rinse, and dry.
- Water Tank: Rinse the water tank regularly.
- Exterior: Wipe the exterior of the machine with a soft, damp cloth. Do not use abrasive cleaners.
6.2. Descaling
Mineral deposits from water can build up over time, affecting performance. Descale your machine every 2-3 months, or more frequently if you have hard water.
- Prepare a descaling solution according to the descaler manufacturer's instructions (or use a mixture of white vinegar and water).
- Fill the water tank with the descaling solution.
- Place a large container under the coffee spout and steam wand.
- Run several brewing cycles (without coffee) and steam cycles until the water tank is empty.
- Rinse the water tank thoroughly and fill with fresh water.
- Run several cycles with fresh water to flush out any remaining descaling solution.
7. Troubleshooting
| Problem | Possible Cause | Solution |
|---|---|---|
| No coffee dispenses. | Water tank empty; machine not primed; clogged filter; pump issue. | Fill water tank; perform first use cycle; clean filter; contact support if pump issue persists. |
| Coffee is too weak or watery. | Insufficient coffee grounds; coffee too coarse; not tamped enough. | Increase coffee amount; use finer grind; tamp more firmly. |
| Milk not frothing properly. | Milk tank empty; milk not cold enough; steam wand clogged. | Fill milk tank; use cold milk; clean steam wand thoroughly. |
| Machine leaks water. | Water tank not seated correctly; drip tray full; internal seal issue. | Ensure water tank is secure; empty drip tray; contact support. |
| Appliance does not turn on. | Not plugged in; power outage; faulty power cord. | Check power connection; verify power supply; contact support if cord is damaged. |
8. Specifications
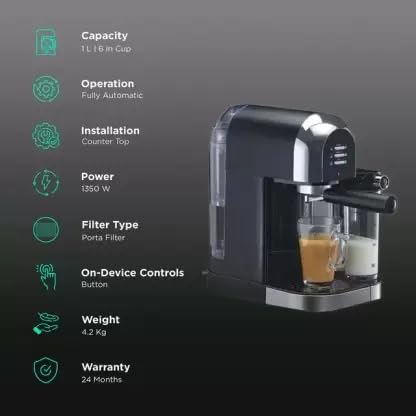
Image 8.1: Key specifications of the Autopresso Coffee Maker.

Image 8.2: Dimensions of the Autopresso Coffee Maker.
| Feature | Detail |
|---|---|
| Brand | Morphy Richards |
| Model Number | AUTOPRESSO 3-in-1 |
| Power | 1350 Watts |
| Output Pressure | 15 Bars |
| Water Tank Capacity | 1200 ml |
| Milk Tank Capacity | 700 ml |
| Product Dimensions (D x W x H) | 34.5D x 40W x 36H Centimeters |
| Material | Stainless Steel |
| Coffee Input Type | Pre-ground coffee |
| Filter Type | Reusable |
| Dishwasher Safe Components | Milk tank |
9. Warranty and Support
Your Morphy Richards Autopresso 3-in-1 Coffee Maker comes with a 2-year warranty on the product from the date of purchase.
For warranty claims, technical assistance, or service inquiries, please contact Morphy Richards customer support. Keep your purchase receipt as proof of purchase.
Note: An extended 6-month warranty was applicable for purchases made between October 1, 2021, and November 30, 2021, requiring product registration on the Morphy Richards India website by December 7, 2021. Terms and conditions applied.
For the most current support information, please visit the official Morphy Richards website or refer to the contact details provided with your product packaging.