
1. Introduction
This manual provides comprehensive instructions for the Wokyo V520 OBD2 Scanner Code Reader. The V520 is a professional automotive diagnostic tool designed to help users identify and resolve vehicle issues by accessing the On-Board Diagnostics (OBD2) system. It supports all OBD2 protocols and offers a range of diagnostic functions.
Key Features:
- Full OBD2 Modes: Read and clear diagnostic trouble codes (DTCs), turn off the Check Engine Light (MIL).
- I/M Readiness: Check emission-related system status.
- Live Data Stream: View real-time vehicle sensor data with graphing display.
- Freeze Frame Data: Capture vehicle conditions at the moment a fault code is set.
- O2 Sensor Test, On-Board Monitoring Test (Mode 6), EVAP System Test (Mode 8).
- Vehicle Information Retrieval: Access VIN, CID, and CVN.
- Battery Voltage Test.
- Built-in DTC library with over 35,901 codes.
- 2.8-inch color screen with Dual UI (dark and light modes).
- Cloud Printing Function for test data reports.
- Supports 10 languages.
2. Product Overview
Device Components and Layout
The Wokyo V520 features a robust design with a 2.8-inch color screen and intuitive button layout for easy navigation and operation.

Image: Front view of the Wokyo V520 scanner, highlighting the 2.8-inch color screen, universal OBD connector, and control buttons including DTC, I/M, BAT, EXIT, OK, and directional arrows.
- 2.8-inch Color Screen: Displays diagnostic information, menus, and data streams.
- DTC Button: Shortcut key for Diagnostic Trouble Codes.
- I/M Button: Shortcut key for I/M Readiness status.
- BAT Button: Shortcut key for Battery Voltage test.
- EXIT Button: Returns to the previous menu or exits a function.
- OK Button: Confirms selections or enters a menu.
- Directional Arrows: Navigate through menus and data.
- Universal OBD Connector: Connects to the vehicle's OBD2 port.
- Indicator Lights: Red, Yellow, Green LEDs indicate communication status and readiness.
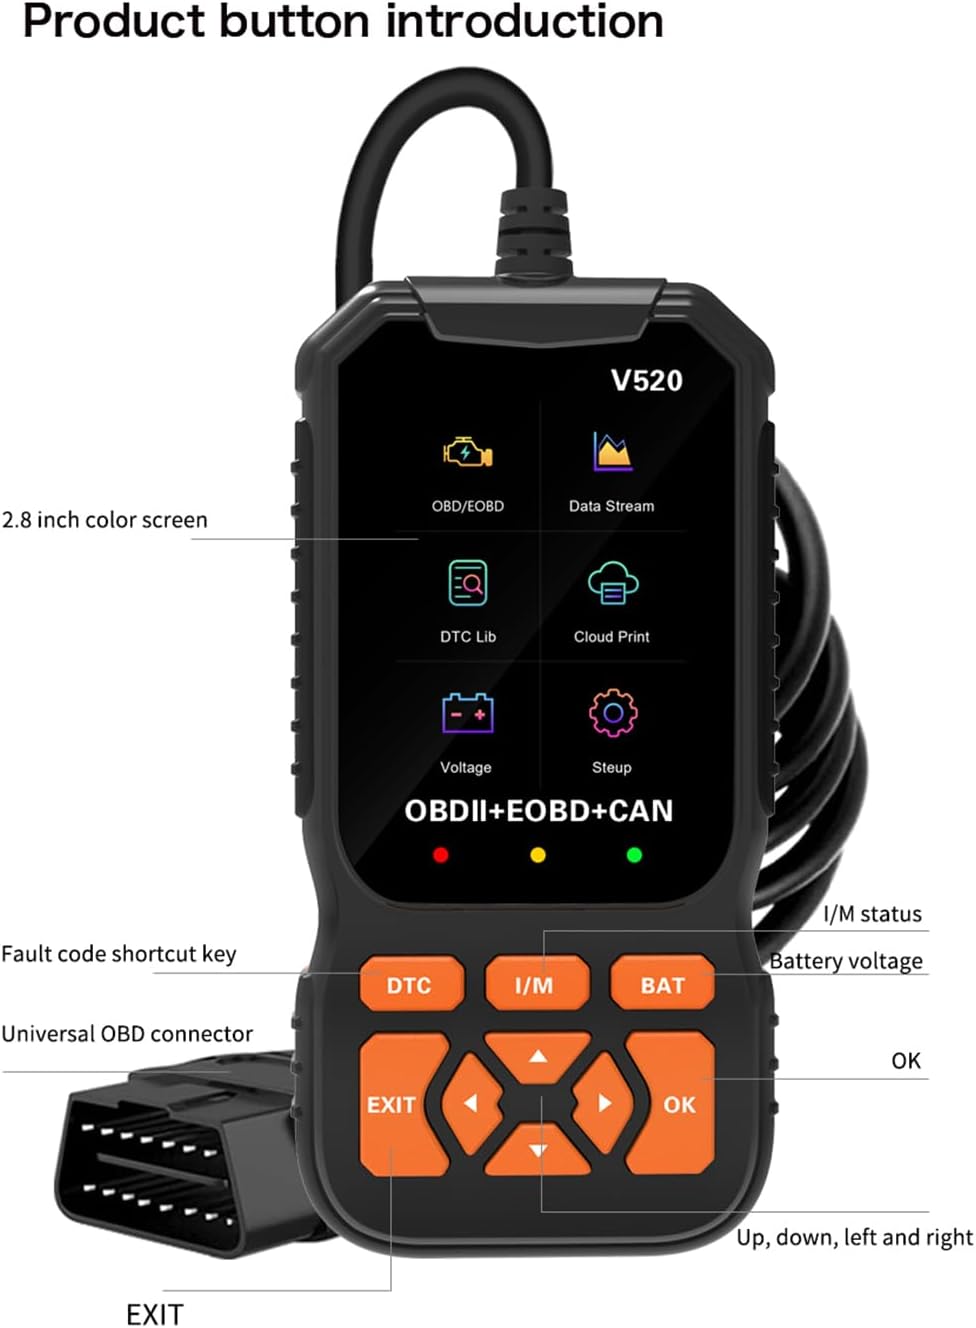
Image: Front and back views of the Wokyo V520 device, showing its ergonomic design and the OBDII label on the rear.
3. Setup and Connection
The Wokyo V520 scanner is powered directly from your vehicle's OBD2 port, requiring no internal battery. Follow these steps to connect the device:
- Locate the vehicle's 16-pin Data Link Connector (DLC). This port is typically located under the dashboard on the driver's side.
- Ensure the vehicle's ignition is in the OFF position.
- Firmly plug the V520's OBD connector into the vehicle's DLC.
- Turn the vehicle's ignition to the ON position (engine can be off or running, depending on the diagnostic task).
- The V520 scanner will power on automatically and display the main menu.
4. Basic Operation
Menu Navigation
Use the directional arrow buttons (Up, Down, Left, Right) to navigate through the menu options on the screen. Press the OK button to select an option or enter a submenu. Press the EXIT button to return to the previous screen or exit a function.
Language Selection
The V520 supports 10 languages. To change the language, navigate to the 'System Setup' menu, select 'Language', and choose your preferred language from the list.
Dual UI Mode
The device offers a Dual UI model, allowing you to switch between dark and light display modes for optimal visibility in various lighting conditions.
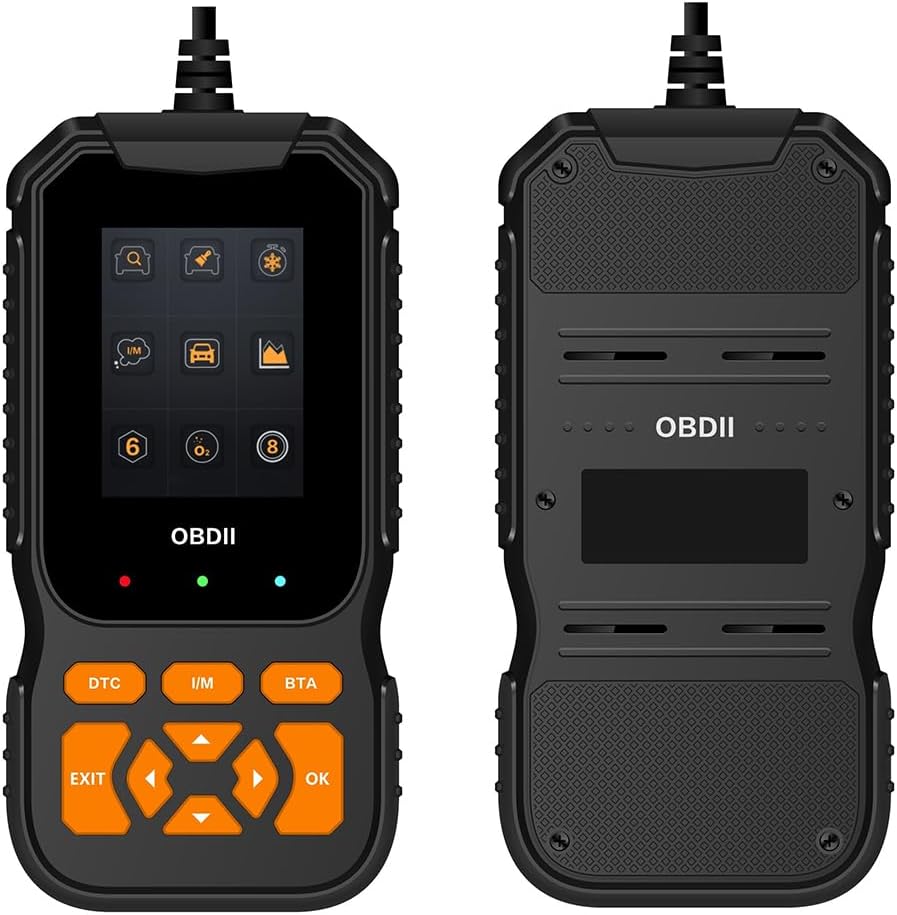
Image: Side-by-side comparison of the V520's dark and light user interface modes, showing different icon styles and background colors for various functions like OBD/EOBD, Data Stream, DTC Lib, Cloud Print, Voltage, and Setup.
To switch UI modes, navigate to the 'System Setup' menu and select 'Color Scheme'.
5. Diagnostic Functions
Reading and Clearing Trouble Codes (DTCs)
This function allows you to read current, pending, and permanent diagnostic trouble codes (DTCs) from the vehicle's Engine Control Unit (ECU) and clear them. Clearing codes will also turn off the Check Engine Light (MIL).

Image: The V520 display showing 'Trouble Codes' with an example code P3002 and 'Erase Codes' option. Icons for Read DTC, Clear DTC, Freeze Frame, I/M, Vehicle Info, and Live Data are visible.
- From the main menu, select 'OBD/EOBD' or press the DTC shortcut button.
- Choose 'Read Codes' to view stored, pending, or permanent codes.
- To clear codes, select 'Erase Codes'. Confirm your selection when prompted. Note: Clearing codes will erase all diagnostic data.
I/M Readiness Status
The I/M Readiness function checks the status of the vehicle's emission-related monitoring systems to ensure they are functioning correctly and ready for an emissions test. Red, Yellow, and Green LED lights on the device also indicate readiness status.

Image: The V520 screen showing the I/M Readiness display, indicating the status (MIL, DTC, MIS, FUE, CCM, CAT, HCAT, EVAP, AIR, O2S, HRT, EGR) with checkmarks or numbers for completed or incomplete tests.
- From the main menu, select 'I/M Readiness' or press the I/M shortcut button.
- The screen will display the status of various monitors (e.g., MIL, MISFIRE, FUEL, EVAP). A green checkmark indicates the monitor has completed its test, while other symbols may indicate incomplete tests or faults.
Live Data Stream
View real-time operational data from the vehicle's sensors, such as engine RPM, vehicle speed, oxygen sensor readings, coolant temperature, and more. This data can be displayed in text or graph format.

Image: The V520 display showing a 'Data Stream' with multiple parameters and their current values, such as DTC_CNT, FUELSYSA, LOAD_PCT, ETC, SHRTFT, LONGFT, FRP, MAP, RPM, VSS, SPARKADV, IAT, MAF, TP, AIR_STAT, O2SLOC, and O2B1S1(V).
- From the main menu, select 'Data Stream'.
- Choose the parameters you wish to monitor.
- The data will be displayed, updating in real-time.
Freeze Frame Data
When an emission-related fault occurs, the ECU stores certain vehicle operating conditions (Freeze Frame Data) at the time the DTC was set. This data helps in diagnosing the cause of the fault.
O2 Sensor Test
This function retrieves O2 sensor monitor test results for the most recently completed tests from the vehicle's on-board computer.
On-Board Monitor Test (Mode 6)
Retrieves test results for emission-related powertrain components and systems that are not continuously monitored.
EVAP System Test (Mode 8)
Initiates a test of the Evaporative Emission Control System (EVAP) for leaks.
Vehicle Information Retrieval
Access the Vehicle Identification Number (VIN), Calibration ID (CID), and Calibration Verification Number (CVN) from the vehicle's ECU.
Battery Voltage Test
Quickly check the vehicle's battery voltage. Press the BAT shortcut button for direct access.
DTC Lookup Library
The V520 includes a built-in library of Diagnostic Trouble Codes, allowing you to look up the meaning of codes directly on the device.

Image: The V520 display showing various diagnostic screens including Vehicle Info (ID Number, Calibration ID, Cal.Verif Number), View Freeze Frame (DTCFRZE, FUELSYS, LOAD_PCT, ETC, SHRTFT, LONGFT), On-board monitor (Exhaust gas sensor monitor), and System Setup (Language, Unit Of Measure, Contrast, Beep, Color Scheme, About).
6. Advanced Features
Cloud Printing Function
The V520 allows you to generate and print diagnostic reports using a cloud printing function, typically by scanning a QR code displayed on the device with your smartphone.

Image: The V520 display showing the 'Cloud Print' menu option and a QR code for initiating the printing of diagnostic reports, including DTCs, data streams, and freeze frame data.
- Navigate to the 'Cloud Print' option from the main menu.
- Select the type of data you wish to print (e.g., DTC, Data Stream, Freeze Frame).
- A QR code will appear on the screen. Use your smartphone to scan the QR code to access and print the report.
7. Specifications
Below are the technical specifications for the Wokyo V520 OBD2 Scanner:
| Feature | Specification |
|---|---|
| Model | V520 |
| Display | 2.8-inch Color Screen |
| Supported Protocols | KWP2000, J1850 VPW, J1850 PWM, CAN, ISO9141 |
| DTC Database | 35,901 codes |
| Supported Languages | 10 |
| UI Themes | Dark/Light |
| Power Source | 16-pin DLC (Vehicle powered) |
| Item Weight | 10.7 ounces |
| Product Dimensions | 6.6 x 3.5 x 0.9 inches |

Image: A comparison table detailing features across Wokyo models V317, V520, and V519, including fault diagnosis, clearing, freeze frame data, I/M readiness, real-time data streaming, battery voltage, O2 sensor test, DTC database size, languages, UI themes, and printing function. Explanations of terms like Freeze Frame, I/M Ready, Oxygen Sensor, Data Playback, Mode 6, Mode 8/EVAP, Specific Fault Codes, Intelligent Indicator Lights, and UI Theme are also provided.
8. Maintenance
To ensure the longevity and proper functioning of your Wokyo V520 OBD2 Scanner, follow these general maintenance guidelines:
- Keep the device clean and free from dust, dirt, and moisture. Use a soft, dry cloth for cleaning.
- Avoid exposing the device to extreme temperatures or direct sunlight for extended periods.
- Do not drop the device or subject it to strong impacts.
- Store the device in a safe place when not in use, preferably in its original packaging or a protective case.
- Regularly check the OBD connector for any damage or bent pins.
9. Troubleshooting
If you encounter issues with your Wokyo V520 scanner, consider the following general troubleshooting steps:
- Device does not power on: Ensure the OBD connector is securely plugged into the vehicle's DLC. Verify the vehicle's ignition is in the ON position. Check the vehicle's battery for sufficient power.
- Communication error: Confirm the vehicle supports the OBD2 protocol. Ensure the connection is stable. Try connecting to a different OBD2-compliant vehicle to rule out a vehicle-specific issue.
- Screen is frozen: Disconnect the device from the vehicle, wait a few seconds, and then reconnect it.
- Incorrect readings: Ensure the vehicle's ignition is ON and the engine is running (if required for specific tests). Verify that the correct vehicle information (VIN, etc.) is being read.
For persistent issues, refer to the manufacturer's support resources or contact customer service.
10. Warranty and Support
For information regarding product warranty, technical support, or service inquiries, please refer to the warranty card included with your product or visit the official Wokyo website. Customer support is available to assist with any questions or concerns you may have regarding the operation or functionality of your V520 OBD2 Scanner.
