1. Introduction
Thank you for choosing the DAITSU ADD-20XB Dehumidifier. This manual provides essential information for the safe and efficient operation, installation, and maintenance of your appliance. Please read this manual thoroughly before using the dehumidifier and retain it for future reference.
The DAITSU ADD-20XB is designed to reduce excess humidity in your indoor environment, contributing to a more comfortable and healthier living space. It features a compact design, an integrated display, and various functions for optimal humidity control.
2. Safety Information
Please observe the following safety precautions to prevent injury or damage to the appliance:
- Always connect the dehumidifier to a grounded power outlet with the correct voltage.
- Do not operate the unit with a damaged power cord or plug.
- Keep the appliance away from water and other liquids. Do not immerse it.
- Ensure adequate ventilation around the unit. Do not block air inlets or outlets.
- Do not insert objects into the air vents.
- Unplug the unit before cleaning, maintenance, or when not in use for extended periods.
- This appliance is not intended for use by persons (including children) with reduced physical, sensory, or mental capabilities, or lack of experience and knowledge, unless they have been given supervision or instruction concerning use of the appliance by a person responsible for their safety.
- Children should be supervised to ensure that they do not play with the appliance.
3. Product Overview
The DAITSU ADD-20XB Dehumidifier is a white, compact, floor-standing unit designed for efficient moisture removal. It features an intuitive control panel on the top surface and a large capacity water tank.

Figure 3.1: Front view of the DAITSU ADD-20XB Dehumidifier. This image shows the sleek white design and the DAITSU brand logo prominently displayed on the front panel.
3.1. Main Components
- Control Panel: Located on the top surface, with an integrated digital display and touch buttons.
- Air Inlet/Outlet: Vents for drawing in humid air and expelling dry air.
- Water Tank: Removable tank for collecting condensed water.
- Continuous Drainage Port: For connecting a hose for continuous water drainage.
- Handle: Integrated handle for easy mobility.

Figure 3.2: Close-up view of the control panel. This image highlights the digital display and various control buttons for operating the dehumidifier.
3.2. Control Panel Functions
- Power Button: Turns the unit on or off.
- Mode Button: Selects operating modes (e.g., Dehumidification, Laundry Mode).
- Humidity Adjustment Buttons: Increases or decreases the desired humidity level.
- Timer Button: Sets the auto-on or auto-off timer.
- Fan Speed Button: Adjusts the fan speed.
- Integrated Display: Shows current humidity, set humidity, timer settings, and error codes.
4. Setup
4.1. Unpacking
- Carefully remove the dehumidifier from its packaging.
- Remove all packing materials, including any protective films or tapes.
- Inspect the unit for any signs of damage. If damaged, do not operate and contact customer support.
4.2. Placement
- Place the dehumidifier on a firm, level surface capable of supporting its weight.
- Ensure there is at least 20 cm (8 inches) of clear space around the air inlet and outlet for proper airflow.
- Avoid placing the unit near heat sources, in direct sunlight, or in areas with excessive dust.
- For optimal performance, close all doors and windows in the room where the dehumidifier is operating.
4.3. Power Connection
Plug the power cord into a suitable grounded electrical outlet. Ensure the voltage matches the specifications of the unit.
5. Operating Instructions
5.1. Basic Operation
- Press the Power Button to turn on the dehumidifier. The display will show the current room humidity.
- Use the Humidity Adjustment Buttons (Up/Down arrows) to set your desired humidity level. The recommended range is typically between 40% and 60% relative humidity.
- The unit will automatically start dehumidifying until the set humidity level is reached, then it will cycle on and off to maintain it.
5.2. Mode Selection
Press the Mode Button to cycle through available operating modes:
- Dehumidification Mode: Standard operation to reduce room humidity.
- Laundry Mode (Dry Clothes): Designed to quickly dry clothes by continuously running the dehumidifier at a high fan speed.
5.3. Timer Function
Press the Timer Button to set an auto-on or auto-off time. Use the humidity adjustment buttons to set the desired hours (1-24). The timer indicator will illuminate when active.
5.4. Fan Speed Adjustment
Press the Fan Speed Button to select between different fan speeds (e.g., Low, High). Higher fan speed results in faster dehumidification but may produce more noise.
5.5. Water Tank and Continuous Drainage
- Water Tank: When the water tank is full, the unit will automatically shut off, and a Full Tank Alert will activate. Carefully remove the tank, empty the collected water, and reinsert it securely.
- Continuous Drainage: For extended operation without emptying the tank, connect a suitable drainage hose (not included) to the continuous drainage port at the back of the unit. Ensure the hose is sloped downwards to allow gravity drainage into a floor drain or larger container.
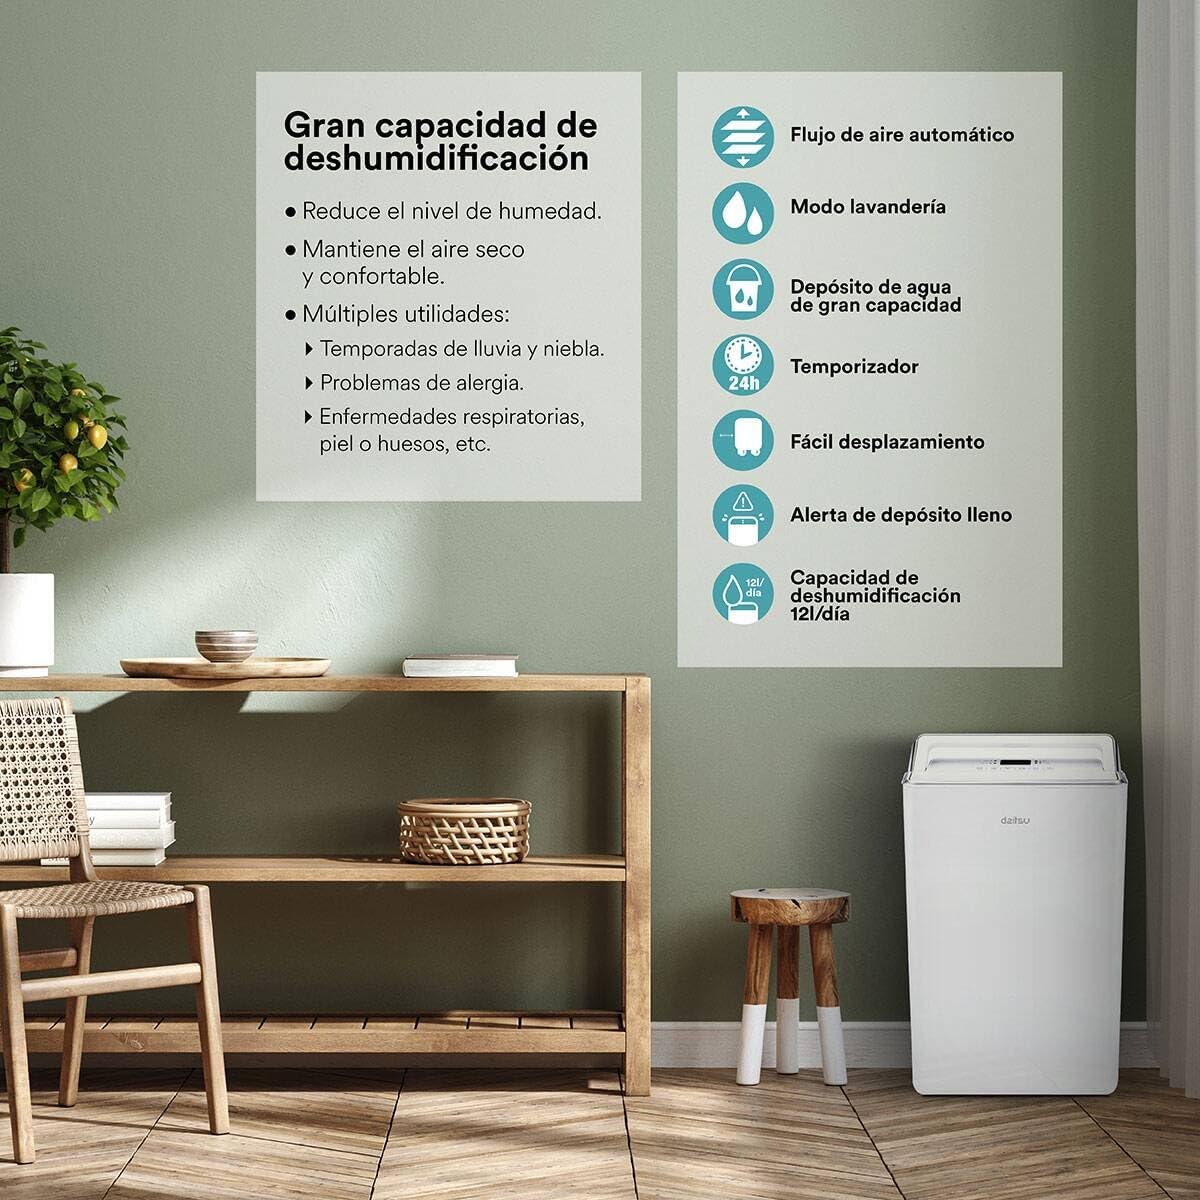
Figure 5.1: Overview of key features including high dehumidification capacity (20L/day), automatic airflow, laundry mode, large capacity water tank, timer, easy mobility, and full tank alert.
6. Maintenance
Regular maintenance ensures optimal performance and extends the lifespan of your dehumidifier.
6.1. Cleaning the Air Filter
The air filter should be cleaned every two weeks or more frequently depending on usage and air quality.
- Turn off and unplug the dehumidifier.
- Locate and remove the air filter (typically at the back or side of the unit).
- Wash the filter with warm, soapy water. Rinse thoroughly and allow it to air dry completely before reinserting.
- Do not use a dishwasher or expose the filter to direct sunlight for drying.
6.2. Cleaning the Water Tank
Clean the water tank regularly to prevent mold and mildew growth.
- Remove the water tank from the unit.
- Wash the tank with mild detergent and warm water.
- Rinse thoroughly and dry before placing it back into the dehumidifier.
6.3. External Cleaning
Wipe the exterior of the unit with a soft, damp cloth. Do not use harsh chemicals, abrasive cleaners, or solvents.
6.4. Storage
If storing the unit for an extended period:
- Empty and clean the water tank.
- Clean the air filter.
- Wrap the power cord neatly.
- Store the unit upright in a cool, dry place, away from direct sunlight and extreme temperatures.
7. Troubleshooting
Before contacting customer support, please refer to the following troubleshooting guide for common issues:
| Problem | Possible Cause | Solution |
|---|---|---|
| Unit does not turn on | No power supply Power cord not securely plugged in | Check power outlet and plug connection Ensure the outlet is functional |
| No water collected | Room humidity is too low Air filter is clogged Temperature is too low Water tank not properly installed | Increase desired humidity setting Clean the air filter Operate in a warmer environment (above 5°C) Ensure water tank is correctly seated |
| Unit is noisy | Unit not on a level surface Air filter is clogged Internal components vibrating | Place on a flat, stable surface Clean the air filter This may be normal during operation; if excessive, contact support |
| Water tank full indicator on, but tank is not full | Float switch malfunction Tank not seated correctly | Remove and reinsert the water tank firmly Contact customer support if issue persists |
| Automatic defrost function active | Coils are freezing due to low temperature | This is normal operation. The unit will pause dehumidification and run the fan to melt frost. Dehumidification will resume automatically. |
8. Specifications
| Feature | Specification |
|---|---|
| Model Number | ADD-20XB (3NDA0044) |
| Brand | DAITSU |
| Dehumidification Capacity | 20 Liters/day |
| Color | White |
| Material | Alloy Steel |
| Weight | 13 Kilograms |
| Special Features | Adjustable Humidity Control, Automatic Defrost, Water Level Indicator, Continuous Drainage |
| Energy Class | A++ to E |
9. Warranty and Support
For warranty information, please refer to the documentation provided at the time of purchase. Keep your proof of purchase for any warranty claims.
If you encounter issues not covered in this manual or require further assistance, please contact DAITSU customer support. Contact details can typically be found on the manufacturer's website or your purchase receipt.


