Thank you for choosing the RPNB Biometric Rifle Safe. This manual provides essential information for the proper setup, operation, and maintenance of your new security cabinet. Please read this manual thoroughly before using the safe to ensure optimal performance and safety. Keep this manual for future reference.
Safety Information
Always follow these safety guidelines to prevent injury and damage to the safe or its contents:
Do not store backup keys inside the safe. Keep them in a secure, separate location away from the safe and out of reach of children.
Ensure the safe is securely mounted to a wall or floor using the provided expansion bolts before storing any items. This prevents tipping and unauthorized removal.
Keep the safe closed and locked at all times when not in use.
Do not allow children or unauthorized individuals to operate the safe.
Avoid exposing the safe to extreme temperatures or humidity.
Do not attempt to force the safe open if it malfunctions. Refer to the troubleshooting section or contact customer support.
Package Contents
Carefully unpack your RPNB Biometric Rifle Safe and verify that all components are present:
RPNB Biometric Rifle Safe Unit
Backup Keys (2)
Removable Shelf
Lightweight Plastic Rifle Rack (for up to 3 rifles)
Pistol Holsters (3, located on door panel)
Expansion Bolts (for mounting)
Instruction Manual (this document)
Image: The RPNB Biometric Rifle Safe, displaying its sleek black exterior with the biometric keypad and L-shaped handle, alongside an open view revealing the interior rifle rack and door organizer with pistol holsters.
Setup and Installation
Choosing a Location
Select a discreet and secure location for your safe. Consider areas like closets, garages, or offices where the safe can be easily accessed by authorized users but remains out of sight from others.
Mounting the Safe
It is crucial to secure the safe using the provided expansion bolts to prevent unauthorized removal or tipping. The safe features two pre-drilled holes at the back and two in the bottom for easy attachment.
Position the safe in your desired location.
Mark the drilling points through the pre-drilled holes on the wall or floor.
Drill pilot holes at the marked points.
Align the safe with the drilled holes and insert the expansion bolts.
Tighten the bolts securely to anchor the safe.
Image: The RPNB Biometric Rifle Safe positioned securely in a home office setting, demonstrating its compact design and the importance of securing it with expansion bolts for stability.
Dimensions
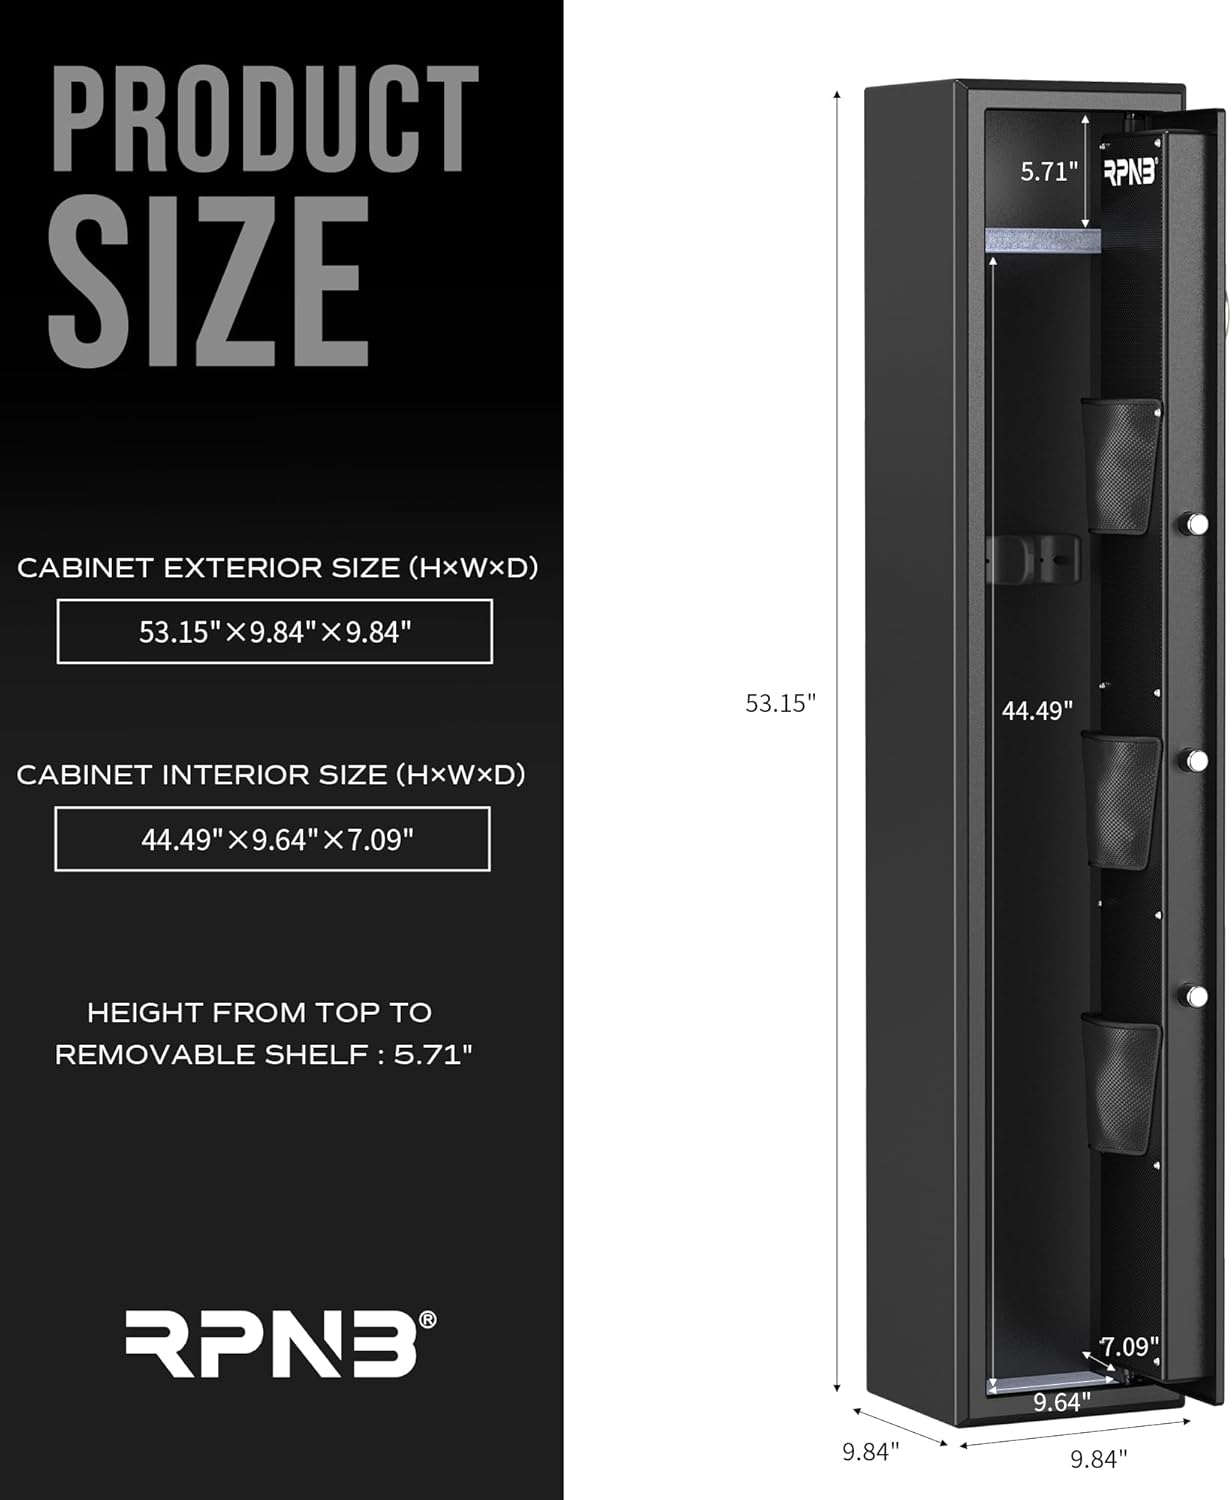
Understanding the safe's dimensions is important for placement and capacity planning.
Image: A detailed diagram illustrating the exterior and interior dimensions of the RPNB Biometric Rifle Safe, including the height from the top to the removable shelf.
Operating Instructions
Powering On and Battery Installation
The safe requires batteries for its electronic locking system. The external battery compartment allows for convenient replacement.
Locate the external battery compartment, typically near the keypad.
Turn the lock cover counterclockwise to access the battery compartment.
Insert the required batteries (check specifications for type and quantity), ensuring correct polarity.
Replace the lock cover by turning it clockwise.
Image: A close-up view of the safe's digital touchscreen keypad and advanced fingerprint sensor, highlighting the hidden emergency keyhole and the L-shaped handle for opening.
Entry Methods
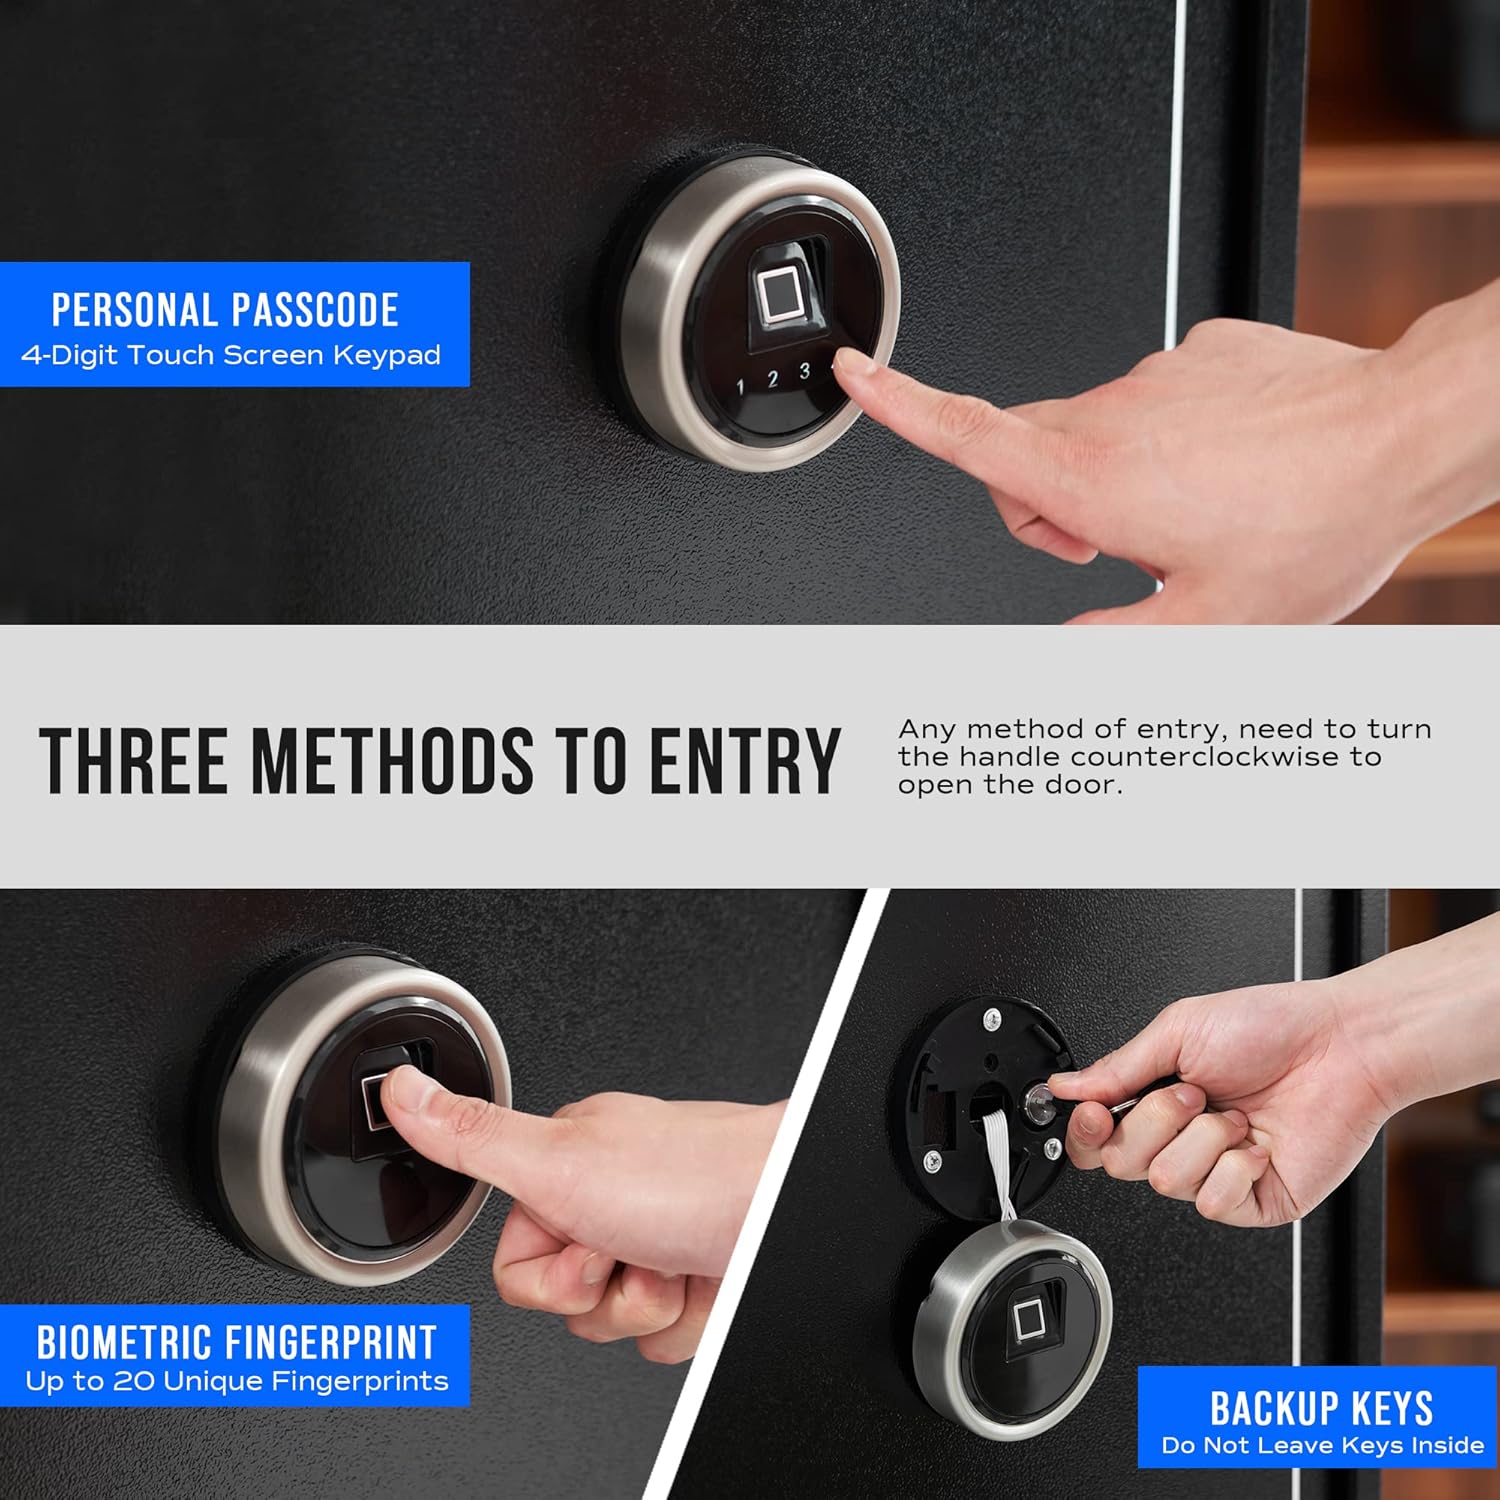
Your RPNB safe offers multiple ways to access its contents:
Biometric Fingerprint: The advanced 500 DPI biometric fingerprint sensor allows for quick access. You can register up to 20 unique fingerprints.
4-Digit Smart Touchscreen Keypad: Enter your personal passcode using the digital touchscreen keypad.
Backup Keys: Two backup keys are provided for emergency access. Always store these keys securely outside the safe.
Image: This image illustrates the three primary methods of entry for the RPNB safe: using a personal passcode on the 4-digit touchscreen keypad, biometric fingerprint recognition, and the traditional backup key access.
Opening the Door
After successfully authenticating via fingerprint, keypad, or key, you must turn the L-shaped safe handle counterclockwise to open the door.
Video: An official RPNB video demonstrating the features of the FR Series Touchscreen Biometric Fingerprint Rifle Safe, including the smart touchscreen, advanced fingerprint sensor, and the operation of the L-shaped door handle.
Internal Features and Organization
The RPNB safe is designed for smart capacity and flexible storage:
Rifle Capacity: Accommodates up to 3 rifles up to 44.49 inches long without scopes.
Removable Shelf: An internal removable shelf allows you to enlarge the storage space as needed for various items.
Door Organizer: The inside of the door panel features a door organizer with three separate pistol holsters and additional pockets for maximizing storage space for handguns, ammunition, or other small valuables.
Image: A detailed view of the RPNB safe's interior, showcasing the lightweight plastic rifle rack, the internal removable shelf, the robust 3 solid steel live-locking bolts, and the versatile gun safe door panel organizer with pistol holsters.
Image: A visual representation of the RPNB 3-Gun Rifle Safe's internal storage components, including one 3-gun rack, three pistol holders, and one removable shelf, illustrating the flexible storage options.
Maintenance
Regular maintenance ensures the longevity and proper functioning of your safe:
Cleaning: Wipe the exterior of the safe with a soft, damp cloth. Avoid abrasive cleaners or solvents that could damage the finish.
Battery Replacement: Replace batteries annually or when the low battery indicator appears. Use high-quality alkaline batteries.
Lock Mechanism: Do not lubricate the lock mechanism. If the lock feels stiff, contact customer support.
Troubleshooting
If you encounter issues with your RPNB safe, refer to the table below for common problems and solutions:
Ensure the L-shaped handle is turned counterclockwise fully after successful authentication.
Keypad is unresponsive.
Batteries are dead or improperly installed.
Replace batteries, ensuring correct polarity.
Safe makes unusual noises.
Internal mechanism issue.
Contact customer support. Do not attempt to repair yourself.
Product Specifications
Feature
Detail
Brand
RPNB
Model Number
RP10FR
Product Dimensions
9.84"D x 9.84"W x 53.15"H
Lock Type
Biometric, Electronic Combination Lock, Key
Color
Black
Capacity
3 Rifles
Material
Alloy Steel
Special Features
Lockable, Removable Shelf, Door Organizer
Mounting Type
Wall Mount
Control Type
Touchpad Control
Included Components
Expansion Bolts
Item Weight
66.1 pounds
Water Resistance Level
Not Water Resistant
Warranty and Support
Your RPNB Biometric Rifle Safe comes with a 1-year limited warranty from the date of purchase. This warranty covers defects in materials and workmanship under normal use.
For warranty claims, technical support, or any questions regarding your safe, please contact RPNB customer service. Refer to the product packaging or the RPNB official website for the most current contact information.
Please have your model number (RP10FR) and purchase information ready when contacting support.
Related Documents - RP10FR
RPNB RPFS Series Fireproof Fingerprint Gun Security Cabinet Instruction Manual This comprehensive instruction manual provides detailed information on the RPNB RPFS Series fireproof fingerprint gun security cabinets. It covers product features, model specifications, box contents, safe accessories, warnings, disclaimers, operating instructions (opening, battery installation, programming, fingerprint registration, lock-down system, alarms), installation, mounting, and customer support/warranty information.
RPNB RPESA Series Electronic Security Home Safe Instruction Manual Comprehensive instruction manual for RPNB RPESA Series electronic security home safes, covering setup, operation, security features, and customer support. Includes details on battery installation, master code programming, backup key usage, and mounting instructions.