
1. Introduction
Welcome to the world of immersive entertainment with your new VITURE One XR Glasses. These lightweight, high-definition smart glasses are designed to provide a cinematic viewing experience anywhere, anytime. Featuring an OLED display, integrated Harman Audio, and advanced visual adjustments, the VITURE One offers a portable and powerful way to enjoy your favorite content.
2. What's in the Box
Your VITURE One XR Glasses package includes the following items:
- VITURE One XR Glasses
- Quick Start Guide
- Safety Guidelines
- Lens Cleaning Cloth
- Glasses Carrying Case
- USB-C to Magnetic Connector Cable
- Nose Pads (various sizes)
- Anti-Clip Hair Cover
For a visual guide to unboxing and included accessories, please watch the video below:
Video: Unboxing the VITURE One XR Glasses and identifying included accessories.
3. Product Overview
The VITURE One XR Glasses are designed for comfort and performance, offering a premium extended reality experience.
Key Features:
- Immersive Display: Organic EL (OLED) Full HD display, equivalent to a 120-inch screen viewed from 3 meters. Features 55 PPD (Pixels Per Degree) for exceptional clarity and up to 1,800 nits brightness.
- High-Quality Audio: Co-developed with HARMAN, the glasses feature an integrated spatial audio system that minimizes sound leakage while delivering an immersive, three-dimensional sound experience.
- Lightweight Design: Weighing approximately 78g, the glasses are designed for extended comfortable wear.
- Diopter Adjustment: Built-in dials allow for individual eye focus adjustment up to -5.0D, eliminating the need for prescription glasses for many users.
- Electronic Dimming Film: Adjust the transparency of the lenses for optimal viewing in various lighting conditions.
- 3DoF Functionality: Supports 3 Degrees of Freedom for a more interactive viewing experience (beta version).

Image: Close-up of the VITURE One XR Glasses highlighting the diopter adjustment dials and Harman Audio integration.

Image: Illustration of the electronic dimming film and a comparison demonstrating the high PPD (Pixels Per Degree) of the VITURE One display.
4. Setup
4.1 Attaching/Removing Nose Pads
The VITURE One XR Glasses come with multiple nose pad sizes to ensure a comfortable fit. To attach or remove a nose pad:
- Gently pull the existing nose pad away from the glasses frame to detach it.
- Align the desired nose pad with the slots on the glasses frame.
- Press firmly until it clicks into place.
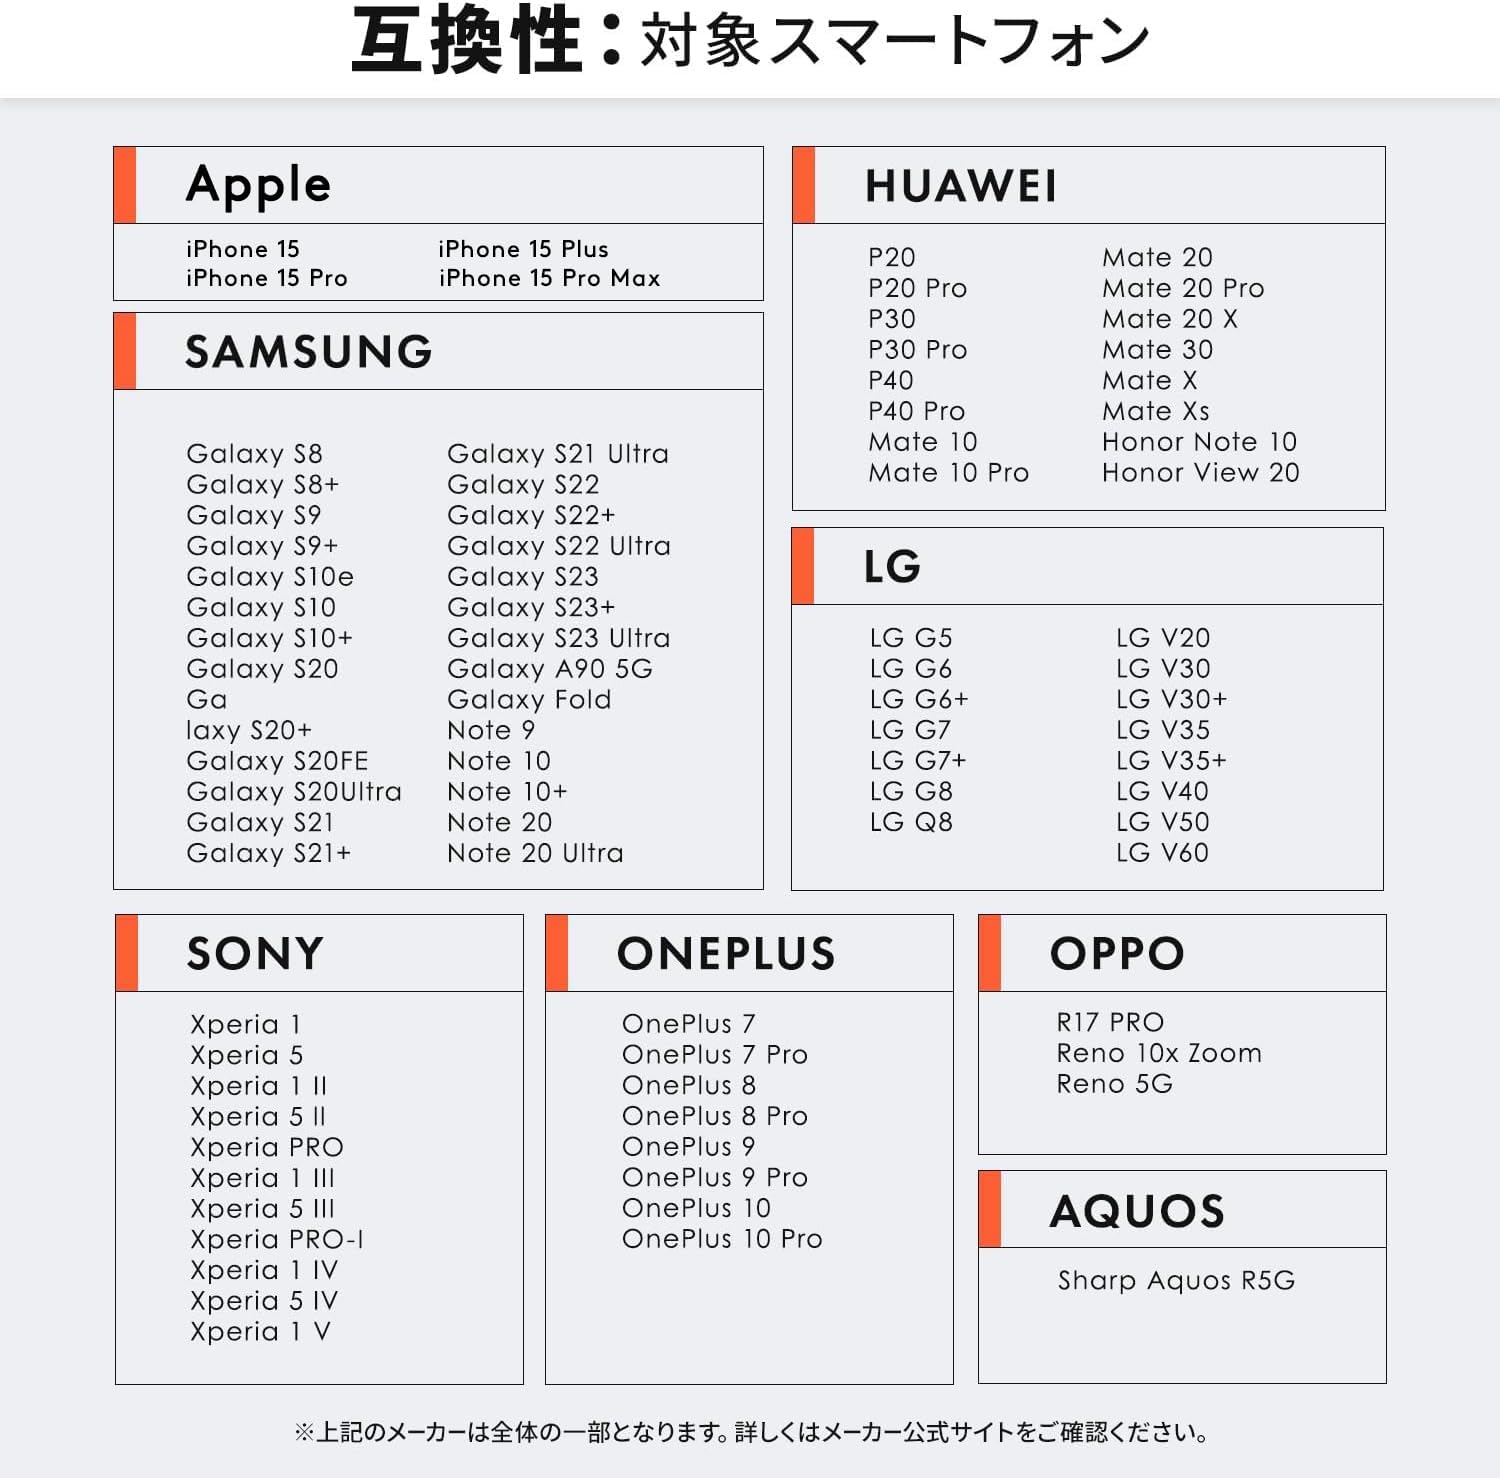
Image: The VITURE One XR Glasses showing the nose pad area.
4.2 Adjusting Diopter
The glasses feature individual diopter adjustment for each eye. This allows you to achieve clear focus without prescription glasses.
- Locate the small dials on the top of the glasses frame, above each lens.
- While wearing the glasses, cover one eye.
- Rotate the dial for the uncovered eye until the image appears sharp and clear.
- Repeat for the other eye.

Image: Diagram illustrating the diopter adjustment mechanism on the VITURE One XR Glasses.
4.3 Connecting to a Smartphone
To connect your VITURE One XR Glasses to a compatible smartphone:
- Unfold the glasses.
- Connect the magnetic USB-C cable to the glasses' magnetic port.
- Connect the other end of the USB-C cable to your smartphone's USB-C port.
- The glasses display should activate, mirroring your smartphone screen.

Image: The VITURE One XR Glasses connected to a smartphone via USB-C cable.
5. Operating Instructions
The VITURE One XR Glasses feature two main buttons on the right temple for various functions:

Image: Diagram showing the location of the mode and adjustment buttons on the VITURE One XR Glasses.
5.1 Mode Button Functions
- Short Press (A): Toggles the electronic dimming film ON/OFF.
- Double Short Press (B): Switches between brightness adjustment mode and volume adjustment mode. Use the adjacent adjustment buttons to change the selected setting.
- Long Press (C, approximately 5 seconds): Switches between 2D and 3D display modes.
- Triple Short Press (D): Toggles the standalone 3DoF display ON/OFF (beta version).
5.2 Adjustment Buttons
The two smaller buttons located next to the Mode button are used for adjusting brightness or volume, depending on the selected mode (see 5.1 B).
6. Compatibility
The VITURE One XR Glasses are compatible with a wide range of devices:
- Smartphones: Compatible with most smartphones supporting DisplayPort Alternate Mode via USB-C. This includes many Android phones (e.g., Samsung Galaxy S8 and newer, Huawei P20 and newer, LG G5 and newer, Sony Xperia 1 and newer, OnePlus, OPPO, Sharp Aquos R5G).
- PCs: Connects to PCs via USB-C (DisplayPort Alternate Mode). For enhanced PC functionality, download the SpaceWalker app for Windows from viture.com/windows.
- iPhones: iPhone 15/15 Pro models are directly compatible via USB-C. For iPhone 14 and earlier models, an HDMI adapter (sold separately) and an Apple Lightning Digital AV Adapter (sold separately) are required.
- Gaming Consoles: Compatible with various gaming consoles when used with the VITURE Mobile Dock or HDMI XR Adapter (sold separately).

Image: A detailed compatibility chart listing various smartphone models supported by the VITURE One XR Glasses.

Image: Illustration showing how to connect the VITURE One XR Glasses to an iPhone, including the necessary adapters for older models.
7. Maintenance
To ensure the longevity and optimal performance of your VITURE One XR Glasses, follow these maintenance guidelines:
- Cleaning Lenses: Use the provided lens cleaning cloth to gently wipe the lenses. Avoid using abrasive materials or chemical cleaners, which can damage the optical surfaces.
- Cleaning Frame: Wipe the frame with a soft, damp cloth. Do not submerge the glasses in water.
- Storage: When not in use, store the glasses in their protective carrying case to prevent scratches and damage.
- Avoid Extreme Temperatures: Do not expose the glasses to extreme heat or cold, as this can affect performance and battery life.
8. Troubleshooting
If you encounter any issues with your VITURE One XR Glasses, please refer to the following common solutions:
- Screen Malfunction / Screen Goes Dark / No Display: If the screen malfunctions, goes dark during use, or does not display, a restart is recommended. Disconnect the glasses from the power source and reconnect them.
- Overheating: If the glasses become excessively warm, especially near the right temple, disconnect them and allow them to cool down before resuming use. Prolonged overheating can affect performance.
- Nose Pad Not Fitting: If the nose pad does not fit correctly or falls off, ensure it is properly aligned and firmly attached. Experiment with different sizes of nose pads provided in the box to find the best fit.
- Focus Issues / Blurry Image: Adjust the diopter dials on top of the glasses for each eye individually until the image is clear. If you have significant differences in vision between your eyes, you may need to adjust each dial carefully.
- Connectivity Issues: Ensure the USB-C cable is securely connected to both the glasses and your device. Verify that your device supports DisplayPort Alternate Mode. For iPhones 14 and older, confirm that both the HDMI adapter and Apple Lightning Digital AV Adapter are correctly connected.
If problems persist, please contact VITURE customer support for further assistance.
9. Specifications
| Feature | Specification |
|---|---|
| Screen Size (equivalent) | 120 inches |
| Display Type | Organic EL (OLED) |
| Resolution | Full HD (1920x1080 per eye) |
| PPD (Pixels Per Degree) | 55 |
| Brightness | Up to 1,800 nits |
| Audio | Integrated HARMAN AudioEFX Spatial Audio |
| Weight | Approx. 78g |
| Diopter Adjustment | Up to -5.0D |
| Connectivity | USB-C (DisplayPort Alternate Mode), Bluetooth |
| Material | Polycarbonate (PC) |
| Product Dimensions | 16.3 x 4.77 x 5.37 cm |
| Battery Included | Yes (Lithium Ion) |
10. Warranty and Support
For warranty information and customer support, please refer to the official VITURE website or contact your retailer. Keep your proof of purchase for warranty claims.


