1. Important Safety Information
The ATOMSTACK S40 Pro is a Class 4 laser product. Always observe the following safety precautions to prevent injury or damage:
- Never look directly into the laser beam.
- Always wear the provided safety glasses during operation.
- Ensure the work area is well-ventilated to dissipate fumes and smoke.
- Do not leave the machine unattended during operation.
- Keep flammable materials away from the laser path.
- Use the emergency stop button in case of any malfunction or emergency.
- Ensure proper grounding of the machine.
2. Product Overview
The ATOMSTACK S40 Pro is a high-power laser engraving and cutting machine designed for precision and versatility. It features a 48000mW optical power laser module with a unique one-key switch for 24W (engraving) and 48W (cutting) modes. The machine is equipped with automatic air assist and supports multiple control methods for enhanced user experience.

Figure 2.1: ATOMSTACK S40 Pro Laser Engraving Machine with example projects.
Key Features:
- One-Key Switch Engraving/Cutting Mode: Easily switch between 24W for fine engraving and 48W for powerful cutting.
- Ultra-Fine Engraving & Super Fast Cutting: Achieves a laser spot of 0.08mm*0.1mm for detailed work and high cutting speeds.
- Diverse Control Methods: Supports touchscreen, smartphone app (via WiFi), and computer (LaserGRBL/LightBurn) control.
- Automatic Switch Air Assist: Integrated F30 Pro air-assist kits with dual pumps for improved cutting performance and cleaner results.
- Enhanced Safety: Features a panoramic light filtering glass protector, drag chain wire harness, emergency stop button, reset switch, and limit switch.
3. Setup and Assembly
Before operating your ATOMSTACK S40 Pro, ensure all components are present and assembled correctly. Refer to the included product manual for detailed step-by-step assembly instructions.
3.1 Packaging Contents

Figure 3.1: Packaging contents of the ATOMSTACK S40 Pro.
Verify that your package contains all items shown in Figure 3.1, including the laser engraving machine, power cable, USB cable, power adapter, metal mat board, product manual, safety glasses, wood chips, and a USB card reader.
3.2 Initial Setup
- Place the machine on a stable, level surface in a well-ventilated area.
- Connect the power cable to the machine and a suitable power outlet.
- Connect the USB cable to your computer (if using computer control).
- Connect the air assist kit to the designated port on the machine.
- Ensure the laser protective cover is in place or wear safety glasses before powering on.
4. Operating Instructions
4.1 Power On and Mode Selection
The S40 Pro features a physical button to switch between 24W (engraving) and 48W (cutting) output power. Select the appropriate mode based on your project requirements.
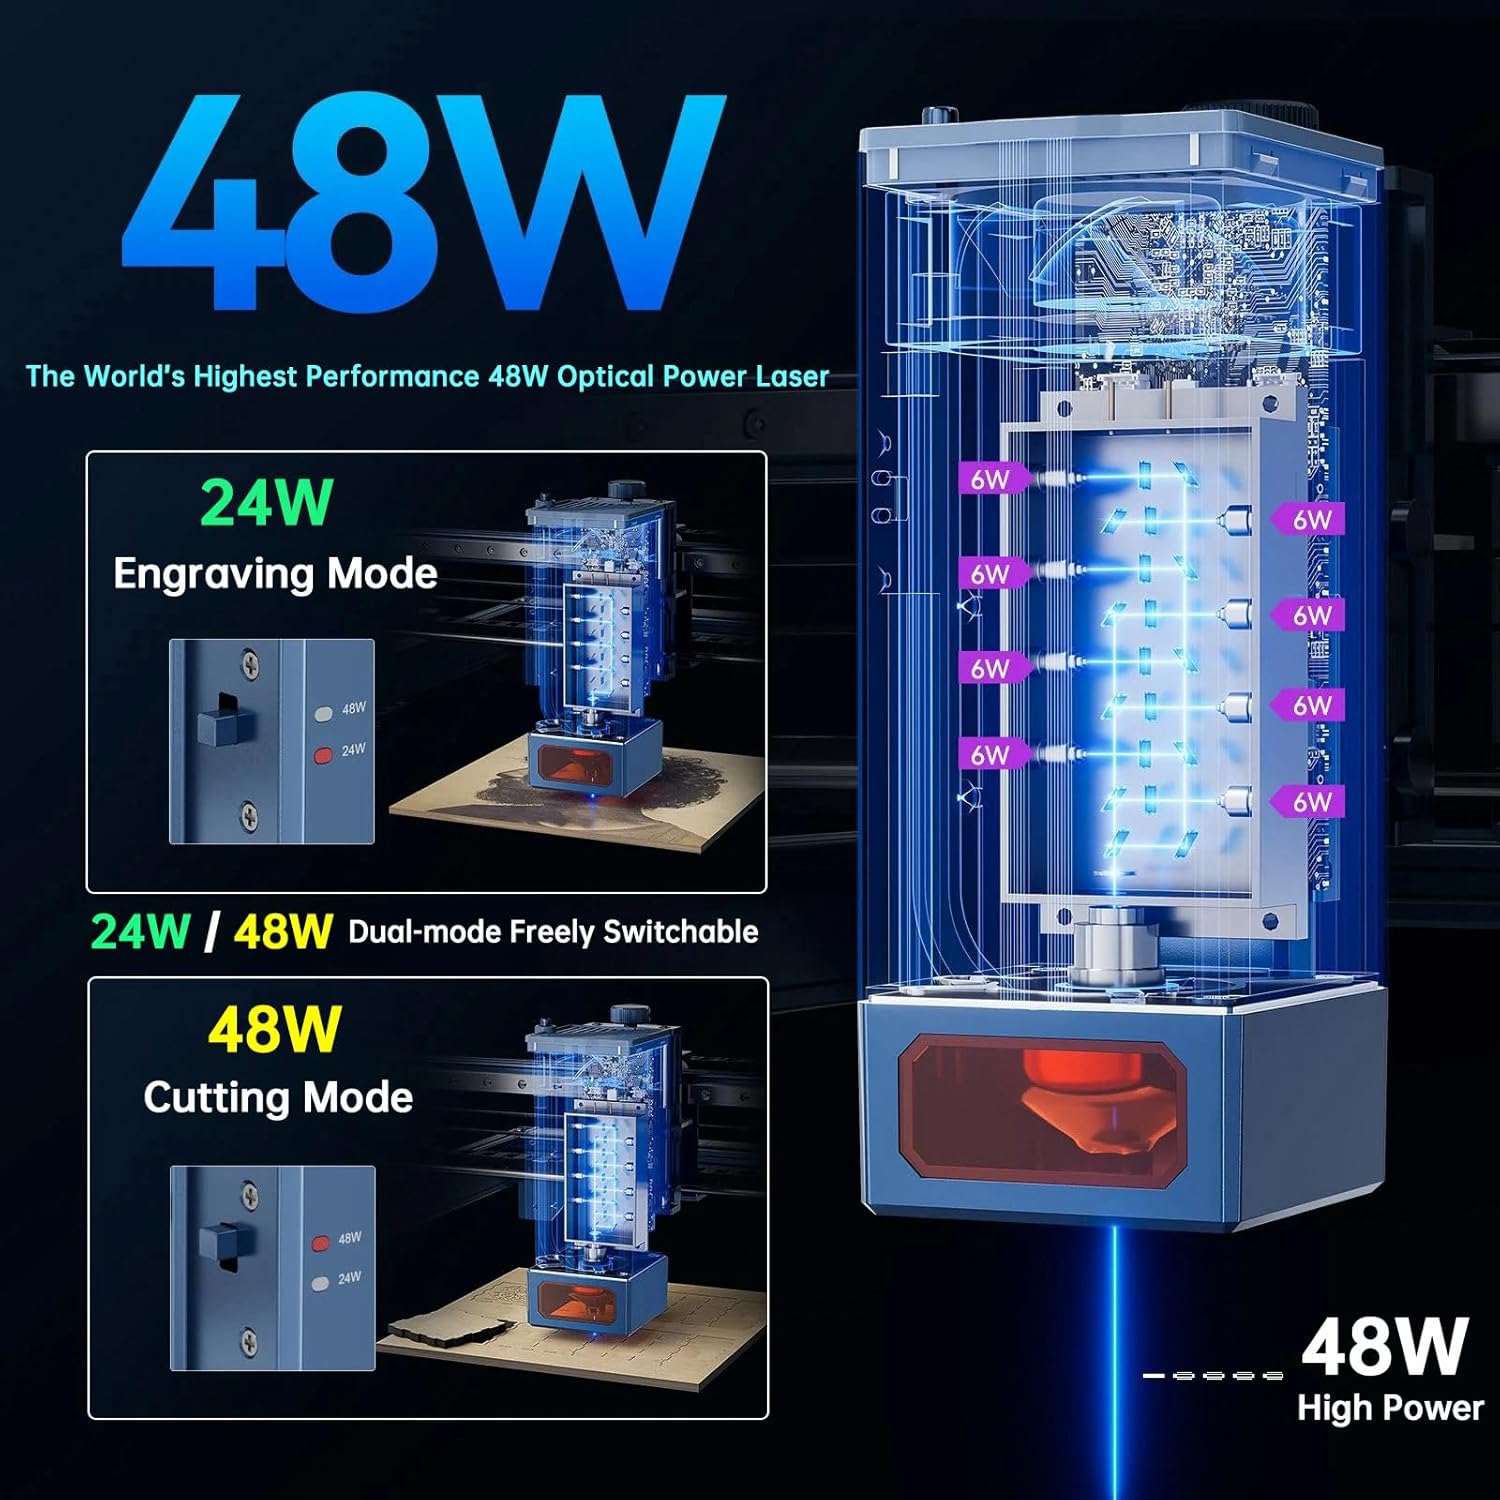
Figure 4.1: Dual-mode switch for 24W (Engraving) and 48W (Cutting).
4.2 Focusing the Laser
The S40 Pro uses a fixed-focus laser. Adjust the laser module's height using the rotary knob to achieve optimal focus for your material. Refer to the manual for specific height settings for cutting and engraving.
4.3 Control Methods
The machine offers three primary control methods:
- Touchscreen Control: Insert a TF/SD card with your design files and operate directly via the integrated touchscreen.
- Smartphone Control: Download the ATOMSTACK app, connect via Wi-Fi, and control the machine from your smartphone.
- Computer Control: Use software like LaserGRBL or LightBurn (compatible with Win XP / Win 7 / Win 8 / XP / Win 10 / Win 11) connected via USB.

Figure 4.2: Multiple operation methods for the S40 Pro.
4.4 Automatic Air Assist
The S40 Pro is equipped with an automatic air assist system. This system helps to blow away smoke and debris during cutting and engraving, resulting in cleaner cuts and reduced charring. It can be automatically switched on/off via LightBurn's M7 mode.

Figure 4.3: Automatic Switch Air Assist in action.
4.5 Supported Materials
The ATOMSTACK S40 Pro can engrave and cut a wide range of materials. Always test on a small, inconspicuous area first to determine optimal settings.

Figure 4.4: Examples of materials compatible with the S40 Pro.
The machine is capable of cutting ultra-thick materials such as 20mm basswood, 25mm pinewood, 20mm acrylic, and 9mm MDF.

Figure 4.5: Maximum thickness for one-pass cutting.
4.6 Official Product Video
Watch the official product video for a visual guide on the ATOMSTACK S40 Pro's features and capabilities, including demonstrations of its engraving and cutting functions, mode switching, and air assist system.
Video 4.1: ATOMSTACK S40 Pro Laser Engraver with Automatic Air Assist. This video demonstrates the machine's capabilities, including the dual-mode switching, air assist, and precision engraving and cutting.
5. Maintenance
Regular maintenance ensures the longevity and optimal performance of your ATOMSTACK S40 Pro.
- Clean the Laser Lens: Periodically clean the laser lens with a soft, lint-free cloth and lens cleaning solution to maintain engraving and cutting quality.
- Clean the Machine Body: Wipe down the machine's frame and components with a damp cloth to remove dust and debris.
- Lubricate Moving Parts: Apply a small amount of lubricant to the linear guide rails and other moving parts as recommended in the detailed product manual to ensure smooth operation.
- Check Connections: Regularly inspect all cables and connections for wear or looseness.
6. Troubleshooting
If you encounter issues with your ATOMSTACK S40 Pro, try the following common troubleshooting steps:
- Machine Not Powering On: Check power cable connections and ensure the power adapter is functioning correctly.
- Laser Not Firing: Verify that the laser module is properly connected, the correct power mode (24W/48W) is selected, and the safety features (e.g., emergency stop) are not engaged.
- Poor Engraving/Cutting Quality:
- Ensure the laser is correctly focused for the material thickness.
- Adjust power and speed settings in your software (LaserGRBL/LightBurn) according to the material.
- Clean the laser lens.
- Check if the air assist is functioning properly for cutting.
- Machine Not Responding to Software: Ensure the USB cable is securely connected, the correct COM port is selected in the software, and the necessary drivers are installed. Restart both the machine and the software.
- Abnormal Noise: Check for any obstructions in the movement path of the laser module or gantry. Ensure all belts are properly tensioned.
For persistent issues, refer to the comprehensive troubleshooting guide in the full product manual or contact ATOMSTACK customer support.
7. Specifications
| Feature | Specification |
|---|---|
| Product Model | AtomStack S40 Pro |
| Engraving Size | 400*400mm (15.74*15.74") |
| Output Laser Power | 48000mW (48W) |
| Laser Class | 4 |
| Electric Power | 210W |
| Laser Wavelength | 455±5nm |
| Engraving Accuracy | 0.01mm |
| Engraving Speed | 500mm/s (30000mm/min) |
| Cutting Speed | 2200mm/min |
| Laser Spot | 0.08mm*0.1mm |
| Focusing Mode | Fixed focus laser, no focus |
| Operating Methods | Touchscreen, smartphone, computer |
| Operating Software | LaserGRBL, LightBurn |
| Supported OS | Win XP / Win 7 / Win 8 / XP / Win 10 / Win 11 |
| Supported File Formats | NC, BMP, JPG, PNG, DXF |
| Data Transfer Method | USB connection |
| Input Voltage | 100-240V AC, 50/60HZ |
| Output Voltage | 12V 8.5A |
8. Warranty and Support
For warranty information and technical support, please refer to the official ATOMSTACK website or contact their customer service directly. Details can typically be found in the full product manual or on the manufacturer's support page.


