
1. Introduction
Thank you for choosing the COUGAR MX600 RGB Full Tower Gaming Case. This manual provides essential information for the proper installation, operation, and maintenance of your new PC chassis. The MX600 RGB is designed for optimal airflow with omnidirectional ventilation, features pre-installed ARGB fans, supports vertical GPU mounting, and offers efficient cable management solutions.
Please read this manual thoroughly before beginning installation to ensure correct assembly and to maximize the performance and longevity of your system components.
2. Safety Guidelines
- Always disconnect the power supply from the wall outlet before installing or removing any components.
- Handle all components with care to prevent damage from static electricity. Use an anti-static wrist strap if available.
- Avoid placing the case in direct sunlight, near heat sources, or in environments with high humidity.
- Keep small parts and screws away from children.
- Do not attempt to open or modify the power supply unit (PSU) or any other sealed components.
- Ensure all cables are properly routed and secured to prevent interference with fans or other moving parts.
- The tempered glass side panel is fragile. Handle with extreme care to avoid breakage.
3. Package Contents
Verify that all items are present in your package:
- COUGAR MX600 RGB Full Tower Gaming Case
- Accessory Box (containing screws, standoffs, cable ties, etc.)
- Vertical GPU Kit
- User Manual (this document)
4. Case Overview
Familiarize yourself with the key features and components of your COUGAR MX600 RGB case.

Figure 4.1: Angled view of the COUGAR MX600 RGB case, showcasing the mesh front panel, tempered glass side panel, and pre-installed ARGB fans.
4.1 External Components
- Front Panel: Features a high-airflow mesh design with pre-installed ARGB fans for optimal intake.
- Top Panel: Removable for easy access to fan/radiator mounts and includes a magnetic dust filter.
- Side Panels: One tempered glass panel for showcasing internal components, and one solid steel panel for cable management.
- Front I/O Ports: Located on the top front edge, includes USB 3.0, USB 2.0, audio jacks, and power/reset buttons.
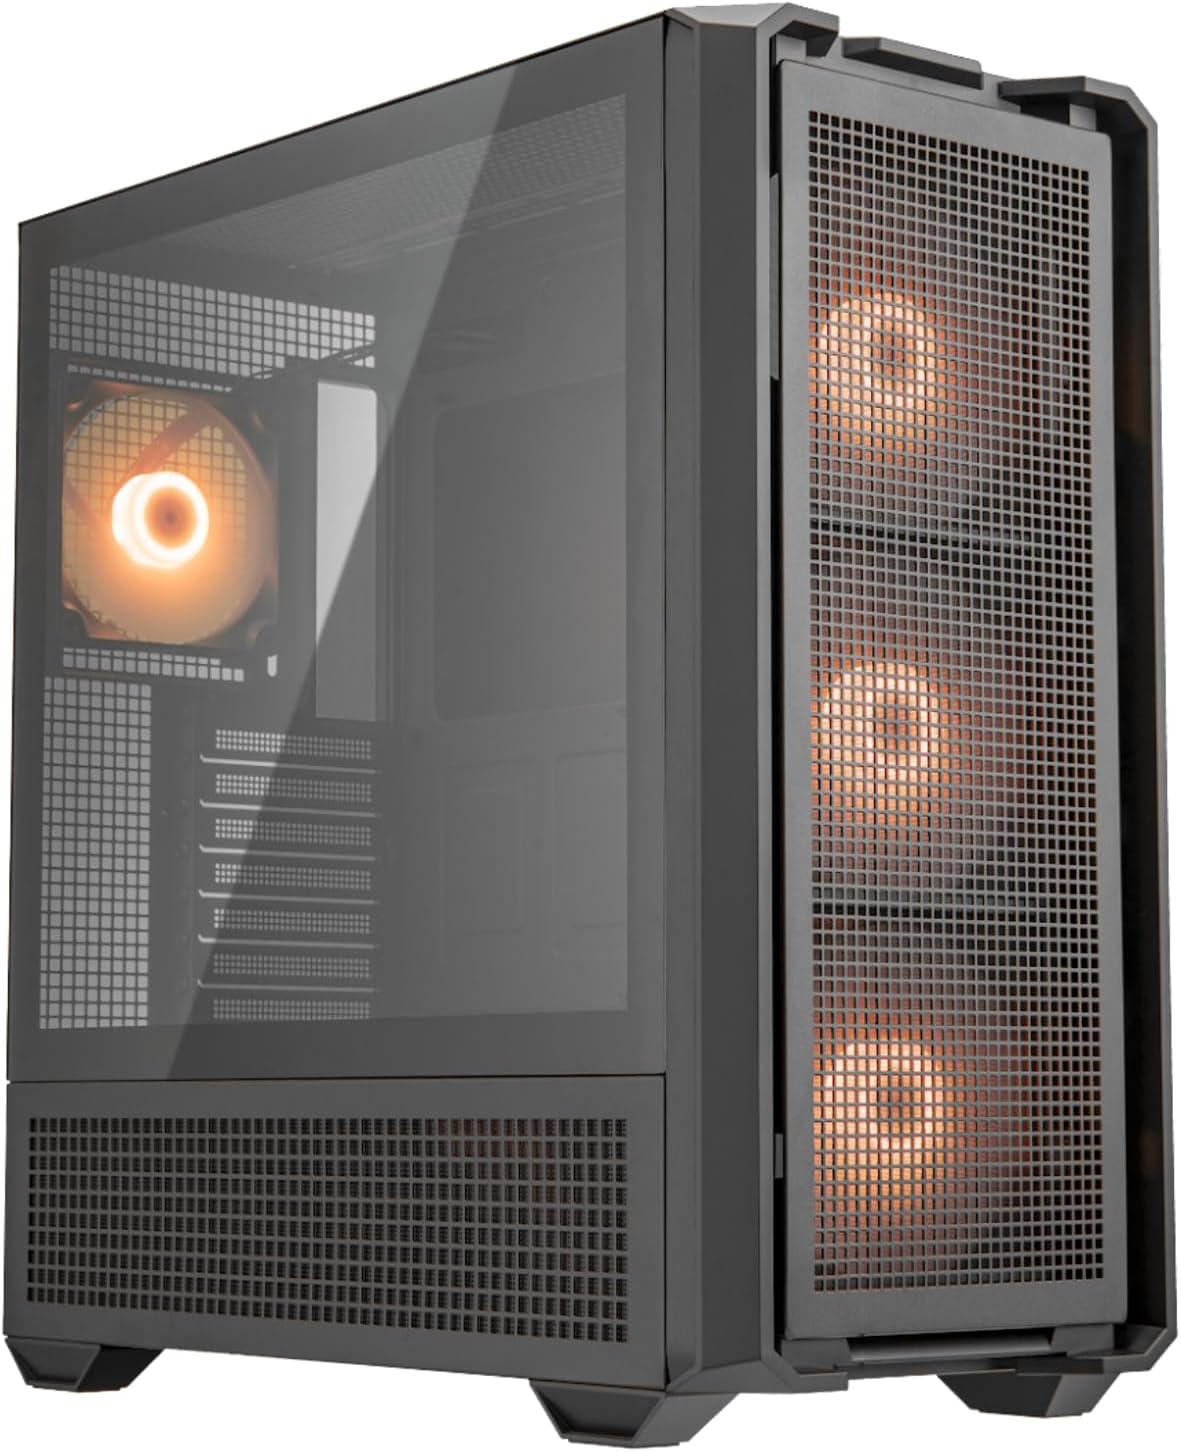
Figure 4.2: Front view of the COUGAR MX600 RGB case, highlighting the full mesh design and three visible ARGB intake fans.
4.2 Internal Layout
- Motherboard Tray: Supports Mini ITX, Micro ATX, ATX, CEB, and E-ATX motherboards.
- PSU Shroud: Conceals the power supply and cables for a cleaner build, with a vented side cover for improved PSU airflow.
- Drive Bays: Dedicated mounts for 2.5" SSDs and 3.5" HDDs.
- Cable Management Channels: Strategically placed cutouts and tie-down points behind the motherboard tray.

Figure 4.3: Interior view of the COUGAR MX600 RGB case, showing the spacious layout, motherboard tray, and PSU shroud.
5. Setup and Installation Guide
Follow these steps for installing your components into the COUGAR MX600 RGB case.
5.1 Preparing the Case
- Place the case on a flat, stable surface.
- Remove the tempered glass side panel by unscrewing the thumb screws at the rear and carefully sliding it off. Set it aside on a soft, non-abrasive surface.
- Remove the steel side panel by unscrewing the thumb screws at the rear and sliding it off. This provides access to the cable management area.
- The front panel can be removed by pulling it firmly from the bottom edge to detach it from the chassis clips. The top panel can be detached by removing screws and sliding it.
5.2 Motherboard Installation
- Install the I/O shield (if applicable) into the rear opening of the case.
- Align the motherboard with the pre-installed standoffs. Ensure the correct standoffs are used for your motherboard form factor (Mini ITX, Micro ATX, ATX, CEB, E-ATX).
- Secure the motherboard with the provided screws.
5.3 Power Supply Unit (PSU) Installation
- Mount the PSU into the dedicated compartment at the bottom rear of the case, typically with the fan facing downwards (if there's a bottom vent) or upwards.
- Secure the PSU with screws from the rear of the case.
5.4 Storage Drive Installation
The MX600 RGB supports multiple 2.5" SSDs and 3.5" HDDs. Refer to the accessory box for specific mounting brackets and screws.
- Locate the 2.5" SSD mounts behind the motherboard tray or on the PSU shroud.
- Locate the 3.5" HDD cage, usually beneath the PSU shroud.
- Secure your drives using the appropriate screws and brackets.

Figure 5.1: Interior view with the steel side panel removed, showing the cable management area and drive mounting points.
5.5 Expansion Card (GPU) Installation
The case supports both horizontal and vertical GPU mounting.
Horizontal Installation:
- Remove the necessary PCIe slot covers from the rear of the case.
- Insert your graphics card into the PCIe slot on the motherboard.
- Secure the graphics card with screws.
Vertical Installation (using included kit):
- Remove the standard horizontal PCIe slot covers.
- Install the vertical GPU bracket provided in the accessory box.
- Connect your graphics card to the PCIe riser cable (not always included, check kit contents) and mount it to the vertical bracket.
- Secure the graphics card and bracket.
5.6 Fan and Radiator Installation
The MX600 RGB comes with pre-installed PWM ARGB fans. Additional fans or radiators can be installed in various locations:
- Front: Supports up to 3 x 120mm/140mm fans or a 360mm/280mm radiator.
- Top: Supports up to 3 x 120mm/140mm fans or a 360mm/280mm radiator.
- Rear: Supports 1 x 120mm fan (one pre-installed).
Ensure fans are oriented correctly for optimal airflow (intake for front, exhaust for rear/top).
5.7 Front I/O Panel Connections
Connect the front panel cables to the corresponding headers on your motherboard:
- USB 3.0: Connect to the motherboard's USB 3.0 header.
- USB 2.0: Connect to the motherboard's USB 2.0 header.
- HD Audio: Connect to the motherboard's audio header.
- Power SW, Reset SW, HDD LED, Power LED: Connect these small connectors to the front panel headers on your motherboard, observing polarity for LEDs.
5.8 Cable Management
Utilize the cable routing cutouts and tie-down points behind the motherboard tray to organize cables. This improves airflow and aesthetics.

Figure 5.2: Rear view of the COUGAR MX600 RGB case, showing the cable management channels and tie-down points.
6. Operating the ARGB Fans
The COUGAR MX600 RGB case includes pre-installed PWM ARGB fans. These fans can be controlled via your motherboard's ARGB software (if your motherboard supports 3-pin 5V ARGB headers) or through a dedicated controller (if included or purchased separately).
- Motherboard Sync: Connect the ARGB cable from the fan hub (if present) or individual fans to a 3-pin 5V ARGB header on your motherboard. Use your motherboard's software (e.g., ASUS Aura Sync, MSI Mystic Light Sync, Gigabyte RGB Fusion, ASRock Polychrome Sync) to customize lighting effects.
- PWM Control: Connect the 4-pin PWM fan cables to your motherboard's fan headers to allow for speed control based on system temperature.
Refer to your motherboard manual for specific ARGB and fan header locations and software instructions.
7. Maintenance
Regular maintenance helps ensure optimal performance and extends the lifespan of your components.
- Dust Filters: The case features magnetic dust filters on the top and bottom (for PSU intake). Regularly remove and clean these filters with compressed air or water (ensure they are completely dry before reinstallation).
- Internal Cleaning: Periodically use compressed air to remove dust buildup from fans, heatsinks, and other internal components. Ensure the system is powered off and unplugged before cleaning.
- Exterior Cleaning: Wipe the exterior surfaces with a soft, damp cloth. Avoid harsh chemicals that may damage the finish.
8. Troubleshooting
If you encounter issues, refer to these common troubleshooting tips:
- System Not Powering On:
- Ensure the PSU is switched on and properly connected to the wall outlet.
- Verify all power cables (24-pin ATX, 8-pin CPU, PCIe) are securely connected to the motherboard and components.
- Check that the front panel power switch cable is correctly connected to the motherboard header.
- Fans Not Spinning / RGB Not Working:
- Ensure fan power cables (PWM) are connected to motherboard fan headers.
- Verify ARGB cables are connected to a 3-pin 5V ARGB header on the motherboard or a compatible controller.
- Check your motherboard's BIOS/UEFI settings and ARGB software for fan speed and lighting control.
- USB Ports Not Functioning:
- Ensure the front panel USB 3.0 and USB 2.0 cables are correctly connected to the corresponding headers on your motherboard.
If issues persist, consult your motherboard manual or contact COUGAR support.
9. Specifications
| Feature | Specification |
|---|---|
| Model Name | MX600 RGB |
| Item Model Number | CGR-57C9B-RGB |
| Case Type | Mid Tower (Full Tower Capacity) |
| Motherboard Compatibility | Mini ITX, Micro ATX, ATX, CEB, E-ATX |
| Dimensions (LxWxH) | 18.82 x 9.25 x 20.28 inches (478 x 235 x 515 mm) |
| Item Weight | 23.4 pounds (10.6 kg) |
| Material | Alloy Steel, Tempered Glass |
| Color | Black |
| Pre-installed Fans | PWM ARGB Fans (Quantity and specific sizes may vary, typically 3x front, 1x rear) |
| Max Fan Support | Up to 9 fans (120mm/140mm) |
| Cooling Method | Air-Water (Supports AIO/Custom Liquid Cooling) |
| Front I/O Ports | 2 x USB 3.0, 1 x USB 2.0, Audio In/Out |
| Power Supply Mounting Type | Rear Mount (Bottom) |
| Vertical GPU Support | Yes (Vertical GPU Kit included) |
10. Warranty Information
COUGAR products are manufactured to the highest quality standards. For detailed warranty terms and conditions, please refer to the warranty card included with your product or visit the official COUGAR website. The warranty typically covers manufacturing defects for a specified period from the date of purchase.
Please retain your proof of purchase for warranty claims.
11. Support
For technical support, product inquiries, or further assistance, please visit the official COUGAR website:
You may also find FAQs and driver downloads on their support pages.
12. Product Videos
No official product videos from the seller were available for embedding based on the provided data.