Important Safeguards
When using electrical appliances, basic safety precautions should always be followed to reduce the risk of fire, electric shock, and injury to persons, including the following:
- Read all instructions before using the deep fryer.
- Do not touch hot surfaces. Use handles or knobs.
- To protect against electrical shock, do not immerse cord, plugs, or heating element in water or other liquid.
- Close supervision is necessary when any appliance is used by or near children.
- Unplug from outlet when not in use and before cleaning. Allow to cool before putting on or taking off parts.
- Do not operate any appliance with a damaged cord or plug or after the appliance malfunctions or has been damaged in any manner.
- The use of accessory attachments not recommended by the appliance manufacturer may cause injuries.
- Do not use outdoors.
- Do not let cord hang over edge of table or counter, or touch hot surfaces.
- Do not place on or near a hot gas or electric burner, or in a heated oven.
- Extreme caution must be used when moving an appliance containing hot oil or other hot liquids.
- Always attach plug to appliance first, then plug cord into the wall outlet. To disconnect, turn any control to "off", then remove plug from wall outlet.
- Do not use appliance for other than intended use.
- Ensure the oil level is between the MIN and MAX marks.
- Never mix different types of oil.
- Do not wet the charging port.
- Remember to remove the friction cardboard between the oil drum and the stainless steel body when using for the first time.
Product Overview
The Pukomc 5L/5.3Qt Electric Deep Fryer is designed for home use, featuring a large capacity and multiple baskets for versatile frying. It includes adjustable temperature control and a timer for precise cooking.

Image: Pukomc 5L/5.3Qt Electric Deep Fryer with three baskets, showcasing its capacity for frying various foods simultaneously.
Components Included:
- Stainless steel deep fryer body
- Removable oil container
- Immersion heating element
- One large deep frying basket
- Two smaller deep frying baskets
- Lid with viewable window
- Charging cable
Setup
- Unpack Components: Carefully remove all parts from the packaging. Ensure all components listed in the Product Overview section are present.
- Remove Packaging Inserts: Locate and remove any friction cardboard or protective materials placed between the oil drum and the stainless steel body.
- Assemble Oil Container: Place the removable oil container securely into the stainless steel deep fryer body.
- Install Heating Element: Position the immersion heating element over the oil container, ensuring it is properly seated and secured. The control panel should face the front.
- Attach Baskets: Attach the handles to the frying baskets. The fryer includes one large basket and two smaller baskets. These can be used interchangeably based on your cooking needs.

Image: Step-by-step visual guide on assembling the frying baskets by attaching their handles.
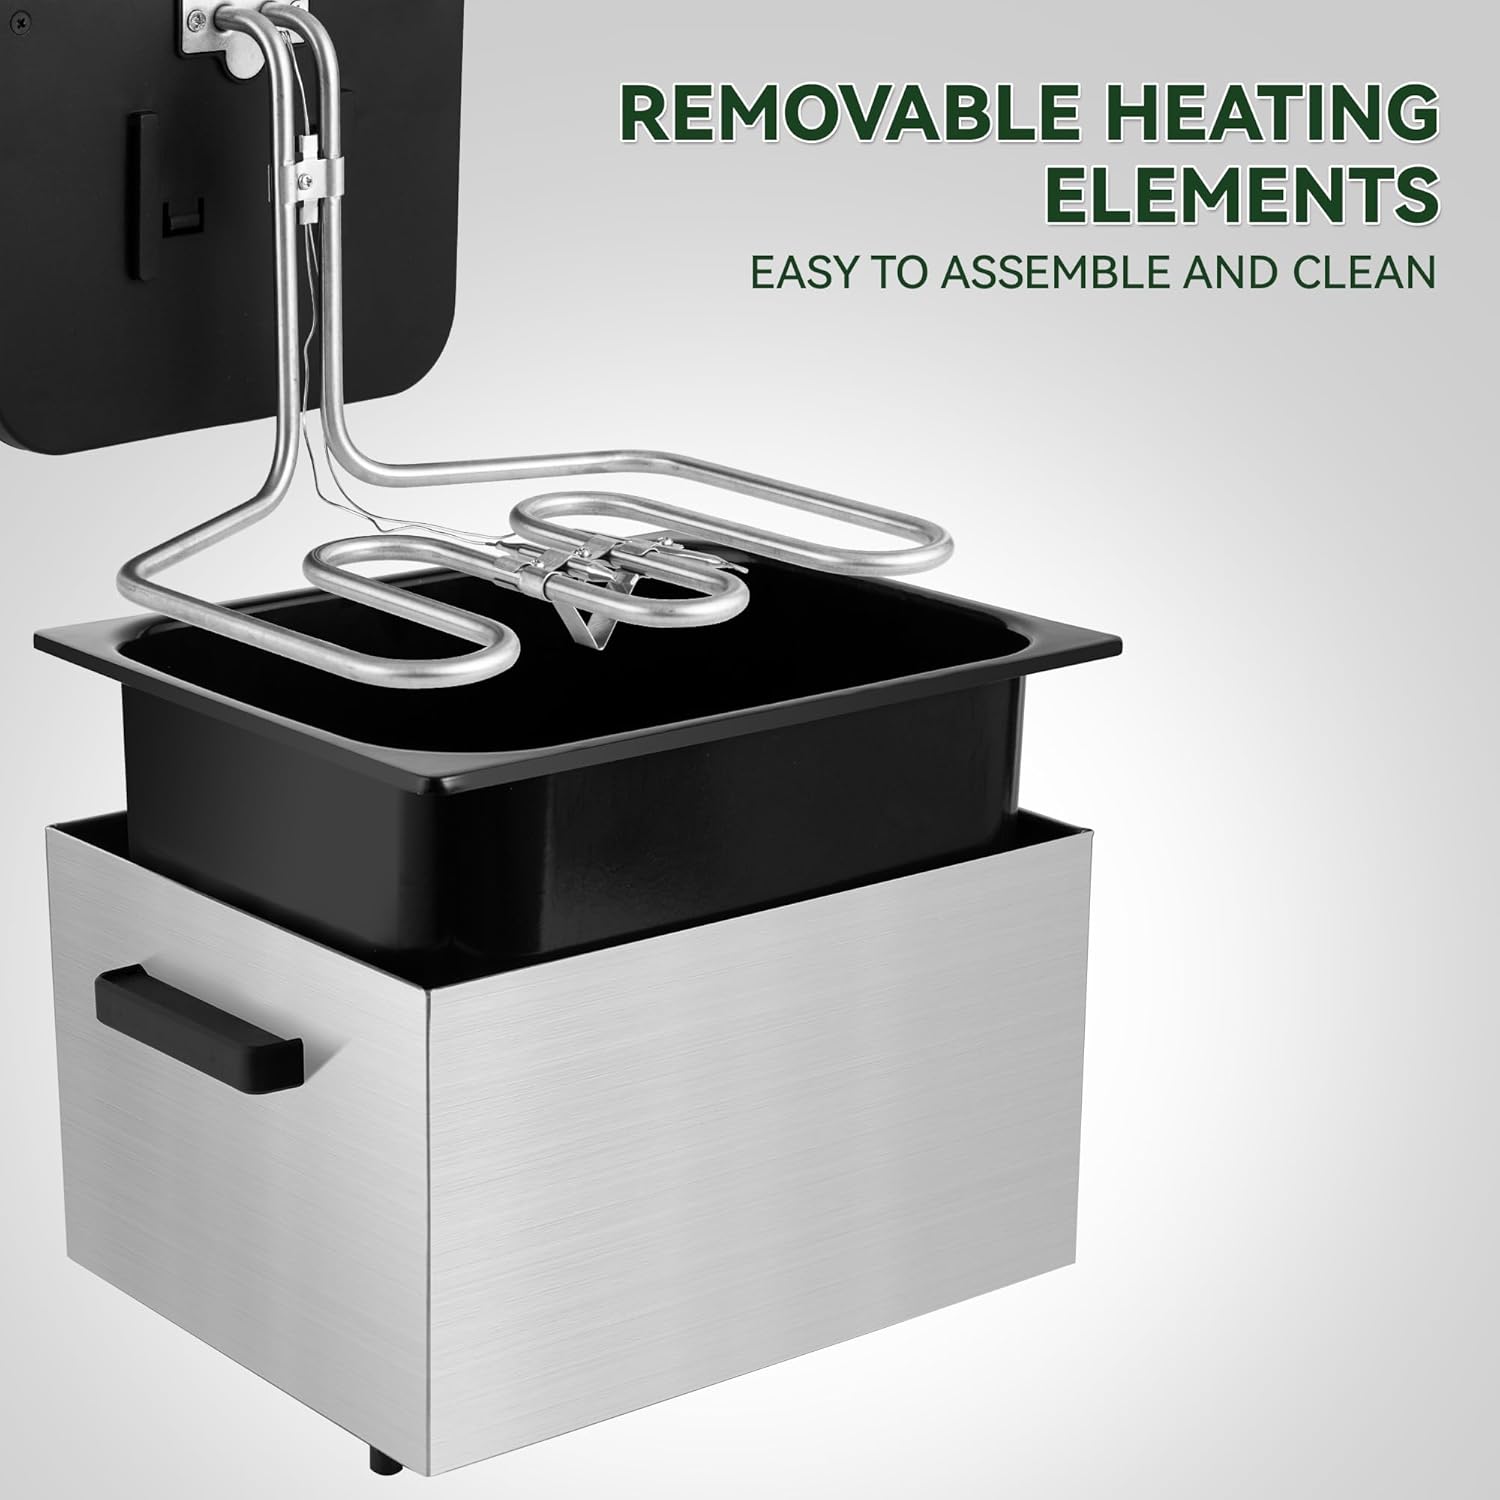
Image: The removable heating element and oil container, illustrating the ease of assembly and disassembly.
Operating Instructions
- Add Oil: Pour cooking oil into the removable oil container. Ensure the oil level is between the MIN and MAX fill lines indicated inside the container. Do not overfill or underfill.
- Connect Power: Plug the charging cable into the fryer's port, then into a standard electrical outlet. The red indicator light (Power) will illuminate.
- Set Temperature: Turn the temperature control knob to your desired frying temperature (range: 285°F-375°F). The green indicator light (Heating) will turn on, indicating the fryer is heating the oil.
- Preheat Oil: Allow the oil to preheat until the green indicator light turns off, signifying that the set temperature has been reached. This may take some time depending on the oil volume and desired temperature.
- Place Food in Basket: Carefully place the food you wish to fry into one or more of the frying baskets. Do not overload the baskets.
- Lower Basket: Slowly lower the basket(s) containing food into the hot oil.
- Set Timer: Use the 30-minute automatic timer knob to set the desired cooking duration. The timer will alert you when cooking is complete.
- Monitor Cooking: The lid with a viewable window allows you to monitor the cooking process without opening the lid, helping to maintain oil temperature and prevent splatters.
- Remove Food: Once cooking is complete, carefully lift the basket(s) from the oil and allow excess oil to drain.
- Serve: Transfer the fried food to a plate lined with paper towels to absorb any remaining oil before serving.
- Turn Off: After use, turn the temperature control knob to the "OFF" position and unplug the fryer from the outlet.

Image: Control panel with temperature dial (285°F-375°F) and 30-minute timer, along with power and heating indicator lights.

Image: Detailed view of the 30-minute timer and 265°F-375°F temperature control dials, with ready and power indicator lights.
Maintenance & Cleaning
Regular cleaning ensures optimal performance and extends the life of your deep fryer. Always ensure the fryer is unplugged and completely cooled before cleaning.
- Drain Oil: Once the oil has cooled completely, carefully drain it from the removable oil container. Dispose of used oil responsibly.
- Disassemble: Remove the heating element and the oil container from the main body. The frying baskets and lid can also be detached.
- Clean Oil Container and Baskets: The removable oil container, frying baskets, and lid can be washed with warm, soapy water. Rinse thoroughly and dry completely. These parts are often dishwasher safe, but hand washing is recommended for longevity.
- Clean Heating Element: Wipe the heating element with a damp cloth. Do not immerse the heating element or its electrical components in water.
- Clean Exterior: Wipe the stainless steel body with a damp cloth and mild detergent. Dry thoroughly.
- Reassemble: Once all parts are clean and dry, reassemble the fryer by placing the oil container back into the body, followed by the heating element.

Image: Visual demonstration of the deep fryer's easy disassembly for cleaning, including washing the removable oil container.
Troubleshooting
| Problem | Possible Cause | Solution |
|---|---|---|
| Fryer does not turn on. | Not plugged in; power outlet malfunction; heating element not properly seated. | Ensure the power cord is securely plugged into both the fryer and a working outlet. Check if the heating element is correctly installed and making proper contact. |
| Oil not heating up. | Temperature knob not set; heating element issue; insufficient oil. | Verify the temperature knob is set to a desired temperature. Ensure the oil level is between MIN and MAX. If the issue persists, contact customer support. |
| Food is not crispy. | Oil temperature too low; too much food in basket; food not dry before frying. | Increase oil temperature. Fry smaller batches of food. Ensure food is patted dry before placing it in the fryer. |
| Excessive smoke. | Oil temperature too high; old or contaminated oil; water in oil. | Reduce oil temperature. Replace old oil with fresh oil. Ensure food is dry before frying to prevent water from reacting with hot oil. |
Specifications
| Feature | Detail |
|---|---|
| Brand | Pukomc |
| Model | 5L/5.3Qt Electric Deep Fryer |
| Material | Stainless Steel |
| Color | Silver-gray |
| Product Dimensions | 14.8"D x 10.75"W x 14.8"H |
| Wattage | 1800 watts |
| Oil Capacity | 5 Liters / 5.3 Quarts |
| Temperature Range | 285°F - 375°F |
| Timer | 30-minute automatic timer |
| Baskets | 1 large, 2 small |

Image: Dimensions of the Pukomc 5L Large Deep Fryer.
Warranty & Support
Pukomc is committed to providing quality products. While specific warranty details are not provided in this manual, please retain your proof of purchase for any warranty claims.
For any questions, concerns, or issues encountered during the use of your Pukomc Electric Deep Fryer, please contact Pukomc customer support. Refer to the product packaging or the official Pukomc website for contact information.
"Please contact us if you have any problems during use."


