1. Introduction
This manual provides detailed instructions for the installation, operation, and maintenance of your SolaMr 120A MPPT Solar Charge Controller. This device is designed to efficiently manage power flow from your solar panels to your battery bank, ensuring optimal charging and system protection. It features an advanced Maximum Power Point Tracking (MPPT) algorithm for high efficiency and supports various battery types.

Figure 1: SolaMr 120A MPPT Solar Charge Controller
2. Safety Instructions
Please read all instructions and warnings carefully before installation and operation. Failure to follow these instructions may result in electric shock, fire, or severe injury.
- Ensure all wiring is correctly connected and securely fastened to prevent loose connections that could cause excessive heat.
- Always disconnect the solar panel and battery power before installing or adjusting the controller.
- Install the controller in a well-ventilated area, away from flammable materials and direct sunlight.
- Do not disassemble or attempt to repair the controller yourself. Contact qualified personnel for service.
- Use appropriate circuit breakers or fuses for all connections to prevent overcurrent damage.
- Wear appropriate personal protective equipment, including eye protection, when working with batteries and electrical systems.
3. Product Overview
3.1. Components and Structure
The SolaMr MPPT Solar Charge Controller features a robust metal casing designed for efficient heat dissipation. Key components include the main control board, power modules, and the LCD display interface.

Figure 2: Product Structure (Exploded View)
3.2. LCD Main Interface Display
The LCD provides real-time monitoring of system status and allows for parameter adjustments. The display includes indicators for solar panel input (PV), battery status (BATT), and load output (LOAD).

Figure 3: LCD Main Interface Display Explanation
- PV: Displays solar panel voltage, current, and generated power.
- BATT: Shows battery voltage, charge current, and state of charge (%).
- LOAD: Indicates load current and power consumption.
- Indicators: Icons for daytime/nighttime, charging, discharging, battery type (USE, FLD, GEL, SLD, LI), system voltage (12V, 24V, 36V, 48V), settings, load time, temperature, and fault warnings.
4. Specifications
| Parameter | Value |
|---|---|
| Model | CM-120A |
| Rated Charge Current | 120A |
| System Voltage | 12V/24V/36V/48V DC Auto |
| Max Solar Panel Input Voltage | 180V (at 25℃), 150V (at -25℃) |
| Max PV Input Power (12V System) | 1440W |
| Max PV Input Power (24V System) | 2880W |
| Max PV Input Power (36V System) | 4320W |
| Max PV Input Power (48V System) | 5760W |
| Temperature Compensation Coefficient | -2mv/℃/2V (default) |
| Working Environment Temperature | -10℃ to +65℃ |
| Conversion Efficiency | Up to 98% |
| MPPT Tracking Efficiency | Not less than 99.9% |
| Display Type | LCD |
| Dimensions (L x W x H) | 313mm x 225mm x 105mm (approximate) |
| Weight | 3.15 kg (approximate) |

Figure 4: Product Dimensions
5. Installation
5.1. Mounting Location
Choose a mounting location that is:
- Well-ventilated to allow for proper heat dissipation.
- Protected from direct sunlight, rain, and moisture.
- Accessible for wiring and maintenance.
- Close to the battery bank but not in the same compartment to avoid corrosive gases.
5.2. Wiring Diagram and Procedure
Follow the wiring diagram carefully. Incorrect wiring can damage the controller and other components.

Figure 5: System Wiring Diagram
- Connect the Battery: Connect the battery to the controller's battery terminals (marked 'BATT' or with battery symbols). Ensure correct polarity (+ to + and - to -). The controller will automatically detect the system voltage (12V/24V/36V/48V).
- Connect the Solar Panel: Connect the solar panel to the controller's PV terminals (marked 'PV' or with solar panel symbols). Ensure correct polarity. Do not exceed the maximum input voltage or power.
- Connect the DC Load: Connect the DC load to the controller's load terminals (marked 'LOAD' or with light bulb symbols). Ensure correct polarity.
- Power On: Once all connections are secure, the controller will power on and begin operation.
Important: Always connect the battery first, then the solar panel, and finally the load. Disconnect in the reverse order: load, then solar panel, then battery.
6. Operation
6.1. Initial Setup and System Voltage
The controller automatically identifies the system voltage (12V/24V/36V/48V DC) upon initial battery connection. Ensure your battery bank voltage matches the system voltage detected.
6.2. Battery Type Selection
The controller supports various battery types. It is crucial to select the correct battery type for optimal charging and to prolong battery life.

Figure 6: Compatible Battery Types
- Use the 'SET' button to navigate through the settings menu on the LCD.
- Locate the battery type setting.
- Select the appropriate type: FLD (Flooded), GEL (Gel), SLD (Sealed), or LI (Lithium).
- Confirm your selection to save the setting.
6.3. Parameter Settings
The controller allows for adjustment of various charging and discharging parameters. Refer to the detailed parameter settings section in the full manual (if available) for specific values and adjustment procedures. Incorrect settings can damage your battery.
6.4. Protection Functions
The controller incorporates multiple electronic protection functions to safeguard your system:
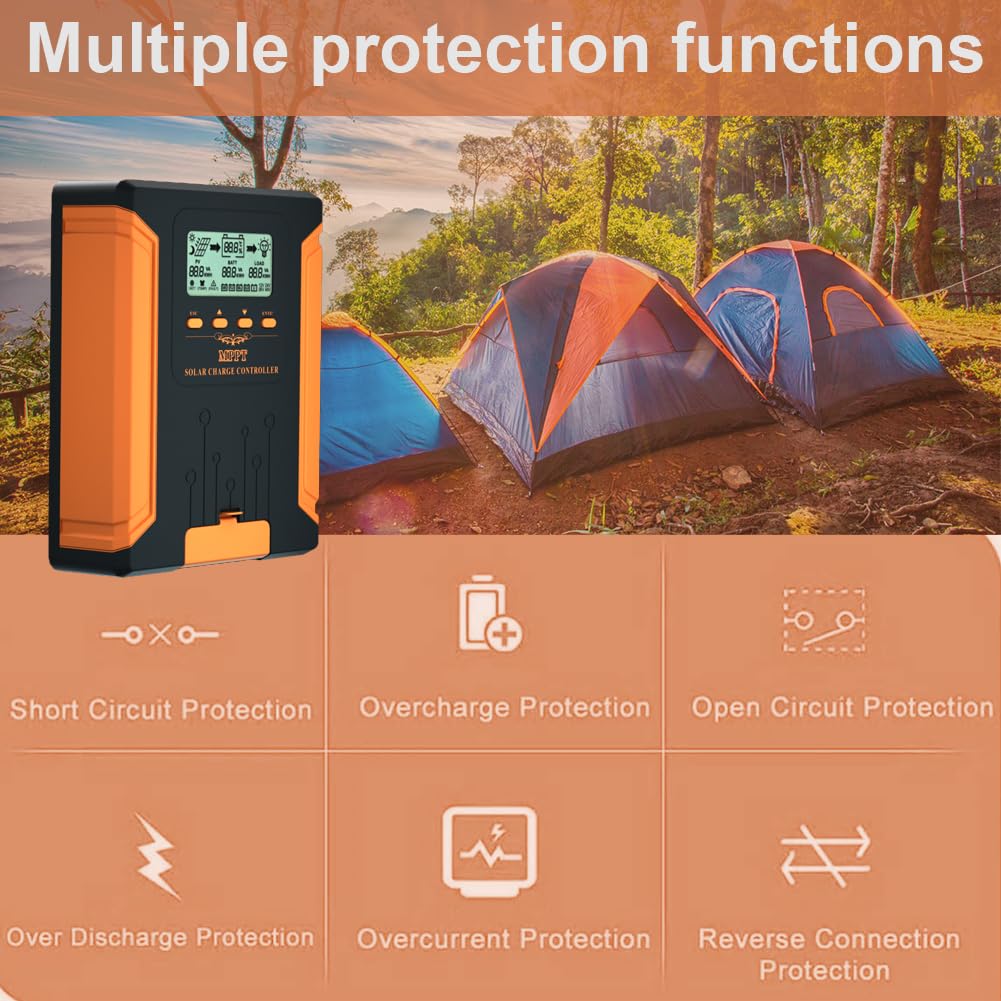
Figure 7: Multiple Protection Functions
- Short Circuit Protection
- Overcharge Protection
- Open Circuit Protection
- Over Discharge Protection
- Overcurrent Protection
- Reverse Connection Protection
- Overheat Protection (integrated mechanism)
7. Maintenance
Regular maintenance ensures the longevity and optimal performance of your solar charge controller.
- Check Connections: Periodically inspect all wiring connections for tightness and corrosion. Tighten any loose connections.
- Clean Controller: Keep the controller clean and free from dust and debris. Use a dry cloth to wipe the casing. Ensure ventilation openings are not obstructed.
- Monitor Performance: Regularly check the LCD display for normal operation and any fault indicators.
- Battery Inspection: Inspect battery terminals for corrosion and ensure battery fluid levels (for flooded batteries) are adequate.
8. Troubleshooting
This section addresses common issues you might encounter with your solar charge controller.
| Problem | Possible Cause | Solution |
|---|---|---|
| Controller not powering on | Battery not connected or low voltage; reverse polarity. | Check battery connections and voltage. Ensure correct polarity. |
| No charging from solar panel | Solar panel not connected; low sunlight; PV voltage too low/high; reverse polarity. | Check PV connections and polarity. Verify sunlight conditions. Ensure PV voltage is within specifications. |
| Load not working | Load not connected; overcurrent; short circuit; battery low voltage disconnect. | Check load connections. Reduce load. Check for short circuits. Allow battery to charge. |
| Overheat warning | Poor ventilation; excessive ambient temperature; heavy load. | Improve ventilation around the controller. Reduce load if possible. |
| Inaccurate battery voltage reading | Loose battery connection; incorrect battery type setting. | Check battery connections. Verify correct battery type is selected in settings. |
9. Warranty and Support
SolaMr products come with a warranty. For technical support, troubleshooting assistance, or any questions regarding your product, please do not hesitate to contact our customer service team. Our technical staff is available to provide guidance and solutions to any issues you may encounter.
Please refer to your purchase documentation or the SolaMr official website for specific warranty terms and contact information.
10. Application Scenarios
The SolaMr MPPT Solar Charge Controller is suitable for a wide range of off-grid solar applications, including:
- Residential solar power systems
- RV and marine applications
- Solar street lighting
- Remote monitoring stations
- Backup power systems

Figure 8: Typical Application Scenarios


