Safety Information
Please read all safety instructions carefully before using the Secura GS-810N Conical Burr Coffee Grinder to prevent injury or damage.
- Always read all instructions before operating the appliance.
- Do not immerse the main unit of the appliance in water or any other liquid.
- Keep the appliance out of reach of children and pets.
- Unplug the grinder from the power outlet when not in use, before cleaning, or before assembling/disassembling parts.
- Use only whole coffee beans in the bean hopper. Do not grind other substances like nuts, spices, or instant coffee.
- Ensure the bean hopper lid and grounds container are properly secured before operating.
- Do not operate the grinder with a damaged cord or plug, or if the appliance malfunctions or has been damaged in any manner.
Product Overview
The Secura GS-810N Conical Burr Coffee Grinder is engineered to deliver a consistent and uniform grind, preserving the delicate flavors and aromas of your coffee beans. Its durable stainless steel conical burrs and anti-static design ensure a superior grinding experience with minimal mess.
Components
- Bean Hopper: Transparent container at the top for holding whole coffee beans.
- Grind Setting Dial: Adjustable dial on the side to select desired grind fineness.
- Quantity Selection Dial: Adjustable dial on the front to select the number of cups to grind.
- Start/Stop Button: Located in the center of the quantity dial to initiate and halt grinding.
- Grounds Container: Removable container at the bottom for collecting ground coffee.
- Cleaning Brush: Included for easy maintenance of the burrs.

This image displays the Secura Conical Burr Coffee Grinder from the front, highlighting its sleek black and stainless steel design. The clear bean hopper is visible at the top, the grind setting dial is on the side, and the grounds container is at the bottom.
Setup
Follow these steps to set up your coffee grinder for first-time use:
- Unpack all components and remove any packaging materials, including protective films.
- Wash the bean hopper lid, bean hopper, and grounds container with warm, soapy water. Rinse thoroughly and ensure all parts are completely dry before reassembly.
- Ensure the grinding burrs are clean and free of any debris.
- Place the grounds container securely into its designated position at the base of the grinder.
- Attach the bean hopper to the top of the grinder, ensuring it is properly seated and locked into place (if applicable).
- Plug the grinder into a suitable 230V (AC) power outlet.
Operating Instructions
1. Add Coffee Beans
Open the bean hopper lid and pour your desired amount of whole coffee beans into the hopper. Do not fill past the 'MAX' line. Replace the lid securely.
2. Select Grind Setting
Rotate the grind setting dial, located on the side of the bean hopper, to choose your desired fineness. The grinder offers 25 precise settings, ranging from extra fine for espresso to coarse for French press. Refer to the diagram below for common brewing methods.

This diagram illustrates the 25 available grind settings, with examples for various brewing methods: French Press (Coarse), Drip Coffee Maker (Medium), Moka Pot (Medium Fine), and Espresso (Extra Fine). The image shows the grinder's top dial with numbers indicating grind fineness.
3. Select Quantity
Rotate the quantity selection dial on the front of the grinder to choose the number of cups (from 2 to 12) you wish to grind. This automatically determines the grinding duration.
4. Start Grinding
Press the illuminated Start/Stop button located in the center of the quantity dial. The grinder will begin operation and automatically stop once the selected quantity of coffee is ground.
5. Collect Ground Coffee
Once grinding is complete, carefully remove the grounds container from the base. The upgraded anti-static technology helps prevent coffee powder from sticking to the container, ensuring a cleaner experience.
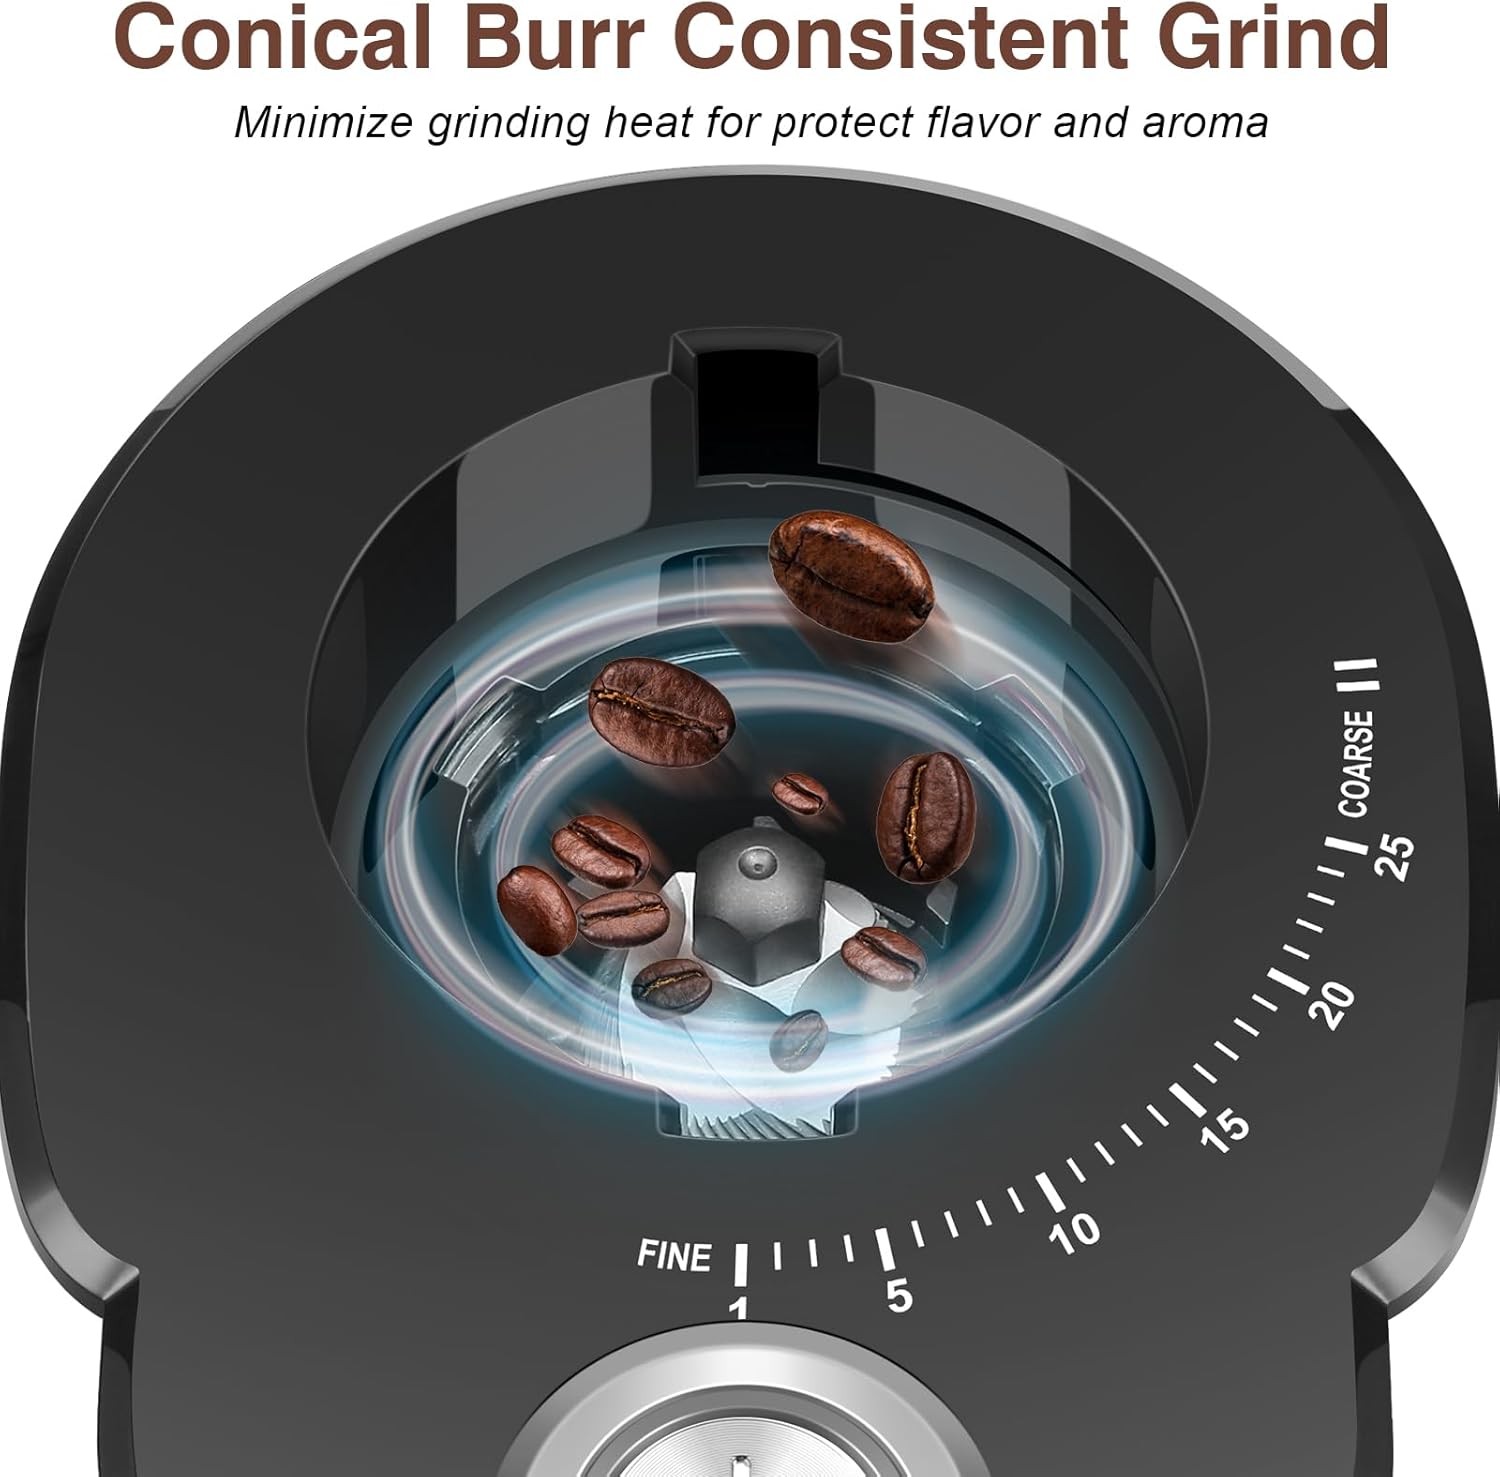
A close-up image showing the internal conical burr mechanism of the grinder, emphasizing its design for consistent grinding and flavor preservation by minimizing heat.
Cleaning & Maintenance
Regular cleaning is essential to maintain the performance and longevity of your Secura coffee grinder.
- Always unplug the grinder from the power outlet before cleaning.
- Remove the bean hopper and grounds container. Empty any remaining whole beans or ground coffee.
- Detach the upper burr by twisting it counter-clockwise and carefully lifting it out.
- Use the included 2-in-1 brush to thoroughly clean both the upper and lower burrs, removing any trapped coffee particles or oils.
- Wash the bean hopper, bean hopper lid, and grounds container with warm, soapy water. Rinse them thoroughly and allow them to air dry completely before reassembling.
- Wipe the exterior of the grinder's main unit with a damp cloth. Do not immerse the main unit in water.
- Reassemble all parts once they are completely dry, ensuring the upper burr is locked into place and the bean hopper is securely attached.

This image shows a step-by-step visual guide on how to clean the grinder. It demonstrates removing the bean hopper, detaching the upper burr, and using the cleaning brush to clean the burrs and the internal grinding chamber.
Troubleshooting
| Problem | Possible Cause | Solution |
|---|---|---|
| Grinder does not start. | Not plugged in; Bean hopper or grounds container not properly seated; Power button not pressed. | Ensure power cord is securely plugged in. Check that the bean hopper and grounds container are correctly installed and locked. Press the Start/Stop button firmly. |
| Inconsistent grind. | Burrs are dirty or clogged; Incorrect grind setting for bean type. | Clean the burrs thoroughly using the provided brush. Adjust the grind setting to a finer or coarser option as needed for your brewing method. |
| Excessive static/messy grounds. | Natural static electricity; Very fine grind setting. | The grinder features anti-static technology, but some static may occur. Tap the grounds container gently before opening. Ensure the container is completely dry after washing. |
| Grinder stops during operation. | Overheating; Jammed burrs; Bean hopper empty. | Unplug the unit and allow it to cool down for 30 minutes. Clean the burrs to remove any obstructions. Ensure there are enough beans in the hopper. |
Additional Tips
- Always use fresh, high-quality whole coffee beans for the best flavor and grinding results.
- Store coffee beans in an airtight container in a cool, dark place to maintain freshness.
- Avoid grinding oily or heavily flavored beans, as they can leave residue and clog the burrs over time.
Specifications
- Model: GS-810N
- Brand: Secura
- Color: Black
- Material: Stainless Steel
- Product Dimensions: 11.3"L x 7.5"W x 7"H
- Item Weight: 4.2 pounds
- Voltage: 230 Volts (AC)
- Grind Settings: 25 Precise Settings
- Capacity: 4.2 Ounce Bean Hopper (provides ground coffee for 2-12 cups)
- GTIN: 00810092454830

An image illustrating the compact dimensions of the Secura coffee grinder, with height (10.5 inches), width (4.6 inches), and depth (6.7 inches) labeled, demonstrating its suitability for various kitchen spaces.
Warranty & Support
For detailed warranty information, product registration, or technical support, please refer to the documentation included with your original purchase. You may also visit the official Secura website or contact their customer service department for assistance.
For additional product information and to explore other Secura products, please visit the official Secura Store on Amazon:


