1. Product Overview
The Jansite 1080P Wireless Backup Camera System provides a clear and stable view for safer reversing and driving. Featuring a 5-inch AHD monitor and a 1080P wireless camera, this system is designed for easy installation and reliable performance across various vehicle types, including cars, vans, trucks, SUVs, pickups, and minivans.
Key features include stable point-to-point wireless signal transmission, super night vision with 6 LED lights, IP68 waterproof rating for the camera, and customizable DIY guide lines.

Image 1.1: The Jansite 5-inch wireless monitor and license plate mount camera, showcasing the system's primary components.
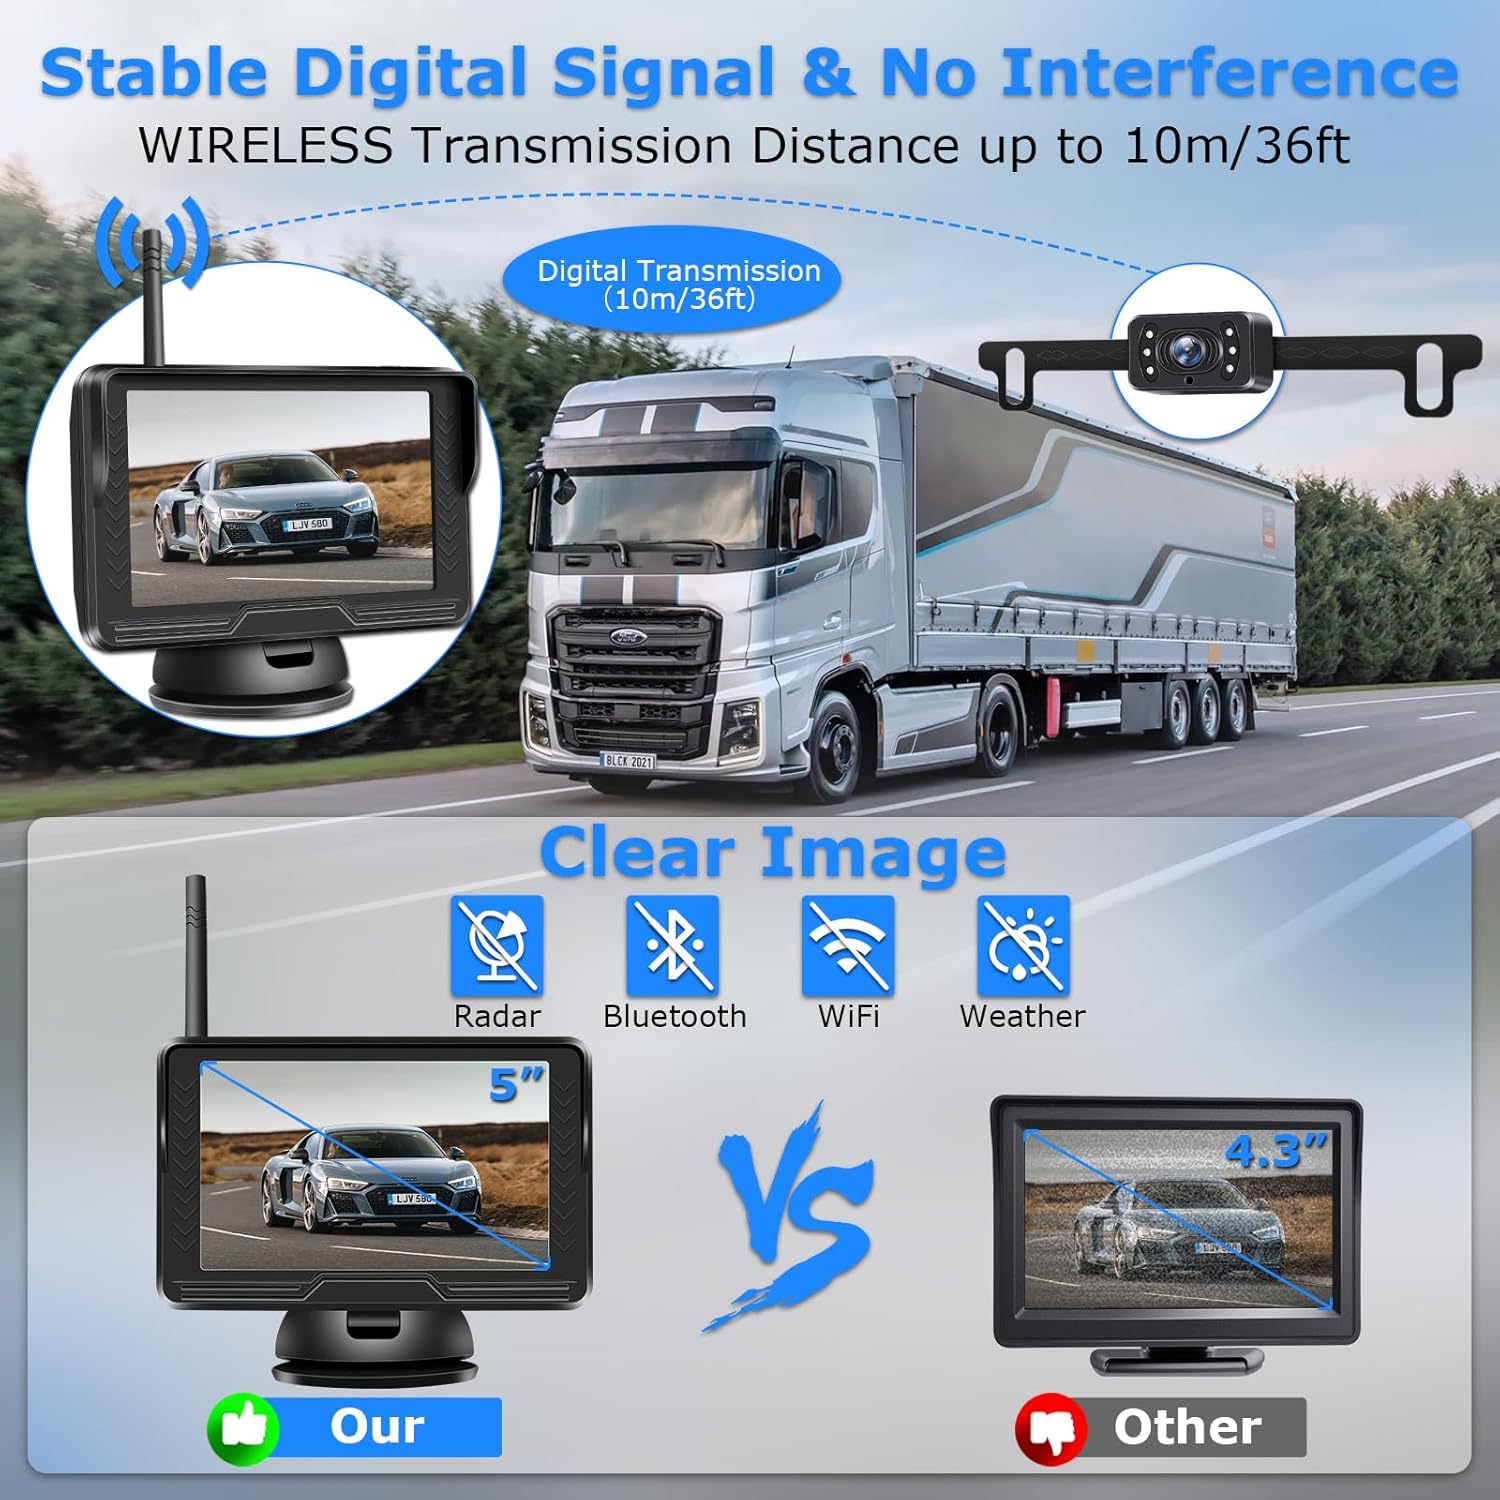
Image 1.2: Illustration demonstrating the stable digital signal transmission up to 10 meters (36 feet) and immunity to interference from radar, Bluetooth, Wi-Fi, and weather conditions.
2. Packing List
Please verify that all components are present in the package before proceeding with installation.

Image 2.1: Visual representation of all items included in the product package.
- Monitor (5-inch AHD Display)
- Rear Camera (with license plate bracket)
- Antenna
- Power source for display (cigarette lighter adapter)
- Power source for camera
- Suction cup mount
- Accessories (for fixing suction cup)
- User Manual
3. Setup and Installation
The Jansite wireless backup camera system is designed for quick and easy installation with minimal wiring.
3.1 Monitor Installation
The 5-inch monitor can be mounted in two primary ways:
- On Dashboard: Use the provided suction cup mount to securely fix the monitor to your vehicle's dashboard.
- On Windshield: Alternatively, attach the suction cup mount to the windshield for optimal viewing angle.
Connect the monitor to the vehicle's cigarette lighter socket using the provided power cable.

Image 3.1: Options for mounting the monitor on the dashboard or windshield.
3.2 Camera Installation
The camera is designed to be mounted on the license plate bracket, requiring no drilling into your vehicle's body.
- Secure the camera to your vehicle's license plate using the integrated bracket.
- Connect the camera's power cable. The camera can be powered in two ways:
- To Reversing Light: Connect the camera's power wire (red) to the positive wire of your vehicle's reversing light. Connect the black wire to a ground point. This setup ensures the camera activates automatically when the vehicle is put into reverse.
- To ACC (Constant Power): Connect the camera's power wire to an ACC power source if you wish for the camera to operate continuously while the vehicle is on.

Image 3.2: Simplified diagram showing power connections for the monitor (cigarette lighter) and camera (reversing light).

Image 3.3: A visual guide to the three main installation steps: installing the monitor, installing the camera, and turning on the monitor.
4. Operating Instructions
4.1 Powering On
Once the monitor and camera are correctly powered, the system will automatically connect wirelessly. The monitor will display the camera feed.
4.2 DIY Guide Lines
The system allows for customization of the reversing guide lines to suit your vehicle and preference:
- Enable/Disable: You can toggle the guide lines on or off.
- Adjust Width: Modify the width of the guide lines.
- Adjust Position: Move the guide lines left/right or up/down to align with your vehicle's dimensions and parking needs.
- Distance Indication: The guide lines may include color-coded segments (e.g., green, yellow, red) to indicate approximate distances.

Image 4.1: Examples of adjustable guide lines, including on/off, width, and horizontal/vertical positioning.
4.3 Image Flip Function
The monitor supports various image flip modes, allowing you to use the camera as a front camera or adjust the view as needed:
- Original: Standard view.
- Mirror: Horizontal flip, typically used for rear view.
- Original Down: Vertical flip of the original view.
- Mirror Down: Vertical flip of the mirror view.
These settings can be accessed through the monitor's menu.
Image 4.2: Demonstrates the four types of image flip: Original, Mirror, Original Down, and Mirror Down.
4.4 Image Adjustment
You can manually adjust the brightness, contrast, saturation, and hue of the image on the monitor to optimize visibility in different lighting conditions.
5. Maintenance
To ensure the longevity and optimal performance of your Jansite backup camera system, follow these maintenance guidelines:
- Camera Cleaning: Regularly clean the camera lens with a soft, damp cloth to remove dirt, dust, or water spots that may obstruct the view. Avoid abrasive cleaners.
- Monitor Care: Wipe the monitor screen with a soft, dry cloth. Do not use liquid cleaners directly on the screen.
- Cable Inspection: Periodically check all cable connections for any signs of wear, damage, or loose connections.
- Waterproof Camera: The camera has an IP68 waterproof rating, designed to withstand rain and snow. However, avoid high-pressure washing directly on the camera.

Image 5.1: The rear camera submerged in water, illustrating its IP68 waterproof capability and resistance to extreme temperatures.
6. Troubleshooting
If you encounter issues with your Jansite backup camera system, refer to the following common problems and solutions:
- No Signal/Black Screen:
- Ensure both the monitor and camera are receiving power. Check power connections and fuses.
- Verify the camera is properly connected to its power source (e.g., reverse light).
- Confirm the wireless antenna on the monitor is securely attached.
- While the system uses stable point-to-point transmission, extreme distances or very thick metal obstructions between the camera and monitor can affect signal. Try repositioning if possible.
- Poor Image Quality/Flickering:
- Clean the camera lens.
- Adjust the brightness, contrast, and other image settings on the monitor.
- Ensure the camera is securely mounted and not vibrating.
- Verify the power supply to both units is stable.
- Guide Lines Not Appearing/Incorrect:
- Access the monitor's menu to ensure the guide line feature is enabled.
- Adjust the guide line position and width as described in Section 4.2.
- Camera Not Activating in Reverse:
- If wired to the reverse light, ensure the connection is secure and the reverse light is functioning correctly.
- If wired to ACC, ensure the vehicle's ignition is on.
7. Specifications
| Feature | Specification |
|---|---|
| Product Dimensions | 10.5 x 6.3 x 2 inches |
| Item Weight | 1.21 pounds |
| Display Technology | LCD |
| Screen Size | 5 Inches |
| Color | Black |
| Voltage | 12 Volts |
| Optical Sensor Technology | CMOS |
| Lens Type | Wide Angle |
| Real Angle of View | 140 Degrees |
| Waterproof Rating | IP68 (Camera) |
| Wireless Transmission | Point-to-point digital signal |
8. Warranty and Support
Jansite provides a 1-year quality promise for this wireless backup camera system, along with lifetime service.
For any questions, technical assistance, or warranty claims, please refer to the email address provided in your physical instruction manual. Our customer support team aims to reply within 24 hours on working days.


