1. Introduction
This manual provides essential information for the safe and efficient operation of your Dr.Water Countertop Reverse Osmosis System. This system is designed to provide purified water through a 5-stage filtration process, including reverse osmosis, and offers instant heating capabilities. Please read this manual thoroughly before using the product and retain it for future reference.
2. Important Safety Information
Observe the following safety precautions to prevent injury or damage to the product:
- Ensure the power supply matches the specifications indicated on the product label.
- Do not immerse the appliance, cord, or plug in water or other liquids.
- Keep the appliance away from heat sources and direct sunlight.
- Do not operate the appliance with a damaged cord or plug.
- Always unplug the system before cleaning or performing maintenance.
- This appliance is for indoor use only.
- When the water tank is low, lift the water tank, pour out any wastewater, and refill the entire water tank to the MAX WATER LEVEL LINE with tap water.
3. Product Overview
The Dr.Water Countertop Reverse Osmosis System is a compact unit designed for ease of use and portability. It integrates a 5-stage filtration system with instant heating functionality.

Image: Front view of the Dr.Water Countertop Reverse Osmosis System, showing the water dispensing spout, digital display, and control buttons. A glass of water with lime is being filled on the drip tray.

Image: The Dr.Water system with key dimensions (8.07in width, 11.61in depth, 15.16in height) and features like '3S Quick-Heating' and 'Room Temp' indicated. Icons for Dupont RO Membrane, 0.0001 Micron RO Filtration, BPA-Free Food Grade Material, and TDS real-time reminder are shown below the unit.
Key Features:
- 5-Stage Reverse Osmosis Filtration: Removes 99.99% of contaminants including chlorine, TDS, radon, arsenic, radium, and nuclear radiation.
- 3-Second Instant Heating: Provides hot water quickly for various beverages.
- Multiple Temperature Settings: Room temperature, 113°F (Milk), 185°F (Tea), and 203°F (Coffee).
- Adjustable Water Volume: 6 oz, 8 oz, 10 oz, 12 oz, 14 oz, and continuous dispensing.
- Digital Display: Shows TDS levels and filter lifespan for real-time monitoring.
- 5L Water Tank: Large capacity for daily use.
- 4:1 Pure to Drain Ratio: Efficient water usage, with wastewater suitable for other household purposes.
- No Installation Required: Portable countertop design.
4. Setup
The Dr.Water system requires no plumbing installation. Simply place it on a stable, flat surface and connect it to a power source.
Initial Setup Steps:
- Unpack the System: Carefully remove all packaging materials and place the unit on a clean, dry, and level countertop.
- Remove Water Tank: Lift the raw water tank from the back of the unit.
- Fill Water Tank: Fill the raw water tank with tap water up to the 'MAX WATER LEVEL' line. Ensure the tank is completely filled to allow proper filtration.
- Replace Water Tank: Carefully place the filled water tank back onto the unit, ensuring it is seated correctly.
- Connect Power: Plug the power cord into a grounded electrical outlet.
- Initial Flush: For first-time use or after filter replacement, perform an initial flush cycle. Dispense and discard at least two full tanks of water to ensure the filters are properly primed and any manufacturing residues are removed. This also helps improve water taste.

Image: The Dr.Water system is depicted in different environments, illustrating its portability and 'No Installation' feature. It is shown on a kitchen counter, an office desk, inside an RV, and on a bedside table.

Image: A woman is shown refilling the 5L raw water tank of the Dr.Water system. A separate inset image displays a close-up of the filter compartment, emphasizing the ease of access for refilling and filter changes. Text indicates 'Add Water Once, Use It For A Day'.
5. Operating Instructions
The Dr.Water system features an intuitive touch panel for selecting water temperature and volume.
Using the Control Panel:
- Power On: Press the power button to turn on the system. The digital display will illuminate.
- Select Temperature: Tap the 'TEMP' button to cycle through the available temperature options: Room Temperature, 113°F (Milk), 185°F (Tea), and 203°F (Coffee). The selected temperature will be displayed.
- Select Water Volume: Tap the 'VOL' button to choose your desired water volume: 6 oz, 8 oz, 10 oz, 12 oz, 14 oz, or continuous dispensing.
- Dispense Water: Place a cup or container under the dispenser spout. Press the dispense button to start the water flow. Press again to stop if continuous dispensing is selected.
- TDS Display: The digital display continuously shows the Total Dissolved Solids (TDS) level of the purified water, allowing real-time monitoring of water quality.
- Filter Lifespan Indicator: The display also indicates the remaining lifespan of the filter, prompting you when a replacement is needed.

Image: The Dr.Water system is shown on a coffee table, surrounded by different drinks such as water, lemonade, coffee, milk, and tea, illustrating the '4 Water Temp Options' and '6 Cup Volume Options' available for various uses.

Image: The Dr.Water system is shown dispensing hot water directly into a cup of instant noodles, highlighting its '3S Instant Heat' feature. Below, a pitcher of purified water is visible inside a refrigerator, suggesting the system can replace a refrigerator filter for cold water.
6. Maintenance
Regular maintenance ensures optimal performance and longevity of your Dr.Water system.
Filter Replacement:
The system's digital display will indicate when the filter needs replacement. Refer to the specific filter replacement instructions provided with your replacement filter cartridge. Always use genuine WaterFirst replacement filters.
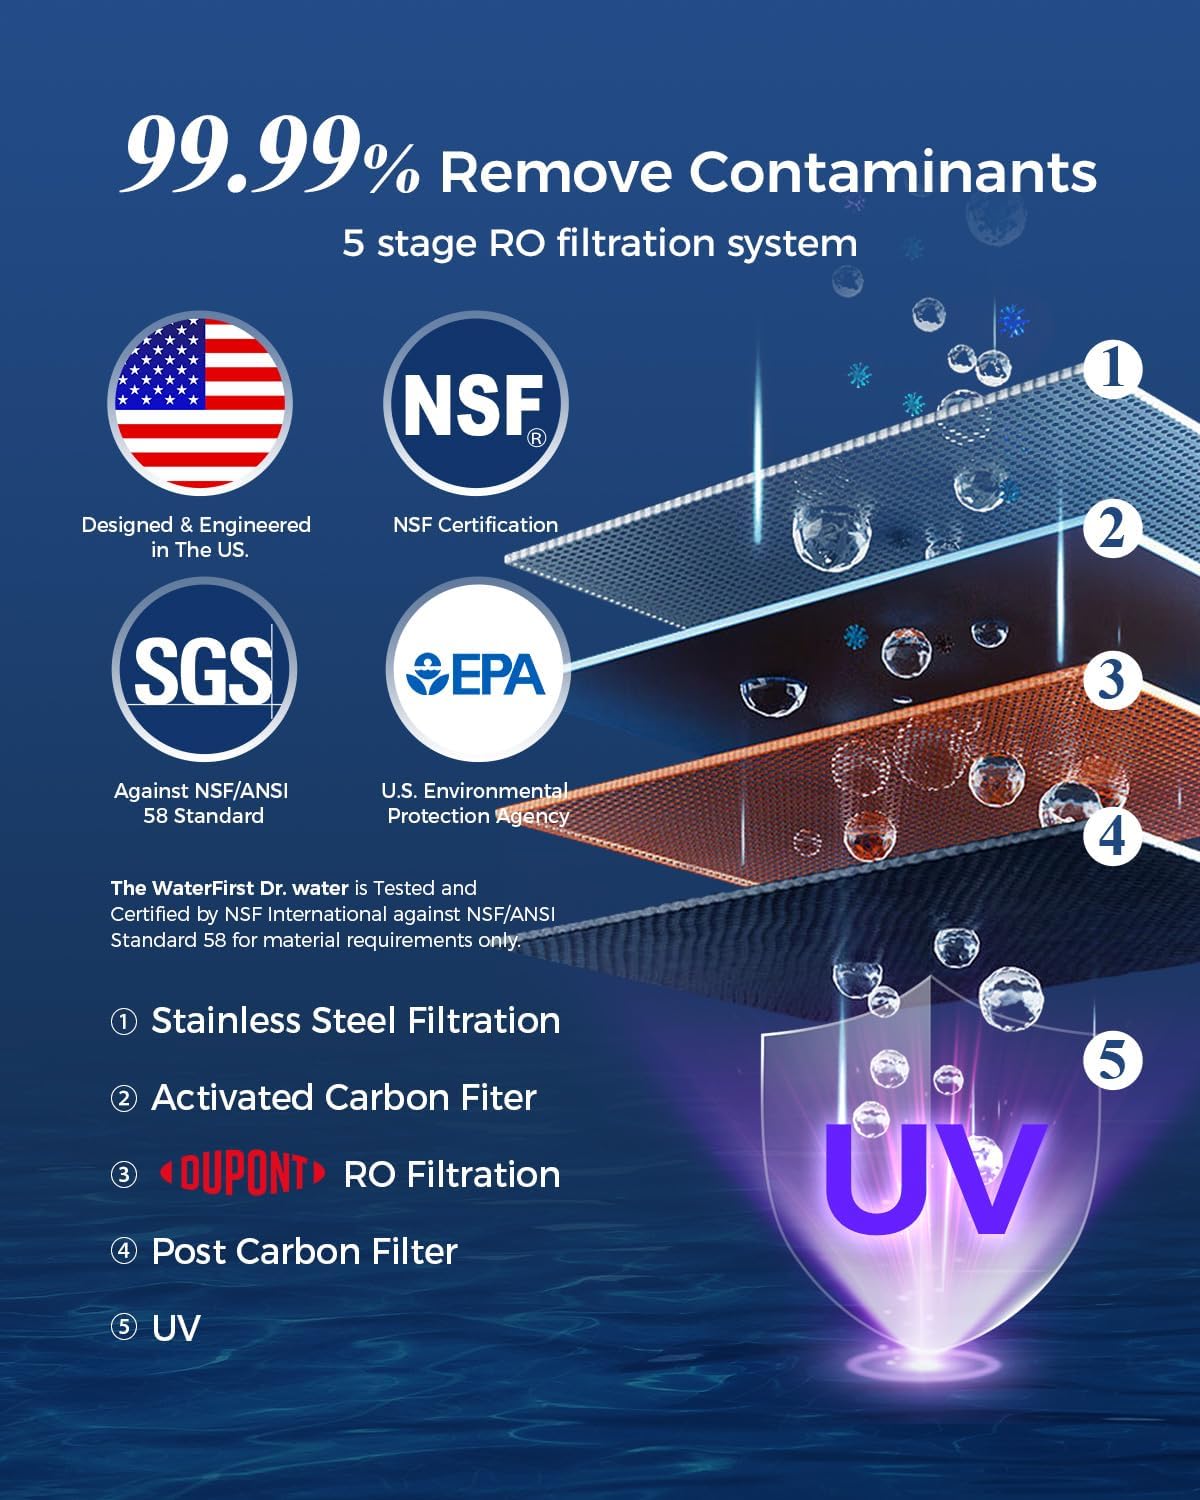
Image: A detailed diagram showing the five stages of the RO filtration system: Stainless Steel Filtration, Activated Carbon Filter, DUPONT RO Filtration, Post Carbon Filter, and UV sterilization. Certifications from NSF, SGS, and EPA are also displayed, indicating the system's compliance with water quality standards.
Cleaning the System:
- Exterior Cleaning: Wipe the exterior of the unit with a soft, damp cloth. Do not use abrasive cleaners or solvents.
- Drip Tray: Regularly empty and clean the drip tray to prevent water overflow and bacterial growth.
- Water Tank: Periodically clean the raw water tank with mild soap and water, then rinse thoroughly.
Wastewater Management:
The Dr.Water system operates with an efficient 4:1 pure to drain ratio. The wastewater generated can be safely reused for non-potable purposes, such as watering plants or mopping floors, contributing to water conservation.

Image: A visual representation of the 'Pure to Drain 4:1' ratio, showing four parts of purified water for every one part of wastewater. On the right, the compact design of the unit is shown with its dimensions and a power cord, emphasizing its 'Power on and Ready to Use' feature.
7. Troubleshooting
Refer to this section for solutions to common issues.
| Problem | Possible Cause | Solution |
|---|---|---|
| No power/Unit not turning on | Power cord not properly connected; Power outlet malfunction | Ensure power cord is securely plugged in. Test outlet with another appliance. |
| No water dispensing | Water tank empty; Tank not properly seated; Filter clogged | Refill water tank. Re-seat water tank correctly. Check filter lifespan indicator and replace if necessary. |
| Water tastes unusual | New filter not flushed; Filter needs replacement | Perform initial flush cycle (dispense and discard two full tanks). Replace filter if indicated by the display. |
| High TDS reading | Filter nearing end of life or expired | Check filter lifespan indicator and replace the filter cartridge. |
| Water leakage | Water tank not properly seated; Loose connections | Ensure water tank is correctly positioned. Check for any visible loose connections or cracks. Contact customer support if issue persists. |
8. Specifications
| Feature | Detail |
|---|---|
| Brand | WaterFirst |
| Model Name | Dr.water-01 reverse osmosis system countertop |
| Product Dimensions | 9.25"L x 16.93"W x 16.7"H |
| Installation Type | Countertop |
| Power Source | Corded Electric |
| Item Weight | 20 Pounds |
| Lower Temperature Rating | 41 Degrees Fahrenheit |
| Upper Temperature Rating | 203 Degrees Fahrenheit |
| Maximum Flow Rate | 750 Milliliters Per Minute |
| Supported Water TDS Level Maximum | 1000 PPM |
| Filtration Stages | 5 Stages (including RO and UV) |
| Water Tank Capacity | 5 Liters (1.35 Gallons) |
| Pure to Drain Ratio | 4:1 |
| Certifications | NSF/ANSI 58 Certified, SGS, EPA |
9. Warranty and Customer Support
The Dr.Water Countertop Reverse Osmosis System comes with a 12-month warranty from the date of purchase.
For technical assistance, warranty claims, or general inquiries, please contact WaterFirst Customer Service:
Email: service@thewaterfirst.com
Please have your model number and purchase date available when contacting support.