1. Introduction
This manual provides comprehensive instructions for the Keychron M6 Wireless Optical Mouse. It covers setup, operation, maintenance, and troubleshooting to ensure optimal performance and longevity of your device. The Keychron M6 is a high-performance wireless mouse designed for productivity and gaming, featuring multiple connectivity options, a precise sensor, and customizable buttons.

Figure 1: Keychron M6 Wireless Optical Mouse (Black)
This image shows the Keychron M6 wireless optical mouse in black, highlighting its ergonomic design and sleek appearance. A separate component, likely a wireless receiver, is also visible to the right.
2. Key Features
- Versatile Connectivity: Supports 2.4 GHz wireless, Bluetooth 5.1, and wired USB connections.
- High Polling Rate: Up to 4000 Hz polling rate for ultra-low latency response.
- Precise Sensor: Equipped with PixArt 3395 sensor, offering up to 26,000 DPI and 650 IPS.
- Lightweight Design: Weighs approximately 78g for comfortable extended use.
- Programmable Buttons: Over ten customizable buttons and an infinite scroll wheel.
- Software Customization: Keychron Engine software for macOS/Windows allows personalization of keys, shortcuts, macros, LOD, polling rate, and DPI settings.

Figure 2: Key Features of Keychron M6 Mouse
This image visually highlights the key features of the Keychron M6 mouse, including its infinite scroll wheel, 4000 Hz polling rate, up to 26000 DPI, and 78g lightweight design.
3. Package Contents
Verify that all items are present in the package:
- 1x Keychron M6 Wireless Optical Mouse
- 1x Type-C to Type-C Cable
- 1x Type-A to Type-C Adapter
- 1x 4K Wireless Receiver

Figure 3: Standard Version (4K) Package Contents
This image illustrates the contents included with the Keychron M6 mouse, showing the mouse itself, a USB-C cable, a USB-A to USB-C adapter, and the 4K wireless receiver.
4. Setup Guide
4.1 Charging the Mouse
The Keychron M6 mouse comes with a built-in 800 mAh battery. Before first use, it is recommended to fully charge the mouse.
- Connect the provided Type-C cable to the mouse's charging port.
- Connect the other end of the cable to a USB power source (e.g., computer USB port, USB wall adapter).
- The charging indicator light will show the charging status. A full charge can provide up to 80 hours of use.

Figure 4: Mouse Dimensions and Battery Life
This image provides the physical dimensions of the Keychron M6 mouse and highlights its 800 mAh battery, which offers up to 80 hours of usage. It also shows the Huano 80M Micro Switch and DPI/Report Rate adjustment buttons.
4.2 Connecting the Mouse
The Keychron M6 supports three connection modes: 2.4 GHz wireless, Bluetooth 5.1, and wired USB.
4.2.1 2.4 GHz Wireless Connection
- Locate the 4K wireless receiver included in the package.
- Plug the 4K wireless receiver into an available USB port on your computer.
- On the bottom of the mouse, slide the switch to the "2.4G" position.
- The mouse should automatically connect to the receiver.

Figure 5: Connectivity Options
This image illustrates the stable and ultra-low latency response of the Keychron M6 mouse, showcasing its 2.4GHz, Bluetooth 5.1, and USB Wired connectivity options.
4.2.2 Bluetooth 5.1 Connection
- On the bottom of the mouse, slide the switch to the "B" (Bluetooth) position.
- The mouse will enter pairing mode (indicator light may flash).
- On your computer or device, open Bluetooth settings and search for new devices.
- Select "Keychron M6" from the list of available devices to pair.
4.2.3 Wired USB Connection
- Connect the provided Type-C cable to the mouse's port.
- Connect the other end of the cable (using the Type-A adapter if necessary) to a USB port on your computer.
- The mouse will function immediately in wired mode.
5. Operating Instructions
5.1 DPI Adjustment
The Keychron M6 mouse allows for on-the-fly DPI adjustment without software.
- Locate the DPI button on the bottom of the mouse.
- Press the DPI button to cycle through different DPI levels. The indicator light may change color to indicate the current DPI setting.
- Fine-tune DPI settings using the Keychron Engine software for more precise control.

Figure 6: DPI and Report Rate Adjustment Buttons
This close-up image shows the buttons on the underside of the Keychron M6 mouse, specifically highlighting the DPI adjustment button and the G/OFF/B switch for connectivity modes, along with the Report Rate button.
5.2 Polling Rate Adjustment
The polling rate can be adjusted to optimize responsiveness for different uses.
- Locate the Report Rate button on the bottom of the mouse.
- Press the Report Rate button to cycle through available polling rates (e.g., 125 Hz, 500 Hz, 1000 Hz, 2000 Hz, 4000 Hz).
- Refer to the table below for indicator light meanings.

Figure 7: M6 (4000 Hz) Polling Rate and Indicator Guide
This image displays a table detailing the polling rates (Hz) and corresponding report rate light indicators (White, Blue, Red, Blue + Red, White + Red) for the Keychron M6 mouse, along with the available connection modes for each rate.
5.3 Customizing Buttons and Macros (Keychron Engine Software)
For advanced customization, download and install the Keychron Engine software from the official Keychron website.
- The software allows you to remap buttons, create custom shortcuts, and set up complex macros.
- Adjust Lift-Off Distance (LOD) and other sensor parameters.
- Manage multiple profiles for different applications or games.
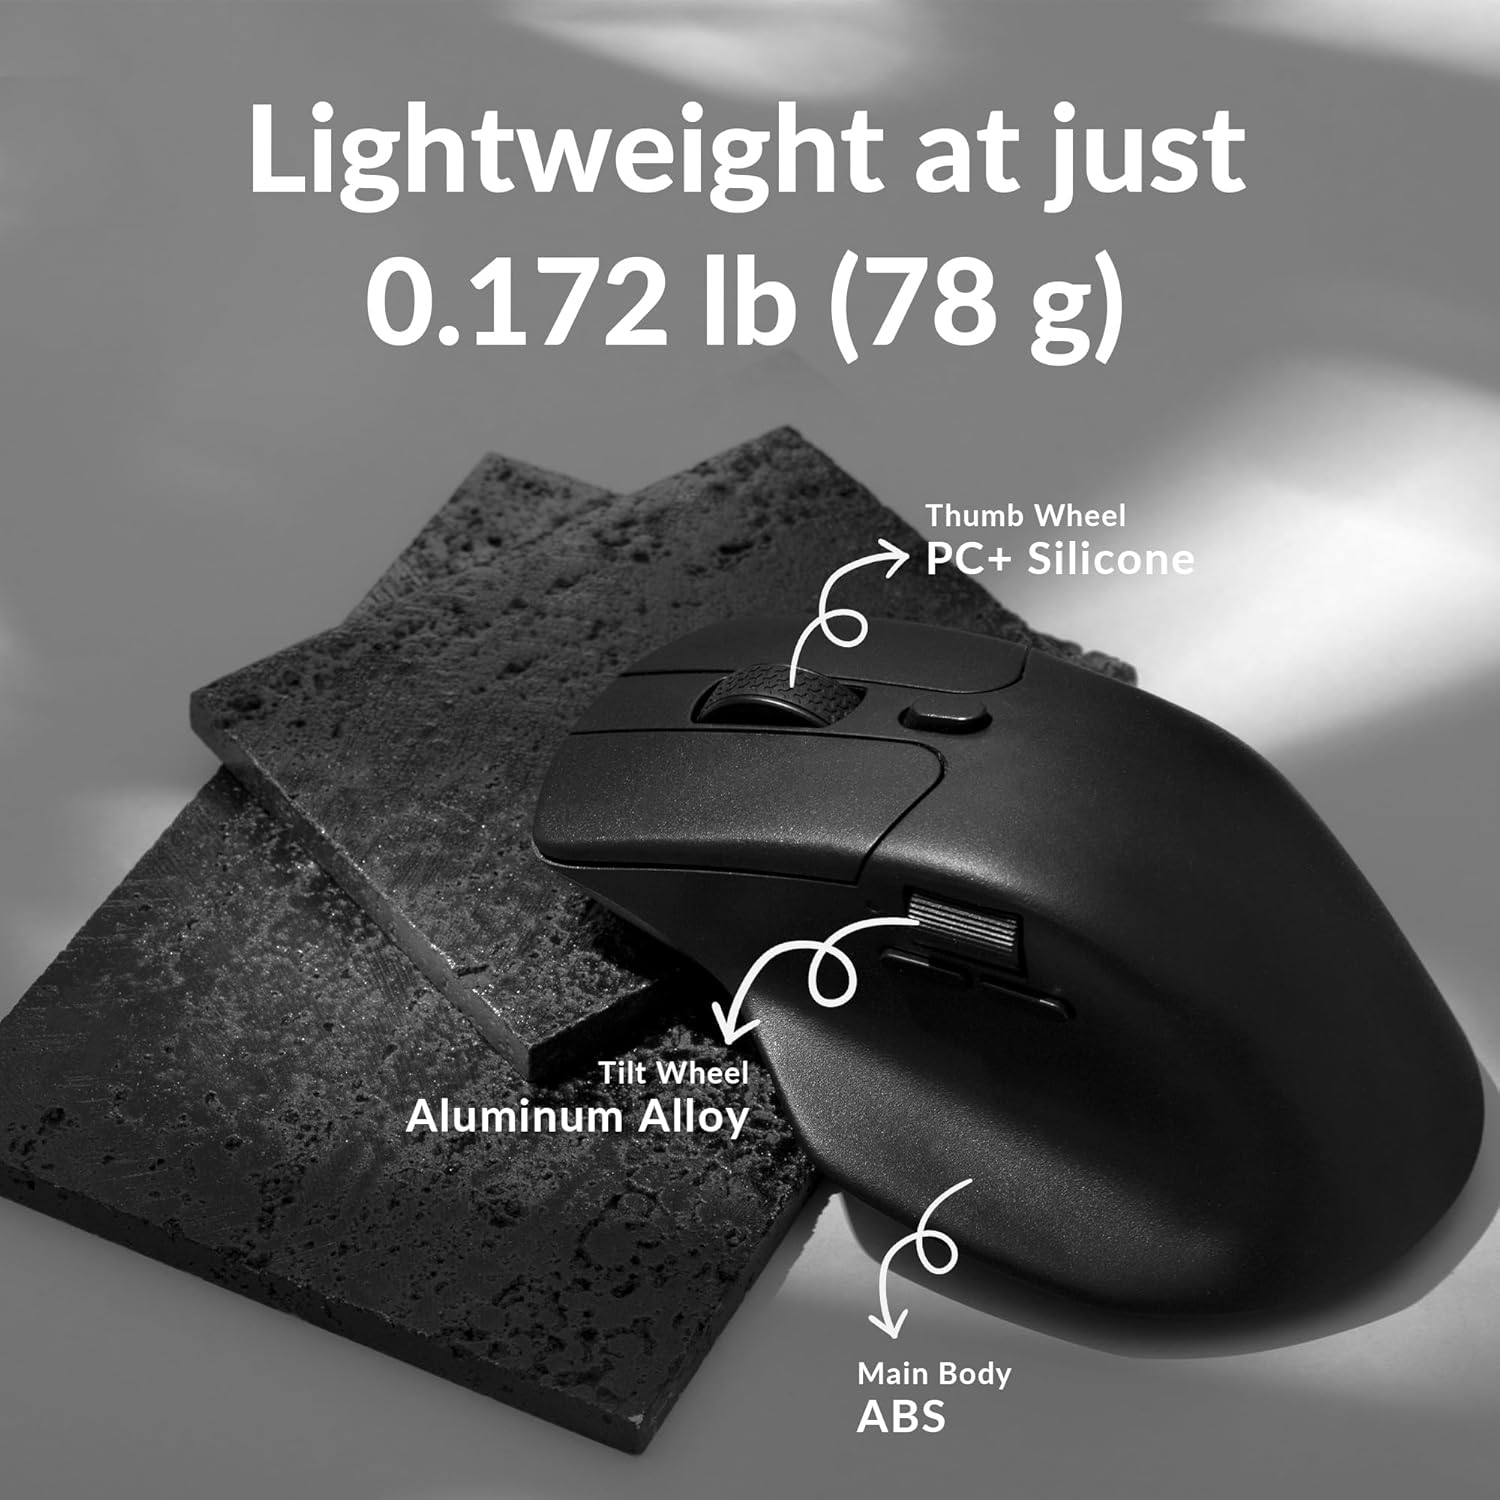
Figure 8: Keychron Engine Software for Customization
This image shows the user interface of the Keychron Engine software, demonstrating how users can customize buttons and settings for the Keychron M6 mouse on macOS and Windows operating systems.
6. Maintenance
Proper maintenance ensures the longevity and optimal performance of your Keychron M6 mouse.
- Cleaning: Use a soft, dry cloth to wipe the mouse surface. For stubborn dirt, slightly dampen the cloth with water or a mild cleaning solution. Avoid harsh chemicals.
- Sensor Care: Keep the optical sensor on the bottom of the mouse clean and free from dust or debris. Use a cotton swab or compressed air if necessary.
- Storage: When not in use for extended periods, store the mouse in a cool, dry place away from direct sunlight and extreme temperatures.
- Battery Life: To preserve battery health, avoid fully discharging the battery frequently. Charge the mouse when the battery indicator is low.
7. Troubleshooting
| Problem | Possible Cause | Solution |
|---|---|---|
| Mouse not responding (Wireless) | Low battery; Receiver not plugged in; Incorrect mode selected; Interference. | Charge the mouse; Ensure 4K receiver is securely plugged in; Switch to 2.4G or Bluetooth mode; Move closer to receiver or reduce interference sources. |
| Mouse not responding (Wired) | Cable not connected properly; Faulty USB port. | Ensure USB-C cable is securely connected to both mouse and computer; Try a different USB port. |
| Lag or erratic movement | Dirty sensor; Surface issues; Low battery; Wireless interference. | Clean the optical sensor; Use on a clean, non-reflective mouse pad; Charge the mouse; Minimize other wireless devices nearby. |
| Buttons not working as expected | Software settings; Driver issues. | Check Keychron Engine software settings for button assignments; Reinstall mouse drivers if necessary. |
| Cannot connect via Bluetooth | Mouse not in pairing mode; Bluetooth on device is off; Already paired to another device. | Ensure mouse is in Bluetooth pairing mode; Enable Bluetooth on your device; Unpair from other devices or reset Bluetooth connection. |
8. Specifications
| Feature | Detail |
|---|---|
| Model Number | M6-A1 |
| Connectivity | 2.4 GHz Wireless, Bluetooth 5.1, USB Wired |
| Sensor | PixArt 3395 Optical Sensor |
| DPI Range | Up to 26,000 DPI |
| IPS | 650 IPS |
| Polling Rate | Up to 4000 Hz |
| Weight | Approx. 78g (2.75 ounces) |
| Battery | 800 mAh (Up to 80 hours) |
| Dimensions | 4.82 x 2.97 x 1.97 inches (122.5 x 75.4 x 50 mm) |
| Operating System Compatibility | Windows, macOS, Linux |
9. Warranty and Support
Keychron products typically come with a limited warranty. Please refer to the official Keychron website or your purchase documentation for specific warranty terms and conditions.
For technical support, driver downloads, or further assistance, please visit the official Keychron support page:
You can also find the official user guide PDF here: Keychron M6 User Guide (PDF)