1. Introduction
This instruction manual provides detailed guidance for the assembly, operation, and maintenance of your Tecmojo 38U 4-Post Open Frame Server Rack. Designed for versatility and durability, this rack is suitable for organizing 19-inch network, server, AV, data, and IT equipment in various professional and home environments.
Key features of your server rack include:
- Durable Construction: Made from 2.5mm heavy-duty cold rolled steel with a 3450 lbs (1565 kg) weight capacity, featuring an electrostatic powder coat for rust and corrosion prevention.
- Adjustable Depth: Offers a flexible depth range of 23.6 inches to 39.3 inches (600mm to 1000mm) to accommodate equipment of different sizes.
- User-Friendly Design: Provides adequate storage space, a compact structure with a small footprint, and pre-drilled holes at the bottom for floor fixation, enhancing stability.
- Efficient Cable Management: Equipped with long striped holes on all four sides to facilitate clear, classified placement and easy management of cables, ensuring optimal airflow and accessibility.
- Universal Compatibility: EIA/ECA-310-E compliant, making it suitable for a wide range of 19-inch wide, directly installable equipment and rack shelves.
2. Safety Information
Please read and understand all safety instructions before assembling or using the server rack. Failure to follow these instructions may result in injury or damage to the equipment.
- Heavy Item: The server rack is heavy. Exercise caution when lifting and moving components. It is recommended to have at least two people for assembly and relocation.
- Proper Assembly: Assemble the rack on a flat, stable surface. Ensure all fasteners are securely tightened according to the instructions to prevent instability.
- Weight Capacity: Do not exceed the maximum weight capacity of 3450 lbs (1565 kg). Distribute equipment weight evenly across the rack.
- Tools: Use appropriate tools for assembly. An electric driver can save time, but ensure it is set to a low torque to avoid stripping screws.
- Cable Management: Properly route cables to prevent tripping hazards and ensure adequate airflow for equipment cooling.
3. Package Contents
Verify that all components listed below are present in your package before beginning assembly. If any parts are missing or damaged, please contact customer support.

Image: The package contents for the Tecmojo 38U 4-Post Open Frame Server Rack, showing various screws, nuts, and the instruction manual.
- Vertical Rails (4)
- Adjustable Horizontal Beams (4)
- Top Brackets (2)
- Base Brackets (2)
- Assembly Hardware (M5 screws, M3 screws, washers, nuts, Allen key)
- Leveling Feet (4) or Casters (4) - (Specific type may vary based on purchase)
- Cable Management Hooks (Optional accessory)
- Instruction Manual
4. Assembly Instructions
Follow these step-by-step instructions to correctly assemble your Tecmojo 38U 4-Post Open Frame Server Rack. It is recommended to assemble the rack on a soft surface like a carpet or drop cloth to prevent scratching.
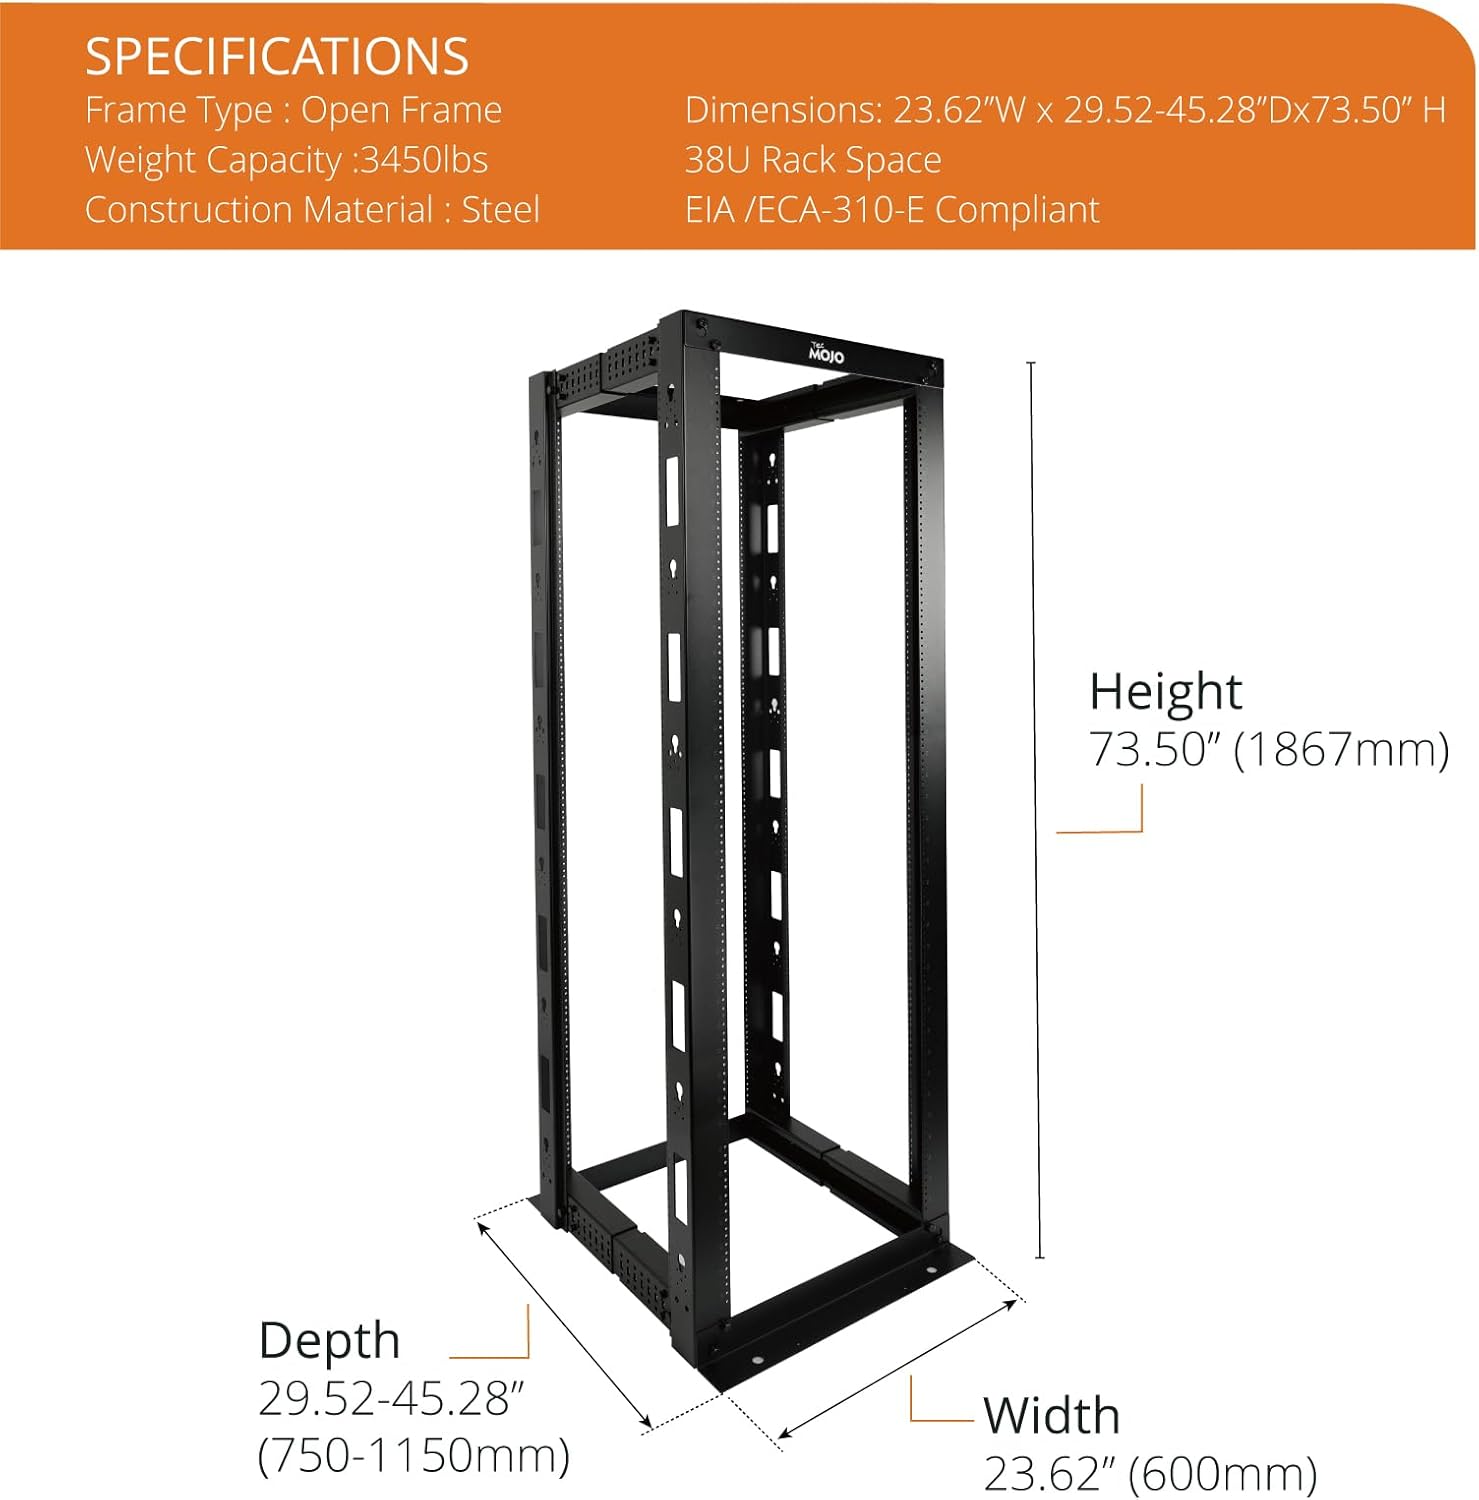
Image: An assembled Tecmojo 38U 4-Post Open Frame Server Rack, illustrating the overall structure before equipment installation.
4.1. Frame Assembly
Begin by assembling the main frame components. Ensure all parts are correctly oriented before tightening screws.
- Attach Base and Top Brackets to Vertical Rails: Secure the base and top brackets to the vertical rails using the provided M5 screws and washers. Ensure the numbered markings on the rails are facing outwards for easy reference during depth adjustment. Only finger-tighten screws at this stage.
- Connect Adjustable Beams: Connect the four adjustable horizontal beams between the vertical rails. These beams allow for depth adjustment. Refer to the specifications section or your manual for recommended depth settings based on your equipment. Use the provided M3 screws and washers. Again, only finger-tighten.
- Secure All Fasteners: Once the frame is fully assembled and aligned, securely tighten all screws and fasteners using the provided Allen key or an electric driver set to a low torque. Avoid over-tightening to prevent stripping.

Image: A detailed view of the adjustable depth mechanism on the Tecmojo 4-Post Server Rack, showing how the horizontal beams can be extended or retracted to fit various equipment depths.
4.2. Optional: Attaching Leveling Feet or Casters
Depending on your setup, attach either the leveling feet for stationary use or casters for mobility to the bottom of the rack using the provided hardware. Ensure casters are installed facing the same direction for optimal movement.
4.3. Visual Assembly Guides
For a visual demonstration of the assembly process, please refer to the following videos:
Video: This video demonstrates the assembly of a 4-post adjustable depth server rack, showing the connection of vertical rails, horizontal beams, and the overall frame construction. It provides a visual aid for users to follow the assembly steps.
Video: This video provides an assembly guide for a CR Series server rack, detailing the process of connecting various frame components and ensuring structural integrity. It serves as a helpful visual aid for rack setup.
5. Operating Instructions
This section guides you on how to effectively use your server rack for mounting and managing equipment.
5.1. Mounting Equipment
The Tecmojo 38U rack is designed for 19-inch wide, EIA/ECA-310-E compliant equipment. To mount your devices:
- Identify Rack Units: The vertical rails are marked with U-heights to help you position your equipment accurately.
- Secure Devices: Use appropriate rack screws for the tapped holes to secure your devices. Ensure each device is firmly attached to both front and rear vertical rails for stability.
- Adjust Depth: If necessary, adjust the depth of the horizontal beams to match your equipment's requirements before mounting.

Image: An illustration showing different U-height options (38U, 45U) for the Tecmojo 4-Post Open Frame Server Rack, highlighting its versatility for various equipment sizes.
5.2. Cable Management
Effective cable management is crucial for maintaining airflow, preventing damage, and simplifying maintenance.
- Utilize Striped Holes: The long striped holes on the four sides of the rack are designed for organized cable routing. Use cable ties or Velcro straps (not included) to bundle and secure cables.
- Route Cables Neatly: Route power cables separately from data cables to minimize interference. Ensure cables do not obstruct equipment fans or access panels.
- Cable Management Hooks: If included or purchased separately, attach cable management hooks to the rack rails to further organize and support cable bundles.

Image: Close-up views highlighting the 2.5mm thick cold rolled steel construction and heavy-duty components of the Tecmojo server rack, emphasizing its durability and robust design.
6. Maintenance
Regular maintenance ensures the longevity and optimal performance of your server rack.
- Cleaning: Periodically wipe down the rack with a dry, soft cloth to remove dust and debris. Avoid using abrasive cleaners or solvents that could damage the powder coat finish.
- Fastener Check: Annually inspect all screws, bolts, and connections to ensure they remain securely tightened. Re-tighten any loose fasteners to maintain structural integrity.
- Load Distribution: Regularly verify that equipment weight is evenly distributed within the rack to prevent stress on individual components and maintain overall stability.
- Environmental Check: Ensure the environment around the rack is free from excessive dust, moisture, and extreme temperatures to protect both the rack and the mounted equipment.
7. Troubleshooting
This section addresses common issues you might encounter with your server rack and provides solutions.
- Rack Instability: If the rack feels wobbly or unstable, first verify that all assembly fasteners are securely tightened. Ensure the rack is placed on a level surface. If using leveling feet, adjust them to ensure all four feet make firm contact with the floor.
- Difficulty Mounting Equipment: Ensure you are using the correct size rack screws for the tapped holes. Sometimes, powder coating can make threads feel tight; gently work the screw in or use a thread chaser if available. Verify that the equipment is properly aligned with the rack units.
- Equipment Overheating: Ensure proper cable management to avoid obstructing airflow. The open frame design promotes natural convection, but if equipment still overheats, consider adding external fan units (not included) to improve ventilation.
- Damaged Components: If any components are damaged during shipping or assembly, do not attempt to force them. Contact Tecmojo customer support for replacement parts.
8. Specifications
| Feature | Detail |
|---|---|
| Model | 4-Post/38U/Tapped Hole |
| Frame Type | Open Frame |
| Rack Units (U) | 38U |
| Adjustable Depth | 23.6 inches - 39.3 inches (600mm - 1000mm) |
| Weight Capacity | 3450 lbs (1565 kg) |
| Material | 2.5mm Heavy Duty Cold Rolled Steel |
| Color | Black |
| Compliance | EIA/ECA-310-E |
| Product Dimensions (D x W x H) | 29.52"D x 23.62"W x 73.5"H |
| Item Weight | 101.9 pounds |
9. Warranty and Support
Tecmojo is committed to providing high-quality products and excellent customer service. For any inquiries or assistance, please refer to the following:
- Returns: This product is eligible for 30-day easy returns from the date of purchase. Please refer to the retailer's return policy for detailed instructions.
- Customer Support: For technical support, assembly questions, or product assistance, please visit the Tecmojo Store on Amazon or contact their customer service directly.
- Protection Plans: Extended protection plans may be available for purchase separately to provide additional coverage beyond the standard return period.