
Volam RC09
Volam Apple Carplay Screen for Car
Instruction Manual - Model RC09
Introduction
This manual provides comprehensive instructions for the installation, operation, and maintenance of your Volam Apple Carplay Screen for Car, Model RC09. This portable car screen features a 6.86-inch touch display, integrated 2.5K dash cam, 1080p backup camera, and supports wireless Apple CarPlay and Android Auto. It is designed to enhance your driving experience with navigation, media playback, and communication functionalities.

The Volam Apple Carplay Screen, showcasing its dual display capability with navigation and a live camera feed.
What's in the Box
Upon unboxing your Volam Carplay Screen, please verify that all components listed below are present and in good condition:
- Carplay Screen (Main Unit)
- Waterproof Rear Camera
- Power Cord
- Suction Cup Holder
- 64GB SD Card
- AUX Cable
- Camera Cable
- Instruction Manual

A visual representation of the items included in the Volam Carplay Screen package, along with dimensions and holder instructions.
Setup & Installation
The Volam Carplay Screen offers flexible installation options to suit various vehicle interiors. Follow these steps for proper setup:
1. Mounting the Main Unit
Choose between the suction cup holder or the sticker bracket for mounting. Ensure the chosen location does not obstruct your driving view or interfere with airbags.
- Suction Cup Holder: Insert the four buckles of the bracket into the buckle groove on the back of the carplay unit. Press firmly on a flat, clean surface (e.g., windshield or dashboard) and pull down the suction cup latch to secure.
- Sticker Bracket: Attach the sticker bracket to the back of the carplay unit. Peel off the protective film from the adhesive and firmly press the unit onto a clean, flat dashboard surface.
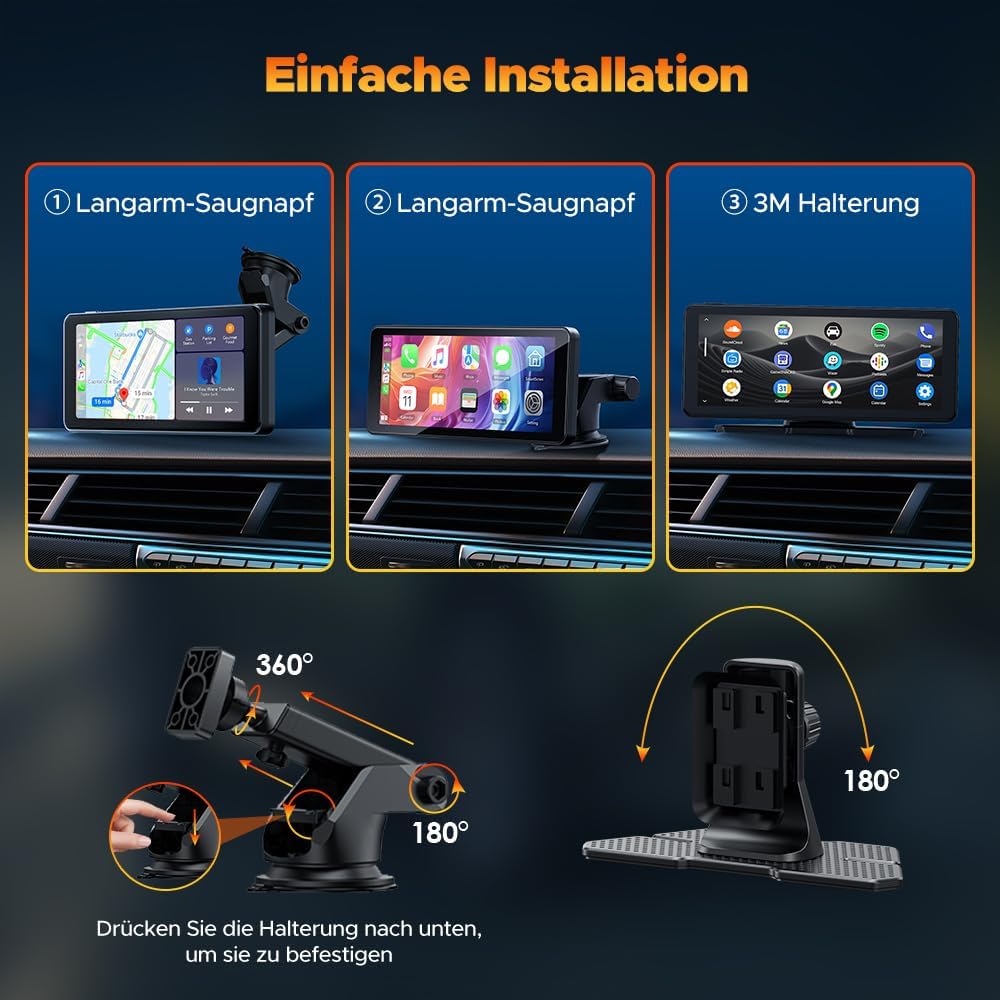
Visual guide demonstrating the long-arm suction cup and 3M adhesive mounting options for the display unit.

Illustration of the plug-and-play power connection via USB Type-C and the wiring for the reverse camera.
2. Connecting Power
Connect the provided power cord to the USB Type-C port on the unit and plug the other end into your vehicle's cigarette lighter socket. The unit will power on automatically with the vehicle's ignition.
3. Installing the Rear Camera
For the backup camera function, install the waterproof rear camera at the back of your vehicle. Route the camera cable from the rear camera to the main unit. For automatic display when reversing, connect the red wire of the camera cable to the reversing light anode of your vehicle.
Operating Instructions
Wireless Apple CarPlay & Android Auto
The Volam Carplay Screen supports seamless wireless connection to both Apple CarPlay and Android Auto, allowing access to navigation, music, calls, and messages directly from your smartphone.
- On the Carplay screen, select either "Apple CarPlay" or "Android Auto".
- On your mobile phone, turn on Wi-Fi and Bluetooth.
- Search for the device's Bluetooth name (e.g., "T86xxxx") in your phone's Bluetooth settings and pair.
- Once paired, the system will automatically connect via Wi-Fi for CarPlay/Android Auto functionality.

Detailed steps for establishing a wireless connection with Apple CarPlay and Android Auto.
Mirror Link Function
For iOS devices, you can use the screen mirroring function to cast your phone's display onto the Carplay screen. For Android devices, you can use Android Cast by scanning a QR code to download the necessary app.

Guide for setting up screen mirroring for iOS and Android devices, allowing video playback from various apps.
Camera Functions (Dash Cam & Backup Camera)
The unit is equipped with a 2.5K HD front camera and a 1080P rear camera, providing comprehensive recording capabilities.
- Loop Recording: Footage is continuously recorded, overwriting the oldest unlocked files when the 64GB SD card is full.
- Reversing Function: When the vehicle is in reverse, the 1080P rear camera view will automatically display on the screen with adjustable assist lines (170° wide angle).
- Video Playback: Review recorded footage directly on the screen.
- Locked Video: Important footage can be manually locked to prevent overwriting.

Illustrates the clarity of the 2.5K front camera and 1080P rear camera, showing license plate detail.

Explains the loop recording feature and the inclusion of a 64GB SD card for continuous video capture.
Audio Output Options
The Volam Carplay Screen offers multiple ways to output audio to your vehicle's sound system:
- Bluetooth Audio: Prioritize connecting the unit's Bluetooth to your car's existing Bluetooth system for the best sound quality.
- FM Transmitter: If your car only has a radio, use the built-in FM transmitter. Tune the unit and your car radio to an unused FM frequency to transmit audio.
- AUX Cable: Connect the provided AUX cable from the unit to your car's AUX input for a direct wired audio connection.
- Built-in Speaker: The unit has a built-in speaker for basic audio output.

Visual guide to the four available audio playback methods: Bluetooth, FM connection, AUX cable, and the built-in speaker.
Voice Control
Utilize Siri (for Apple CarPlay) or Google Assistant (for Android Auto) for hands-free control of navigation, calls, music, and text messages.

Demonstrates how to use voice commands like "OK Google" and "Hey Siri" for various functions.
Screen Settings
Adjust screen brightness and enable screen saver features for optimal viewing and power management.
- Brightness Adjustment: Manually adjust brightness or set automatic dimming based on time.
- Screen Saver: Configure the screen to turn off after a set period (e.g., 10 or 30 seconds) to save power.

Settings interface for adjusting screen brightness and enabling automatic dimming based on time.
Maintenance
To ensure the longevity and optimal performance of your Volam Carplay Screen, follow these maintenance guidelines:
- Cleaning: Use a soft, lint-free cloth to clean the screen and exterior. For stubborn smudges, slightly dampen the cloth with water or a screen-safe cleaner. Avoid abrasive materials or harsh chemicals.
- Temperature: Avoid exposing the device to extreme temperatures, both hot and cold. Prolonged exposure to direct sunlight in a parked car can damage the unit.
- Cable Management: Ensure all cables are securely connected and not pinched or strained, which can lead to damage or intermittent connectivity.
- Software Updates: Periodically check the manufacturer's website or product support channels for any available firmware updates to ensure the best performance and compatibility.
Troubleshooting
If you encounter issues with your Volam Carplay Screen, refer to the following common problems and their solutions:
| Problem | Possible Cause | Solution |
|---|---|---|
| Device does not power on. | No power supply; loose connection. | Check if the power cord is securely plugged into the unit and the car's cigarette lighter. Ensure the vehicle's ignition is on. |
| Cannot connect to Apple CarPlay/Android Auto wirelessly. | Bluetooth/Wi-Fi issues; incorrect pairing. | Ensure Bluetooth and Wi-Fi are enabled on your phone. Forget the device in your phone's Bluetooth settings and re-pair. Restart both the unit and your phone. |
| No audio or poor audio quality. | Incorrect audio output setting; FM interference; loose AUX cable. | Verify the audio output setting (Bluetooth, FM, AUX) on the unit. If using FM, try a different, clear frequency. Ensure the AUX cable is fully inserted. |
| Rear camera not displaying. | Camera cable disconnected; incorrect wiring. | Check the connection of the rear camera cable to the main unit. Ensure the red trigger wire is correctly connected to the vehicle's reverse light anode. |
| Screen is too dark or too bright. | Brightness settings; direct sunlight. | Adjust the screen brightness settings in the unit's menu. If in direct sunlight, reposition the unit or use a sunshade. |
Specifications
Key technical specifications for the Volam Apple Carplay Screen:
| Feature | Detail |
|---|---|
| Model Number | RC09 |
| Screen Size | 6.86 inches |
| Front Camera Resolution | 2.5K (2560*1440) |
| Rear Camera Resolution | 1080P (1920*1080) |
| Connectivity Technology | Bluetooth 5.0, Wi-Fi |
| Compatible Systems | Apple CarPlay, Android Auto, Mirror Link (iOS/Android) |
| Audio Output Modes | Bluetooth, FM Transmitter, AUX, Built-in Speaker |
| Storage | Supports up to 64GB SD card (64GB U3 SD card included) |
| Power Input | 12-24V (suitable for 98% car models) |
| Product Dimensions | 10 x 3.9 x 5 inches |
| Item Weight | 2.21 pounds |

The Volam Carplay Screen is compatible with a wide range of vehicle models, including cars, trailers, RVs, vans, caravans, and trucks.
Warranty & Support
Volam stands behind the quality of its products. Your Volam Apple Carplay Screen comes with:
- 1-Year Warranty Coverage: This product is covered by a 1-year warranty from the date of purchase.
- 30-Day Money-Back Guarantee: If you are not satisfied with your purchase, you may be eligible for a refund within 30 days.
- Dedicated Customer Support: For any questions, technical assistance, or warranty claims, please contact Volam customer support. Refer to the contact information provided in the packaging or on the official Volam website.
Ask a question about this manual
Ask about setup, troubleshooting, compatibility, parts, safety, or missing instructions. Manuals+ will review the question and use this page’s manual context to help answer it.