
RadioShack CA20A
Contents
RadioShack Dual Alarm Clock with Adjustable Volume and LED Display
Model: CA20A | Brand: RadioShack
1. Introduction
The RadioShack CA20A USB Alarm Clock is designed to provide reliable timekeeping and alarm functions with added convenience. Featuring a clear LED display and dual independent alarms, this clock is perfect for managing your daily schedule. It also includes two USB ports for charging compatible devices and a battery backup system to maintain settings during power outages.
Key Features:
- LED display for clear time visibility.
- Two fast-charging USB ports for compatible devices.
- Dual independent alarms with adjustable volume settings.
- Snooze and nap functions for flexible wake-up options.
- Battery backup (batteries not included) to preserve time and alarm settings during power interruptions.

Figure 1: Front view of the RadioShack CA20A Alarm Clock.
2. Setup
2.1 Unpacking
Carefully remove the alarm clock and all accessories from the packaging. Ensure all components are present:
- RadioShack CA20A Alarm Clock
- Power Adapter
- User Manual (this document)

Figure 2: Alarm Clock and Power Adapter.
2.2 Connecting Power
Connect the provided power adapter to the DC 5V=4A input port located on the back of the alarm clock. Plug the other end of the adapter into a standard electrical outlet. The LED display will light up.

Figure 3: Back view with power input and battery compartment.
2.3 Installing Backup Batteries (Not Included)
For battery backup functionality, open the battery compartment on the back of the clock. Insert two AAA batteries (not included) according to the polarity markings (+/-). These batteries will preserve your time and alarm settings in case of a power outage, but will not power the display or alarm sound.
3. Operating Instructions
3.1 Setting the Time
- Press and hold the TIME SET button located on the left side of the clock until the hour digits begin to flash.
- Press the HR button to adjust the hour. Pay attention to the PM indicator if setting a PM time.
- Press the MIN button to adjust the minute.
- Press TIME SET again to confirm the time and exit time setting mode.
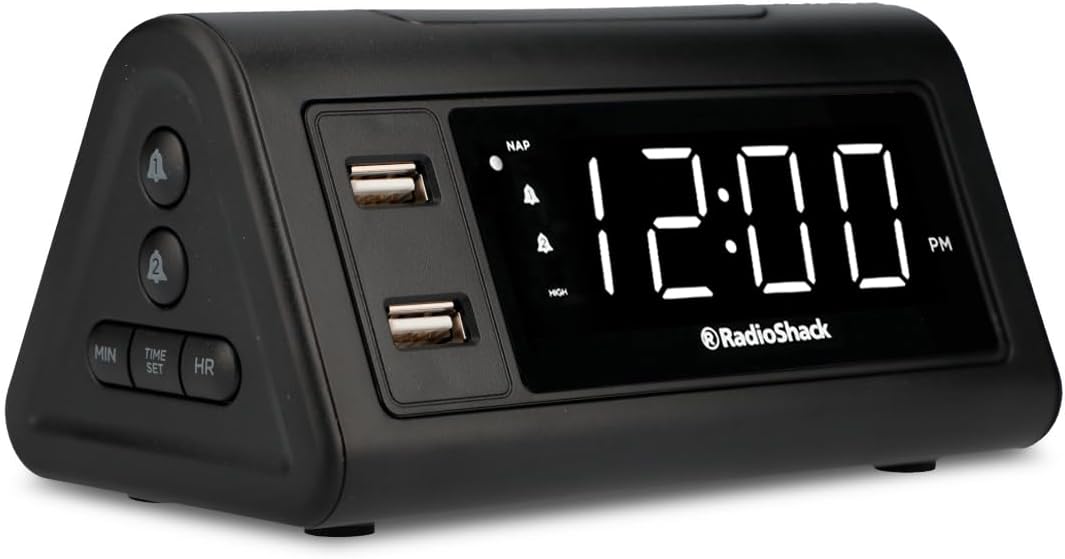
Figure 4: Time setting buttons (MIN, TIME SET, HR).
3.2 Setting Alarms (Alarm 1 and Alarm 2)
The clock features two independent alarms. The alarm icons (bell 1 and bell 2) on the display indicate which alarm is active.
- Press the ALARM 1 button (top bell icon on the side) once to activate Alarm 1. The Alarm 1 icon will appear on the display.
- Press and hold the ALARM 1 button until the hour digits flash.
- Use the HR and MIN buttons to set the desired alarm time for Alarm 1.
- Press ALARM 1 again to confirm and exit.
- Repeat steps 1-4 for ALARM 2 using the ALARM 2 button (bottom bell icon on the side).
- To deactivate an alarm, press its corresponding ALARM button until its icon disappears from the display.

Figure 5: Alarm control buttons (ALARM 1, ALARM 2, HIGH/LOW, OFF).
3.3 Adjusting Alarm Volume
When an alarm is sounding, press the HIGH/LOW button (located on the right side) to toggle between high and low alarm volume settings.
3.4 Using Snooze and Nap Functions
- Snooze: When an alarm sounds, press the large SNOOZE button on top of the clock. The alarm will temporarily stop and sound again after approximately 9 minutes. You can repeat this process.
- Nap: Press the NAP button (on the right side) to activate the nap timer. The nap icon will appear. Press NAP repeatedly to cycle through nap durations (e.g., 10, 20, 30, 60, 90 minutes). The alarm will sound after the selected nap duration.

Figure 6: Snooze button and brightness control.
3.5 Adjusting Display Brightness
Press the SNOOZE button (on top) when the alarm is not sounding to cycle through different display brightness levels (High, Low, Off).
3.6 Using USB Charging Ports
The two USB ports on the front of the clock are designed for charging compatible devices such as smartphones or tablets. Simply connect your device's USB charging cable to one of the ports. The clock must be powered by the AC adapter for the USB charging ports to function.
4. Maintenance
4.1 Cleaning
To clean the clock, gently wipe the surface with a soft, dry cloth. Do not use abrasive cleaners or solvents, as they may damage the finish.
4.2 Battery Replacement
If the clock experiences frequent power outages or if the time/settings are not retained after a power interruption, it may be time to replace the backup batteries. Open the battery compartment on the back and replace the two AAA batteries with new ones, ensuring correct polarity.
5. Troubleshooting
| Problem | Possible Cause | Solution |
|---|---|---|
| Clock display is off. | No power or power adapter is disconnected. Display brightness set to "Off". | Ensure the power adapter is securely connected to the clock and a working outlet. Press the SNOOZE button to cycle through brightness levels. |
| Alarm does not sound. | Alarm is not activated. Alarm volume is too low. Incorrect alarm time set. | Ensure the alarm icon is visible on the display. Press the HIGH/LOW button to adjust volume. Verify the alarm time is correctly set (AM/PM). |
| Time/settings reset after power outage. | Backup batteries are not installed or are depleted. | Install new AAA backup batteries or replace existing ones. |
| USB charging not working. | Clock is not connected to AC power. Device is not compatible or cable is faulty. | Ensure the clock is plugged into an AC outlet. Try a different USB cable or device to confirm compatibility. |
6. Specifications
| Brand: | RadioShack |
| Model Number: | CA20A |
| Color: | Black |
| Product Dimensions: | 8 x 3.81 x 15 cm (3.15 x 1.5 x 5.9 inches) |
| Product Weight: | 390 g (0.86 lbs) |
| Special Features: | Illuminated display, Dual Alarms, USB Charging Ports, Snooze, Nap, Battery Backup |
| Display Type: | Digital LED |
| Power Source: | AC Power Adapter (DC 5V=4A) |
| Backup Battery: | 2 x AAA batteries (not included) |
7. Warranty and Support
This product is manufactured by RadioShack. For any questions, technical support, or warranty inquiries, please contact RadioShack customer service directly. Please refer to your purchase documentation for specific warranty terms and conditions, as these may vary by region and retailer.
Keep your purchase receipt as proof of purchase for any warranty claims.
Ask a question about this manual
Ask about setup, troubleshooting, compatibility, parts, safety, or missing instructions. Manuals+ will review the question and use this page’s manual context to help answer it.