1. Introduction
This manual provides detailed instructions for the proper setup, operation, and maintenance of your BROMECH ATP-30-WA1 Price Computing Scale. This scale is NTEP certified for legal trade, making it suitable for commercial applications such as farmers' markets, delis, and butcher shops. It features a 60lb capacity with 0.01lb increments, dual LCD displays, and a rechargeable battery.

Image: Front view of the BROMECH ATP-30-WA1 Price Computing Scale, showing the stainless steel platform and dual LCD displays.
2. What's in the Box
Upon unpacking, please verify that all components are present:
- ATP NTEP Scale Unit
- AC Adapter
- Scale Pan (Stainless Steel)
- Operating Manual (This document)
3. Setup
- Unpacking: Carefully remove all components from the packaging.
- Platform Placement: Place the stainless steel scale pan onto the main unit, ensuring it sits securely on the four support points.

Image: Underside view of the stainless steel tray showing support pins, and a close-up of the scale's anti-slip rubber pads.
- Leveling: Position the scale on a stable, flat surface. Use the adjustable leveling feet located on the bottom of the scale to ensure it is perfectly level. A bubble level is integrated into the scale for assistance.

Image: Close-up views of the stainless steel panel, adjustable foot pads, and detachable scale feet.
- Power Connection: Connect the AC adapter to the scale and plug it into a 110V power outlet. The scale can operate directly from AC power or using its internal rechargeable battery.

Image: The scale with its AC power adapter and an icon indicating the built-in rechargeable battery.
- Initial Charge: For optimal battery life, charge the scale for at least 8 hours before its first use.

Image: Diagram illustrating the long-lasting rechargeable battery and initial charging recommendation.
- Power On: Locate the main rocker switch underneath the scale and turn it to the "ON" position. Then, press the power button on the front panel.
4. Operating Instructions
4.1 Basic Weighing
Place the item to be weighed on the stainless steel platform. The weight will be displayed on the LCD screen. Ensure the scale is stable and zeroed before placing items.

Image: Close-up of the scale's display showing weight, unit price, and total price, with an inset showing a 5g weight for accuracy.
4.2 Unit Conversion (KG/LB)
To switch between kilograms (kg) and pounds (lb), press the UNIT button on the keypad. The display will update to show the weight in the selected unit. This scale does not support ounces or grams.
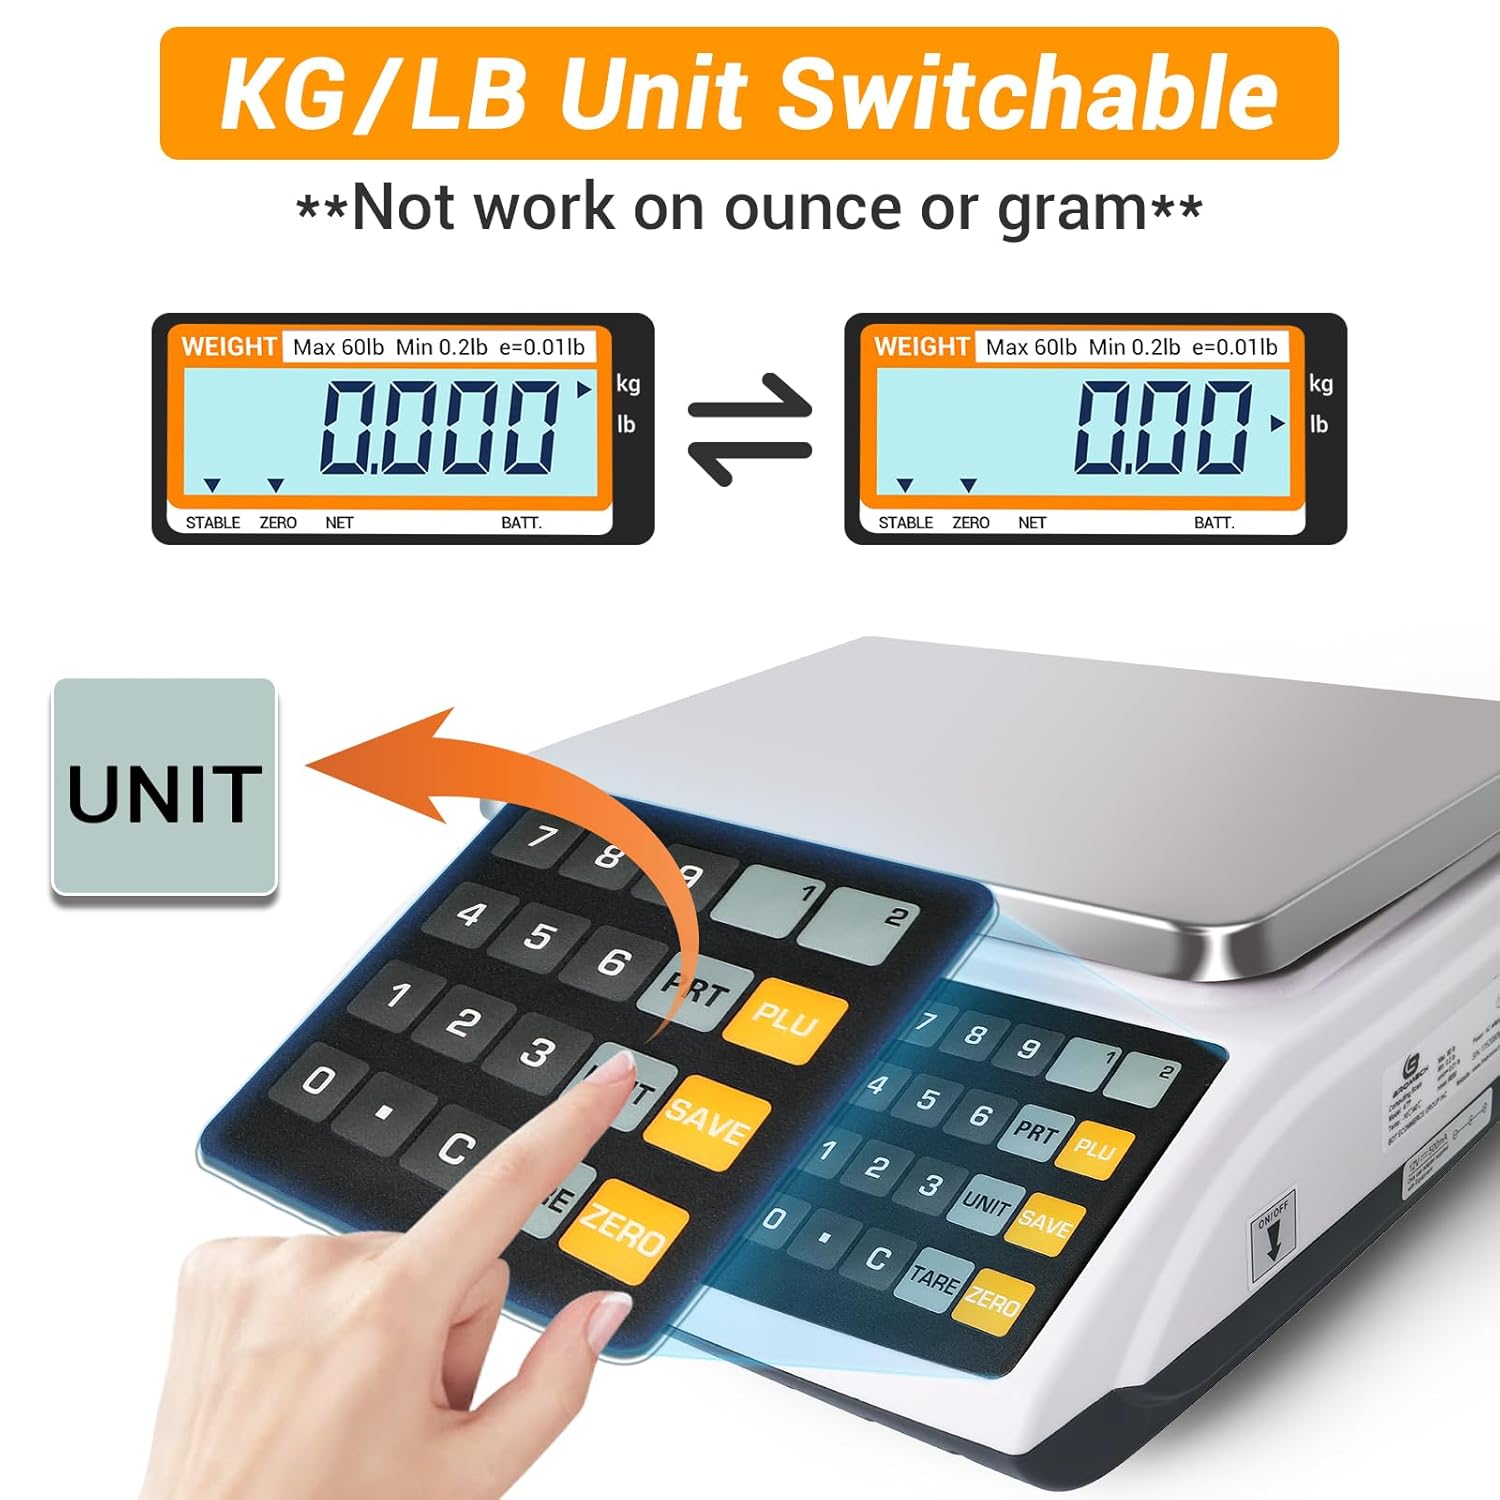
Image: Diagram showing the scale display switching between kilograms and pounds, with a hand pressing the "UNIT" button.
4.3 Setting Up Direct PLUs (Price Look-Up)
The scale supports 2 direct PLUs for frequently sold items.
- Enter the desired unit value (price per unit) using the numeric keypad.
- Long press the "PLU1" or "PLU2" button (located on the upper right corner of the keypad) to save the unit value to that direct PLU.
- The direct PLU is now set. Repeat for the second direct PLU if needed.

Image: Step-by-step visual guide on setting up direct PLUs on the scale.
4.4 Setting Up Indirect PLUs
The scale supports 10 indirect PLUs (PLU0-PLU9).
- Enter the desired unit value using the numeric keypad.
- Long press the PLU button, then press a number from 0 to 9 to set up the indirect PLU.
- To recall a saved indirect PLU, press the PLU button and then the corresponding number (0-9).

Image: Step-by-step visual guide on setting up indirect PLUs on the scale.
4.5 Adjusting Backlight
The LCD backlight can be adjusted for visibility.
- Long press the decimal point button (.).
- Press the PLU button to cycle through backlight modes: On, Off, or Auto.
- Press TARE to confirm your selection.

Image: Step-by-step visual guide on adjusting the backlight settings (On, Off, Auto).
4.6 Locking Unit Value
This feature prevents unauthorized changes to the unit price and streamlines transactions.
- Press the SAVE button.
- An arrow will point to "SAVE" on the display. Enter the unit value to lock it.

Image: Visual guide on how to use the "SAVE" function to lock the unit value on the display.
5. Features Overview
- NTEP Certified: Complies with NCWM standards (COC #21-001A3) for legal trade in commercial settings.

Image: Graphic highlighting the NTEP Certification COC# 21-001, indicating suitability for delis, butcher markets, and bakeries.
- Dual LCD Display with Backlight: Provides clear visibility for both operator and customer, showing weight, unit price, and total cost simultaneously.

Image: The scale displaying weight, unit price, and total price, with separate views for seller and buyer.
- Rechargeable Battery: Offers up to 100 hours of operation on a single charge, providing portability and continuous use.
- Durable Construction: Features a robust ABS plastic shell and a 10.5x8 inch stainless steel weighing platform designed for commercial environments.
- Wide Selection: Weighs up to 60 lb in 0.01 lb increments. Kilogram (Kg) and Pound (Lb) units are interchangeable.
6. Maintenance
- Cleaning: Wipe the scale's surface and stainless steel platform with a damp cloth. Avoid abrasive cleaners or submerging the unit in water. Ensure the scale is dry before use.
- Battery Care: To prolong battery life, recharge the scale every three months when not in regular use. Avoid fully discharging the battery frequently.
- Storage: Store the scale in a dry, stable environment away from extreme temperatures and direct sunlight.
- Calibration: While the scale is factory calibrated and NTEP certified, periodic checks with certified weights are recommended to ensure continued accuracy, especially after transport or prolonged use.
7. Troubleshooting
| Problem | Possible Cause | Solution |
|---|---|---|
| Scale does not power on. | Main rocker switch off; battery discharged; AC adapter not connected or faulty. | Ensure main rocker switch is ON. Connect AC adapter and charge battery. Check AC outlet. |
| Inaccurate readings or fluctuating display. | Scale not level; unstable surface; foreign object under platform; damaged load cell. | Ensure scale is level and on a stable surface. Check for obstructions. If problem persists, contact support. |
| Battery not charging. | Faulty AC adapter; battery issue; charging port issue. | Verify AC adapter is working. Ensure secure connection. If battery is old, it may need replacement (contact support). |
| Display shows "OVERLOAD" or similar error. | Weight exceeds maximum capacity (60lb). | Remove excess weight from the platform. |
8. Specifications
| Feature | Detail |
|---|---|
| Model Number | ATP-30-WA1 |
| Capacity | 60 lb / 30 kg |
| Readability (Division) | 0.01 lb / 0.005 kg |
| Minimum Weight | 0.02 lb |
| Platform Dimensions | 10.5 x 8 inches |
| Product Dimensions | 11 x 12 x 4 inches |
| Product Weight | 8.75 Pounds |
| Display Type | LCD with Backlight |
| Power Source | 110V AC Adapter, 100-hour Rechargeable Lead Zinc Battery |
| Operating Temperature | -10 to 40 °C (14 to 104 °F) |
| PLUs | 2 Direct, 10 Indirect |
| Certification | NTEP Certified, COC #21-001A3 |

Image: Diagram showing the dimensions of the BROMECH Price Computing Scale: 11 inches wide, 12 inches deep, and 4 inches high.
9. Warranty and Support
For warranty information or technical support, please refer to the manufacturer's official website or contact their customer service. The product includes a return policy of 30 days for refund/replacement through the seller.
A PDF version of the user manual and Certificate of Compliance are available online: