1. Introduction
This manual provides comprehensive instructions for the installation, operation, and maintenance of your Inexaccessories Android 13 Car Stereo Radio. Please read this manual thoroughly before installation and use to ensure proper functionality and to maximize your experience with the device. Keep this manual for future reference.
2. Product Overview
2.1 Key Features
- Android 13 Operating System with Quad Core CPU, 4GB RAM + 64GB ROM.
- 8-inch IPS Touch Screen with 1280*720 HD resolution.
- Wireless and Wired Apple CarPlay & Android Auto support.
- Built-in GPS Navigation (online and offline maps).
- Bluetooth 5.2 for hands-free calling and music streaming.
- FM Radio with RDS support.
- Support for Split-Screen Mode and Full RCA Output.
- Steering Wheel Control compatibility.
- Includes HD Backup Camera.
- WiFi Hotspot Connection.
- Multiple UI Themes.
2.2 Applicable Car Models
This car stereo is designed for specific vehicle models and years. Please verify your vehicle's compatibility before installation.
- For Chevrolet: Silverado 1500HD, 2500HD, 3500HD (2007-2013, Second Generation - Note: Not compatible with 2007 Silverado Classic), Avalanche (2007-2011, GMT900), Express Van (2008-2011), Impala (2006-2012, Ninth Generation), Tahoe (2007-2014, Third Generation), Equinox (2005-2009, First Generation), Suburban (2007-2014, Tenth Generation), HHR (SS/LT/Panel/LS) (2006-2011), Traverse (2009-2012), Monte Carlo (2006-2007, Seventh Generation).
- For GMC: Acadia (2007-2012), Savana (2008-2013), Sierra (2007-2011), Yukon (2007-2013).
- For Buick: Enclave (2008-2012).
Important Compatibility Notes: This radio does not support factory original Bose sound systems or Onstar systems.

Image: Visual guide for compatible and incompatible dashboard configurations.
2.3 Package Contents
The package includes all necessary components for standard installation and operation:
- Car Stereo Unit
- Rearview Camera
- Connectivity Cables (Power Cable, RCA Cable, USB Cables, Camera Cable)
- GPS Antenna
- External Microphone
- Brackets
- Disassembly Tool
- User Manual (this document)

Image: Product dimensions and a visual list of all components included in the package.
3. Installation
Professional installation is recommended. Ensure the vehicle's battery is disconnected before beginning installation to prevent electrical damage.
3.1 General Installation Steps
- Carefully remove the original car stereo and dashboard trim.
- Connect the provided wiring harness to the vehicle's factory harness.
- Connect the GPS antenna, USB cables, and external microphone.
- Install the backup camera (if applicable) and route its cable to the stereo unit.
- Mount the new car stereo into the dashboard using the provided brackets.
- Reconnect the vehicle's battery and test all functions before fully reassembling the dashboard.

Image: Comparison of dashboard appearance before and after stereo installation.
3.2 Wiring Instructions
Refer to the wiring diagram below for correct connections. Ensure all connections are secure to prevent intermittent issues.

Image: Comprehensive wiring diagram for the car stereo system.
Amplifier Control: If your car has an amplifier, connect the blue wire labeled 'AMP CTRL' to the ACC power wire. If there is no sound after installation, verify this connection.
4. Operating Instructions
4.1 Basic Operation and User Interface
The unit features an intuitive touch screen interface. Power on the device by turning the vehicle's ignition to the ACC or ON position. The main screen displays various applications and widgets for quick access.

Image: Overview of the car stereo's main user interface.
4.2 Wireless/Wired CarPlay & Android Auto
Connect your smartphone via Bluetooth for wireless CarPlay/Android Auto or via USB for wired connection. This allows access to phone apps, navigation, calls, messages, and music directly from the stereo screen. Voice assistants like Siri or Google Assistant can be activated for hands-free control.
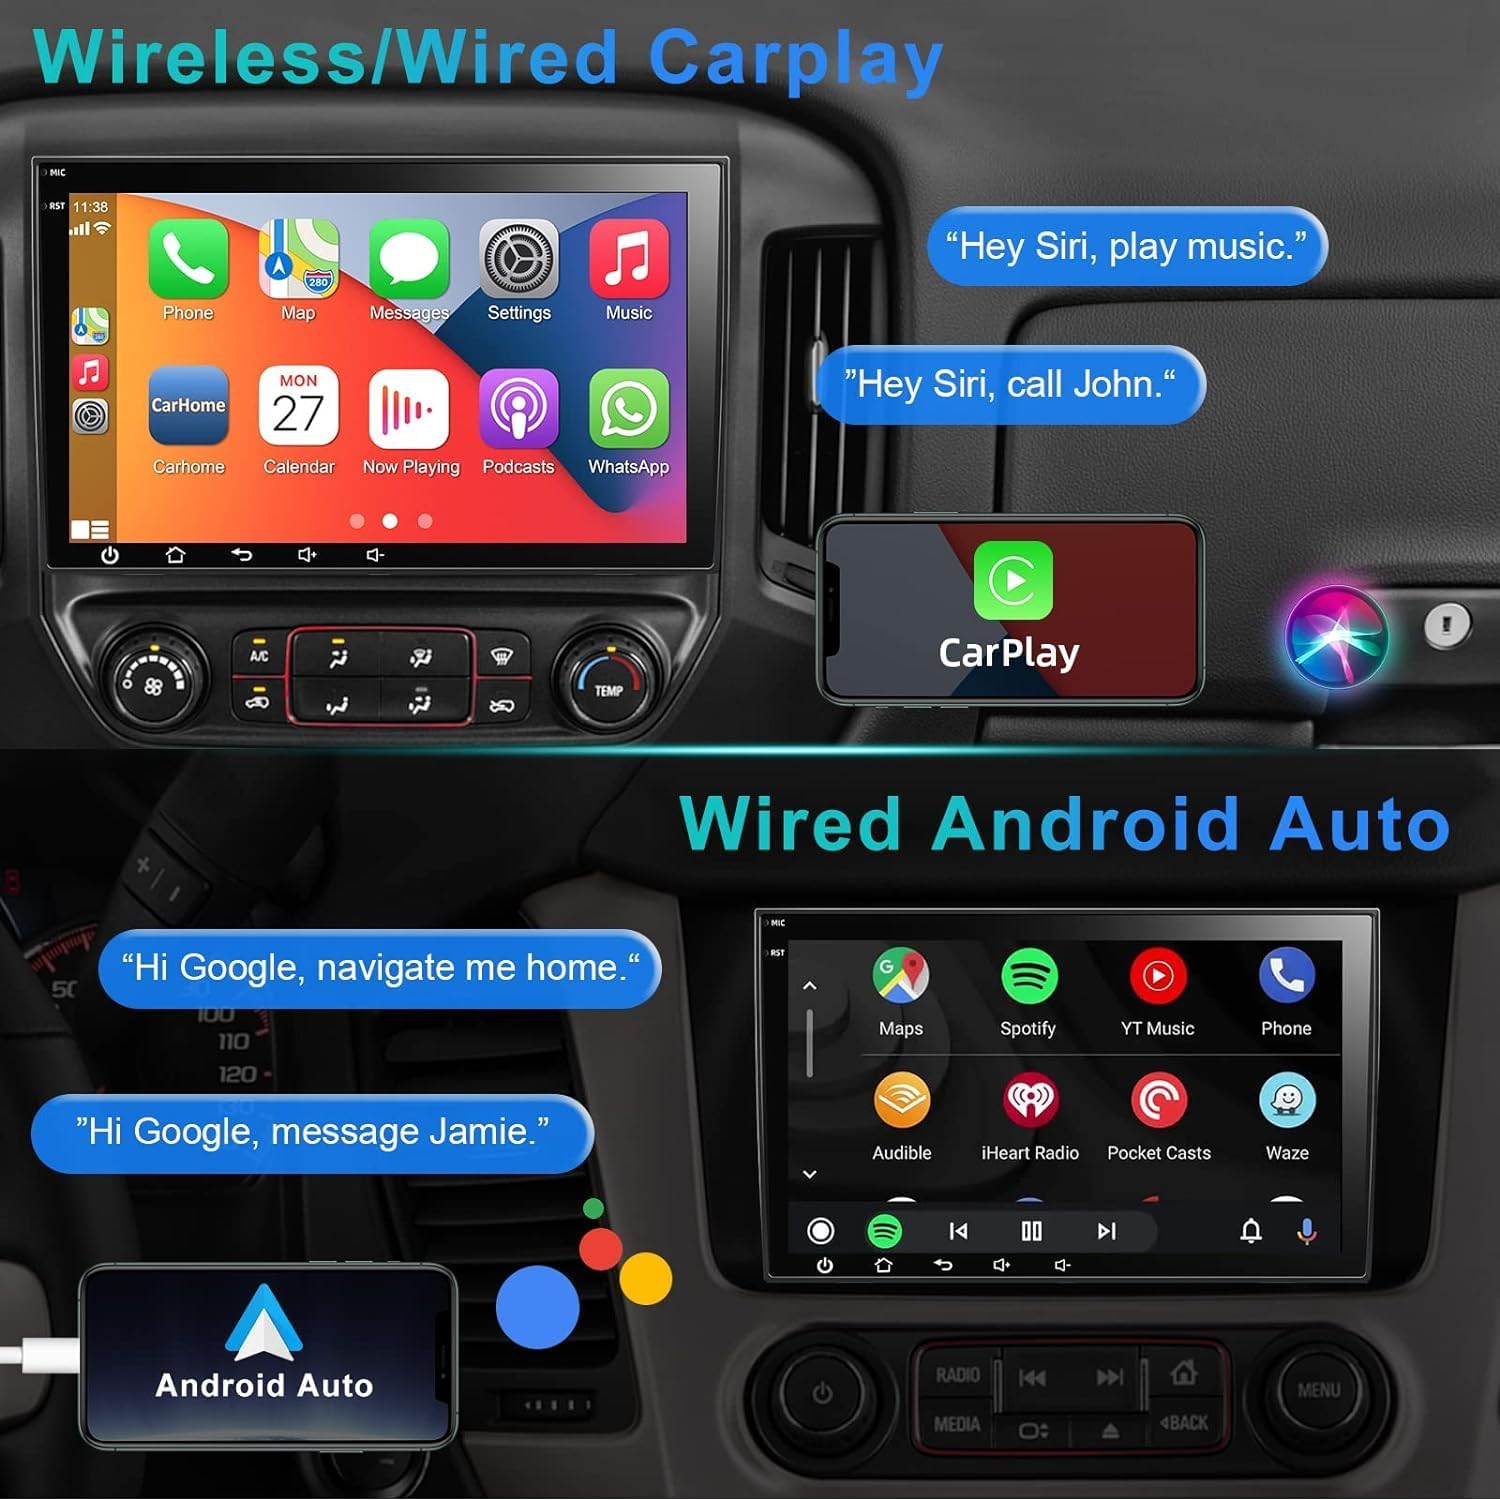
Image: Wireless CarPlay and Wired Android Auto functionality.
4.3 GPS Navigation
The unit supports both online and offline navigation. You can download offline maps (e.g., Here WeGo) or use online map applications like Google Maps or Waze via WiFi connection. The system provides 3D maps and voice guidance.

Image: GPS Navigation and WiFi Hotspot Connection.
4.4 Bluetooth 5.2
Pair your mobile phone via Bluetooth for hands-free calling, phonebook access, and wireless audio streaming. Ensure your phone's Bluetooth is enabled and discoverable.
4.5 Split-Screen Mode
Utilize the split-screen function to run two applications simultaneously, such as navigation and music playback, enhancing multitasking capabilities.
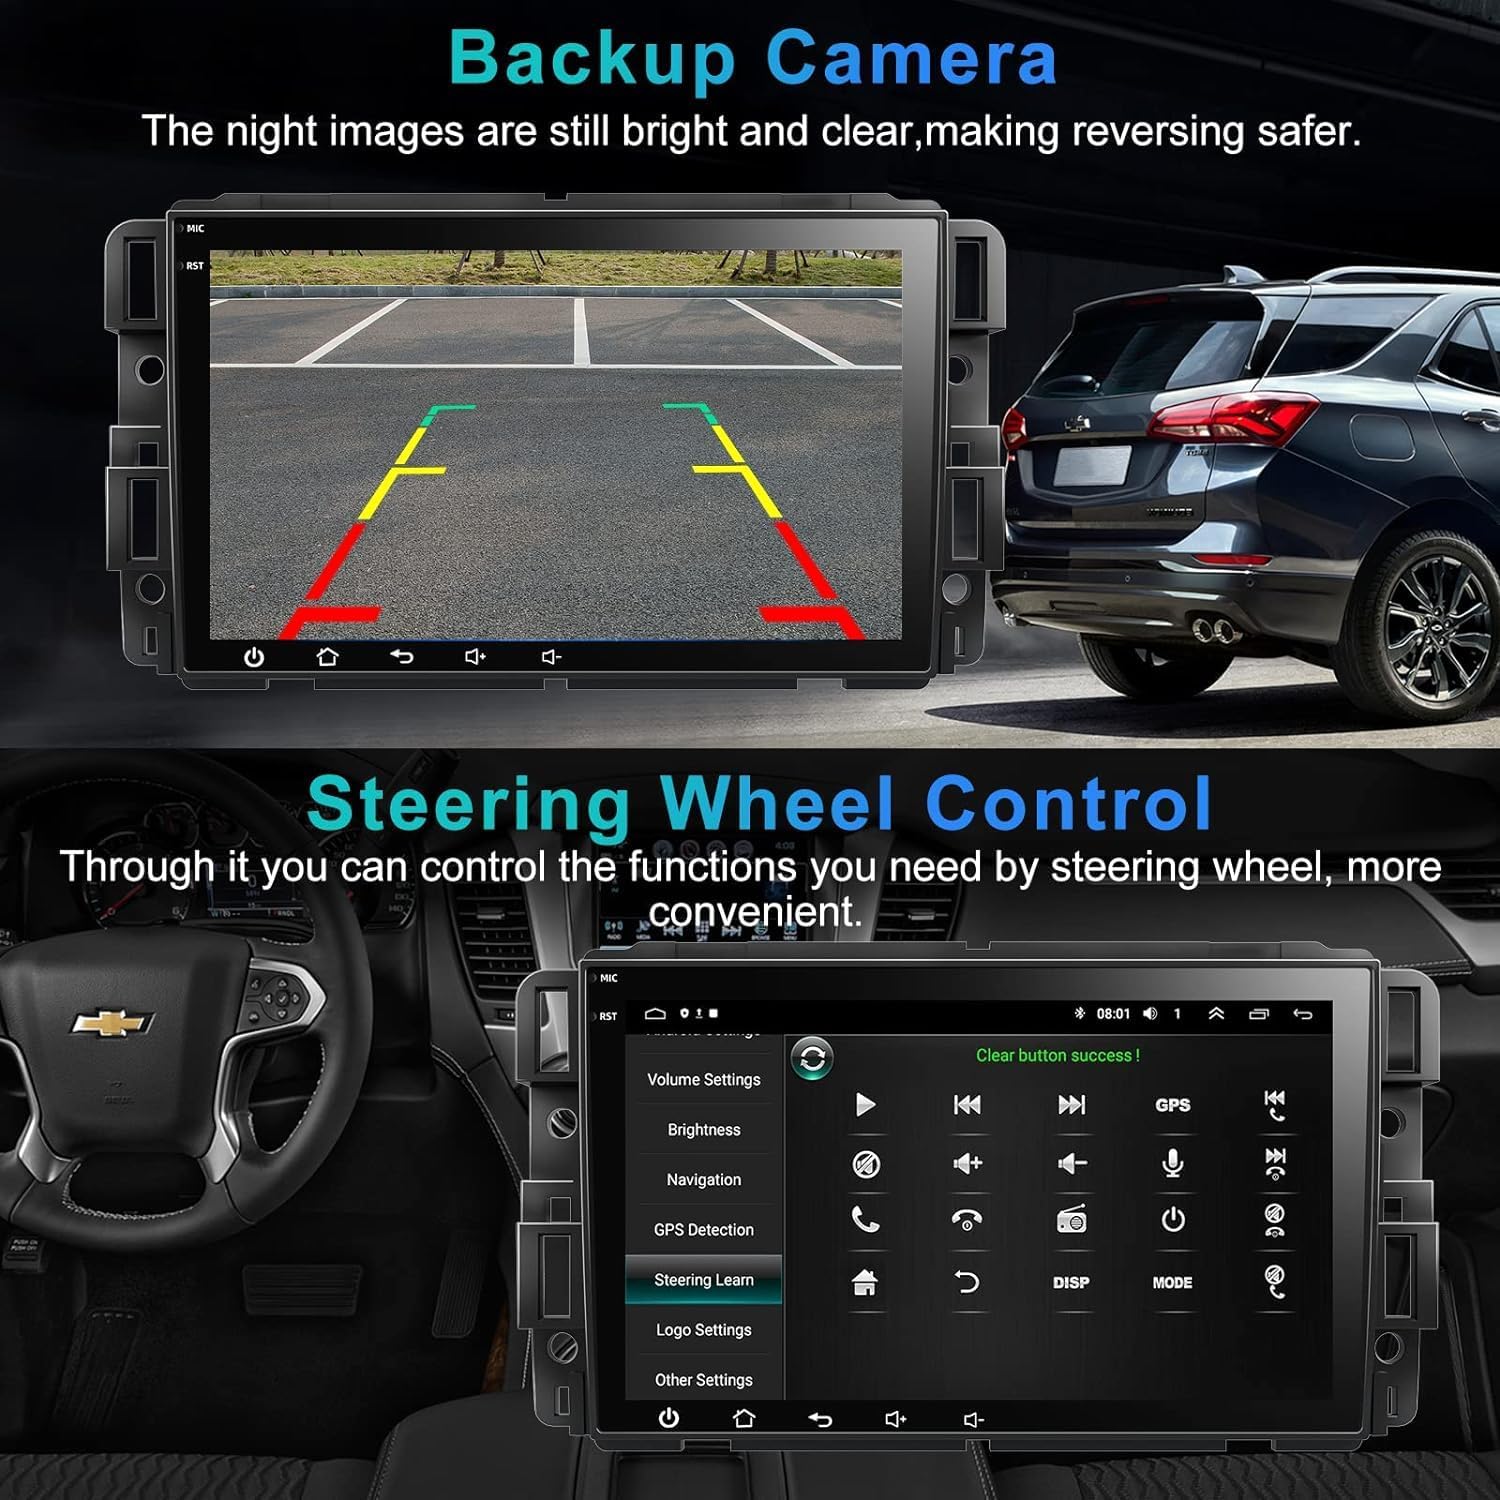
Image: Voice Control, Bluetooth 5.2, and Split-Screen Mode.
4.6 Backup Camera
When the vehicle is shifted into reverse, the stereo automatically displays the rearview camera feed, providing a clear view of the area behind your vehicle for safer parking and maneuvering.

Image: Backup Camera display and Steering Wheel Control interface.
4.7 Steering Wheel Control (SWC)
The unit supports existing steering wheel controls, allowing you to manage audio, calls, and other functions without taking your hands off the wheel. Configuration may be required in the system settings.
4.8 Full RCA Output
The stereo provides full RCA output, enabling connection to external monitors (e.g., headrest screens) for passengers to enjoy video content.

Image: Full RCA Output functionality for external displays.
5. Troubleshooting
This section addresses common issues and their potential solutions.
5.1 Weak WiFi or Bluetooth Signal
If you experience weak WiFi or Bluetooth signals, ensure the antenna is properly connected. For some models, inserting the Camera Input wire or shortening the two blue wires of the CAM-IN wire may improve signal strength.
5.2 Backup Camera Not Working
Verify all camera connections are secure. If the included HD rearview camera is not compatible with your specific vehicle model, please contact customer support for a replacement.
5.3 Bluetooth Connection Issues
Ensure your mobile phone's Bluetooth is turned on before the car radio. If issues persist, delete any existing Bluetooth records on your mobile phone and re-pair the connection.
5.4 No Sound or Low Volume
Check all speaker wiring connections. If an external amplifier is used, ensure the 'AMP CTRL' wire is correctly connected to the ACC power source.
5.5 Screen Delay or Unresponsiveness
In cold weather, the LED screen may exhibit a slight delay or partial darkness for a short period upon startup. This is normal for LED-based units. If the delay is prolonged or the screen becomes completely unresponsive, contact support.
6. Specifications
| Feature | Specification |
|---|---|
| Operating System | Android 13 |
| CPU | Quad Core |
| RAM | 4GB |
| ROM | 64GB |
| Screen Size | 8 Inches (21 cm visible diagonal) |
| Screen Resolution | 1280*720 HD IPS Touch Screen |
| Bluetooth Version | 5.2 |
| Connectivity | Bluetooth, USB, Wi-Fi |
| Audio Output Mode | Stereo |
| Out Power | 50W * 4 |
| Voltage | DC 12V |
| Item Weight | 3.21 pounds |
| Package Dimensions | 11.5 x 7.4 x 4.06 inches |
7. Warranty and Support
Inexaccessories provides the following support for your product:
- 30-Day Money-Back Guarantee: For any reason, you may return the product within 30 days for a full refund.
- 18-Month Warranty: An 18-month warranty covers any quality-related issues.
- Technical Support: For any questions regarding installation or use, professional technical support is available. Please refer to the contact information provided with your purchase or on the Inexaccessories official website.


